EasyManua.ls Logo

Silva Map Measurer Plus - User Manual

Silva Map Measurer Plus
1 page
Print Icon
Loading...
)NSTRUCTION MANUAL -AP -EASURER 0LUS !RTNO 
).42/$5#4)/. 4HANK YOU FOR CHOOSING 3),6! -AP -EASURER 0LUS A PRECISE DEVICE DESIGNED FOR MAP MEASURING AND TRIP PLANNING
4HE 3),6! -AP -EASURER 0LUS IS THE DESIGNED FOR USE WITH VIRTUALLY ANY MAP ON BOTH LAND AND SEA 4HE MAP MEASURER WILL MEASURE TRAVEL DISTANCE
IN KM MILES AND NAUTICAL MILES CALCULATE ESTIMATED TRAVEL TIME AND HAS A COUNTDOWN TIMER THAT SHOWS REMAINING TIME TO YOUR DESTINATION
4O GET
THE MOST OUT OF YOUR PURCHASE BE SURE TO CAREFULLY READ THIS MANUAL AND KEEP IT ON HAND FOR LATER REFERENCE
!N ,#$ STICKER IS PLACED ON THE ,#$ GLASS OF THIS UNIT WHEN PURCHASED 0LEASE MAKE SURE TO REMOVE THE STICKER BEFORE USE
02/$5#4 /6%26)%7
 ,#$
 -EASURING WHEEL
 -EASURE BUTTON
 ,#$ BACKLIGHT BUTTON
 !$*534 BUTTON
 -/$% BUTTON
 "ATTERY COMPARTMENT
 !TTACHMENT CLIP
 2EFERENCE ARROW
3%4 50 9/52 5.)4 0LEASE SET UP THE UNIT ACCORDING TO YOUR NEEDS BEFORE USING IT
"ATTERY INSTALLATION REPLACEMENT 5NSCREW THE CLIP FROM THE BODY WITH A SCREWDRIVER /PEN THE BATTERY COMPARTMENT
COVER BY USING A COIN TURN COUNTERCLOCKWISE
0LACE THE NEW BATTERY #2 INTO THE BATTERY COMPARTMENT WITH THE POSITIVE  SIDE FACING UP 7ITH THE / RING IN THE CORRECT POSITION CLOSE THE BATTERY COMPARTMENTS COVER TURN CLOCKWISE
4IME SETTING
0RESS AND HOLD !$*534 FOR SECONDS 4HE (OUR DIGIT WILL START mASHING 4URN THE MEASURING WHEEL TO INCREASE DECREASE THE VALUE CLOCKWISE TO INCREASE OR ANTI CLOCKWISE TO DECREASE
0RESS !$*534 TO CONlRM AND SWITCH TO MINUTE SETTING 4URN THE MEASURING WHEEL TO SET MINUTES 0RESS !$*534 TO CONlRM AND SWITCH TO SECONDS SETTING 4URN THE MEASURING
WHEEL TO RESET SECONDS TO ZERO
0RESS THE !$*534 KEY TO CONlRM #ONTINUE THE SETTING OF  HOUR -ONTH $ATE AND 9EAR
-AP SCALE SETTING
)T IS IMPORTANT TO SET THE CORRECT MAP SCALE BEFORE MEASURING DISTANCE ON THE MAP
0RESS -/$% REPEATEDLY UNTIL 3#!,% IS DISPLAYED 0RESS AND HOLD !$*534 FOR SECONDS 4HE DISPLAY WILL SHOW     IS THE DEFAULT SCALE 4HE lRST ZERO WILL START mASHING
4URN THE MEASURING WHEEL TO INCREASE DECREASE THE VALUE CLOCKWISE TO INCREASE OR ANTI CLOCKWISE TO DECREASE 0RESS !$*534 TO CONlRM AND SWITCH TO NEXT DIGIT
!DJUST DIGIT BY DIGIT THE SAME WAY OR EXIT SETTING BY PRESSING AND HOLDING !$*534 FOR SECONDS
3PEED SETTING
"Y SETTING THE SPEED THE TIME TO GO FUNCTION WILL CALCULATE THE ESTIMATED TRAVEL TIME FOR THE DISTANCE MEASURED n A USEFUL FUNCTION WHEN PLANNING YOUR DAYTRIP
0RESS -/$% REPEATEDLY UNTIL 30%%$ IS DISPLAYED 0RESS !$*534 REPEATEDLY TO SET SPEED UNIT KMH MPH KNOTS 0RESS AND HOLD !$*534 FOR SECONDS
4HE DISPLAY WILL SHOW  KMH  KMH  MPH OR  KNOTS IS THE DEFAULT SPEED DEPENDING ON THE SELECTED UNIT 4HE lRST ZERO WILL START mASHING
4URN THE MEASURING WHEEL TO INCREASE DECREASE THE VALUE CLOCKWISE TO INCREASE OR ANTI CLOCKWISE TO DECREASE 0RESS !$*534 TO CONlRM AND SWITCH TO NEXT DIGIT
!DJUST DIGIT BY DIGIT THE SAME WAY OR EXIT SETTING BY PRESSING AND HOLDING !$*534 FOR SECONDS
53).' -!0 -%!352%2 0,53 /NCE THE UNIT HAS BEEN SETUP CORRECTLY IT IS READY TO USE 4HE -/$% BUTTON WILL TAKE YOU THROUGH THE FOLLOWING SEQUENCE
4IME !LARM $ISTANCE 4IME TO GO 3CALE 3PEED
-EASURING DISTANCE ON A MAP
0RESS -/$% REPEATEDLY UNTIL $)34!.#% IS DISPLAYED 0RESS !$*534 REPEATEDLY TO SET MEASURING UNIT KM MILE NAUTICAL MILE 4HIS CAN BE DONE ANYTIME DURING MEASURING
0RESS -%!352% TO ACTIVATE THE MEASURING FUNCTION 4HE $)34 ICON WILL START mASHING
0LACE THE MEASURING WHEEL AT THE DESIRED LOCATION ON THE MAP AND START MEASURING BY ROLLING THE MEASURING WHEEL ALONG THE DESIRED ROUTE 7HEN
STARTING AND ENDING THE MEASUREMENT MAKE SURE THE 2EFERENCE ARROW POINTS AT THE START AND STOP OF THE ROUTE
4O GET THE BEST ACCURACY DRAG THE MAP MEASURER IN A SLOW AND STEADY PACE NOT FASTER THAN CMSEC INCHSEC HOLD THE MAP MEASURER AS A PEN AND
USE THE PALM OF YOUR HAND AS A SUPPORT TO THE SURFACE )T DOESNT MATTER IN WHICH DIRECTION THE DISTANCE IS MEASURED "Y CHANGING
DIRECTION YOU CAN DEDUCT DISTANCE 4HIS IS USEFUL IF YOU NEED TO CORRECT THE MEASURED ROUTE n SIMPLY ROLL BACK ALONG THE INCORRECT PART OF THE ROUTE AND CONTINUE MEASURING
0RESS -%!352% AGAIN TO DEACTIVATE THE MEASURING FUNCTION 4HIS WILL LOCK THE VALUE AND PREVENT IT FROM BEING ACCIDENTALLY ADJUSTED 0RESS -%!352% AGAIN TO RESUME THE MEASUREMENT
2ESET MEASUREMENT BY PRESSING AND HOLDING !$*534 FOR SECONDS ./4% 4O REACH ANY OTHER MODE THE -AP MEASURING FUNCTION NEEDS TO BE DEACTIVATED
4IMETOGO /NCE YOU GOT THE DISTANCE MEASURED THE TIME TO GO FUNCTION WILL SHOW YOU THE REQUIRED TRAVEL TIME TO DESTINATION
0RESS -/$% REPEATEDLY UNTIL 4)-% n 4/ '/ IS DISPLAYED 4HE CALCULATED TIME REQUIRED BASED ON THE SET SPEED WILL BE DISPLAYED
0RESS !$*534 TO START THE TIMER AND START TRAVEL TOWARDS YOUR DESTINATION 0RESS !$*534 TO PAUSE THE TIMER AND PRESS !$*534 AGAIN TO RESUME
2ESET THE COUNT DOWN TIMER TO INITIAL TIME BY PRESSING AND HOLDING !$*534 FOR SECONDS $ELETE TIME BY PRESSING AND HOLDING !$*534 FOR MORE SECONDS ./4%
4HIS WILL ALSO DELETE THE MEASURED DISTANCE
4IME
4HE TIME FUNCTION WORKS AS A NORMAL CLOCK
0RESS !$*534 TO DISPLAY DATE
!LARM
0RESS -/$% REPEATEDLY UNTIL !,!2- IS DISPLAYED 0RESS AND HOLD !$*534 FOR SECONDS TO SET THE ALARM 4HE (OUR DIGIT WILL START mASHING
4URN THE MEASURING WHEEL TO INCREASE DECREASE THE VALUE CLOCKWISE TO INCREASE OR ANTI CLOCKWISE TO DECREASE 0RESS !$*534 TO CONlRM AND SWITCH TO MINUTE SETTING
4URN THE MEASURING WHEEL TO SET MINUTES
0RESS THE !$*534 TO CONlRM
!N ALARM ICON WILL INDICATE THE ALARM IS ACTIVATED 0RESS !$*534 IN ALARM MODE TO TURN /./&& THE ALARM
#!2% !.$ -!).4%.!.#% .EVER ATTEMPT TO DISASSEMBLE OR SERVICE YOUR UNIT
0ROTECT THE ELECTRONIC MODULE FROM EXTREME HEAT SHOCKS AND LONG TIME EXPOSURE TO DIRECT SUNLIGHT
5NIT CAN BE WIPED CLEAN WITH A LIGHTLY MOISTENED CLOTH AND MILD SOAP $O NOT EXPOSE THE UNIT TO STRONG CHEMICALS SUCH AS GASOLINE CLEAN SOLVENTS
ACETONE ALCOHOL INSECT REPELLENTS AS THEY MAY DAMAGE THE UNITS SEAL CASE AND lNISH
3TORE THE UNIT IN A DRY PLACE WHEN YOU ARE NOT USING IT
!VOID ALLOWING THE UNIT TO COME INTO DIRECT CONTACT WITH HAIR LIQUIDS COLOGNES SUN BLOCK CREAMS AND OTHER TOILETRIES WHICH CAN CAUSE
DETERIORATION OF THE PLASTIC PARTS 7HENEVER THE UNIT COMES INTO CONTACT WITH THESE OR OTHER TOILETRIES WIPE IT OFF IMMEDIATELY WITH A DRY SOFT CLOTH
7!22!.49
3ILVA WARRANTS THAT FOR A PERIOD OF TWO  YEARS YOUR 3ILVA 0RODUCT WILL BE SUBSTANTIALLY FREE OF DEFECTS IN MATERIALS AND WORKMANSHIP UNDER NORMAL
USE 3ILVAS LIABILITY UNDER THIS WARRANTY IS LIMITED TO REPAIRING OR REPLACING THE PRODUCT 4HIS LIMITED WARRANTY EXTENDS ONLY TO THE ORIGINAL PURCHASER
)F THE 0RODUCT PROVES DEFECTIVE DURING THE 7ARRANTY 0ERIOD PLEASE CONTACT THE ORIGINAL PLACE OF PURCHASE -AKE SURE TO HAVE YOUR PROOF OF PURCHASE
ON HAND WHEN RETURNING THE PRODUCT 2ETURNS CANNOT BE PROCESSED WITHOUT THE ORIGINAL PROOF OF PURCHASE 4HIS WARRANTY DOES NOT APPLY IF THE 0RODUCT
HAS BEEN ALTERED NOT BEEN INSTALLED OPERATED REPAIRED OR MAINTAINED IN ACCORDANCE WITH INSTRUCTIONS SUPPLIED BY 3ILVA OR HAS BEEN SUBJECTED
TO ABNORMAL PHYSICAL OR ELECTRICAL STRESS MISUSE NEGLIGENCE OR ACCIDENT .EITHER DOES THE WARRANTY COVER NORMAL WEAR AND TEAR 3ILVA IS NOT
RESPONSIBLE FOR ANY CONSEQUENCES DIRECT OR INDIRECT OR DAMAGE RESULTANT FROM USE OF THIS PRODUCT )N NO EVENT WILL 3ILVAS LIABILITY EXCEED THE AMOUNT
PAID BY YOU FOR THE PRODUCT 3OME JURISDICTIONS DO NOT ALLOW THE EXCLUSION OR LIMITATION OF INCIDENTAL OR CONSEQUENTIAL DAMAGES SO THE ABOVE LIMITATION OR
EXCLUSION MAY NOT APPLY TO YOU 4HIS 7ARRANTY IS VALID AND MAY BE PROCESSED ONLY IN THE COUNTRY OF PURCHASE
-AP-EASURER0LUS
)NSTRUCTION-ANUAL

Discover other emergency & survival on our website.
Silva puts everything within reach.
All manuals and user guides at all-guides.com
all-guides.com

Other manuals for Silva Map Measurer Plus

Question and Answer IconNeed help?

Do you have a question about the Silva Map Measurer Plus and is the answer not in the manual?

Overview

The SILVA Map Measurer Plus (Art.no. 55068) is a precise device designed for map measuring and trip planning, suitable for use with virtually any map on both land and sea. It measures travel distance in kilometers, miles, and nautical miles, calculates estimated travel time, and features a countdown timer that displays the remaining time to your destination.

Product Overview:

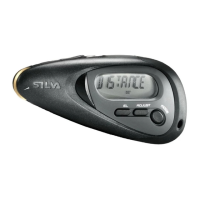
The device features an LCD display, a measuring wheel, a Measure button, an LCD backlight button, an ADJUST button, a MODE button, a battery compartment, an attachment clip, and a reference arrow. An LCD sticker is placed on the LCD glass when purchased and should be removed before use.

Setup and Configuration:

Battery Installation/Replacement:

To install or replace the battery, unscrew the attachment clip from the body using a screwdriver. Open the battery compartment cover by turning it counterclockwise with a coin. Insert a new CR2032 battery with the positive (+) side facing up. Ensure the O-ring is correctly positioned, then close the battery compartment cover by turning it clockwise.

Time Setting:

To set the time, press and hold the ADJUST button for 2 seconds. The hour digit will start flashing. Turn the measuring wheel clockwise to increase the value or counterclockwise to decrease it. Press ADJUST to confirm and switch to minute setting. Turn the measuring wheel to set the minutes. Press ADJUST to confirm and switch to seconds setting. Turn the measuring wheel to reset seconds to zero. Press the ADJUST key to confirm the setting. Continue the process to set the 12/24-hour format, month, date, and year.

Map Scale Setting:

Setting the correct map scale is crucial for accurate distance measurement. Press the MODE button repeatedly until "SCALE" is displayed. Press and hold ADJUST for 2 seconds. The display will show "1: 00050000" (1:50 000 is the default scale). The first zero will start flashing. Turn the measuring wheel clockwise to increase the value or counterclockwise to decrease it. Press ADJUST to confirm and switch to the next digit. Adjust each digit similarly or exit the setting by pressing and holding ADJUST for 2 seconds.

Speed Setting:

The speed setting enables the "time to go" function to calculate the estimated travel time, which is useful for trip planning. Press the MODE button repeatedly until "SPEED" is displayed. Press ADJUST repeatedly to set the speed unit (km/h, mph, knots). Press and hold ADJUST for 2 seconds. The display will show "005.0 km/h" (5.0 km/h, 3.1 mph, or 2.7 knots, depending on the selected unit, is the default speed). The first zero will start flashing. Turn the measuring wheel clockwise to increase the value or counterclockwise to decrease it. Press ADJUST to confirm and switch to the next digit. Adjust each digit similarly or exit the setting by pressing and holding ADJUST for 2 seconds.

Using the Map Measurer Plus:

Once the unit is set up, it is ready for use. The MODE button cycles through the following sequence: Time > Alarm > Distance > Time to go > Scale > Speed.

Measuring Distance on a Map:

Press the MODE button repeatedly until "DISTANCE" is displayed. Press ADJUST repeatedly to set the measuring unit (km, mile, nautical mile). This can be done at any time during measurement. Press the MEASURE button to activate the measuring function; the "DIST" icon will start flashing. Place the measuring wheel at the desired location on the map and begin measuring by rolling the wheel along the desired route. Ensure the reference arrow points to the start and stop of the route for accurate measurement.

For best accuracy, drag the map measurer at a slow and steady pace (not faster than 5 cm/sec or 2 inch/sec), holding it like a pen with the palm of your hand supporting the surface. The direction of measurement does not affect the distance. You can deduct distance by rolling back along an incorrect part of the route and then continuing measurement, which is useful for correcting a measured route. Press the MEASURE button again to deactivate the measuring function, which locks the value and prevents accidental adjustments. Press MEASURE again to resume measurement. To reset the measurement, press and hold ADJUST for 2 seconds. Note: To access any other mode, the map measuring function must be deactivated.

Time-to-Go:

After measuring the distance, the "time to go" function will display the required travel time to your destination. Press the MODE button repeatedly until "TIME - TO - GO" is displayed. The calculated time (based on the set speed) will be shown. Press ADJUST to start the timer and begin travel. Press ADJUST to pause the timer and press ADJUST again to resume. To reset the countdown timer to the initial time, press and hold ADJUST for 2 seconds. To delete the time, press and hold ADJUST for 2 more seconds. This action will also delete the measured distance.

Time Function:

The time function operates as a normal clock. Press ADJUST to display the date.

Alarm Function:

Press the MODE button repeatedly until "ALARM" is displayed. Press and hold ADJUST for 2 seconds to set the alarm. The hour digit will start flashing. Turn the measuring wheel clockwise to increase the value or counterclockwise to decrease it. Press ADJUST to confirm and switch to minute setting. Turn the measuring wheel to set the minutes. Press ADJUST to confirm. An alarm icon will indicate when the alarm is activated. Press ADJUST in alarm mode to turn the alarm ON/OFF.

Care and Maintenance:

Never attempt to disassemble or service the unit. Protect the electronic module from extreme heat, shocks, and prolonged exposure to direct sunlight. The unit can be wiped clean with a lightly moistened cloth and mild soap. Do not expose the unit to strong chemicals such as gasoline, clean solvents, acetone, alcohol, or insect repellents, as these may damage the unit's seal, case, and finish. Store the unit in a dry place when not in use. Avoid direct contact with hair liquids, colognes, sunblock creams, and other toiletries, which can cause deterioration of the plastic parts. If the unit comes into contact with these substances, wipe it off immediately with a dry, soft cloth.

Warranty:

Silva warrants that, for a period of two (2) years, your Silva Product will be substantially free of defects in materials and workmanship under normal use. Silva's liability under this warranty is limited to repairing or replacing the product. This limited warranty extends only to the original purchaser. If the product proves defective during the warranty period, contact the original place of purchase. Ensure you have proof of purchase when returning the product, as returns cannot be processed without it. This warranty does not apply if the product has been altered, improperly installed, operated, repaired, or maintained, or has been subjected to abnormal physical or electrical stress, misuse, negligence, or accident. The warranty does not cover normal wear and tear. Silva is not responsible for any direct or indirect consequences or damages resulting from the use of this product. In no event will Silva's liability exceed the amount paid for the product. Some jurisdictions do not allow the exclusion or limitation of incidental or consequential damages, so these limitations may not apply to you. This warranty is valid and can only be processed in the country of purchase.

Silva Map Measurer Plus Specifications

General IconGeneral
BrandSilva
ModelMap Measurer Plus
CategoryMeasuring Instruments
LanguageEnglish

Related product manuals