This document describes the SilverCrest PORE CLEANSER / PORENREINIGER / NETTOYEUR DE PORES SPR 600 A1, a vacuum technology device designed for deep cleaning facial pores and treating blackheads. It also removes dead skin cells and stimulates circulation. The appliance is intended solely for personal, private use and is not suitable for treating sensitive areas around the eyes or lips, nor for use on animals or in medical/therapeutic or commercial fields.
Technical Specifications:
- Input voltage: 5.0 V
- Input current: max. 500 mA
- Integrated battery: Lithium-ion, 600 mAh / 3.7 V / 2.22 Wh
- Protection class: III / (protection through low voltage)
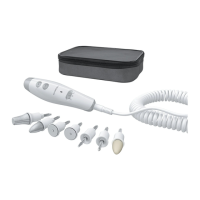
Package Contents:
The appliance is supplied with:
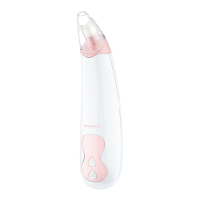
- Pore cleanser (main unit)
- USB charging cable (USB-A to USB-C)
- 3x Attachments (oval, small, large)
- 12x Filters
- 6x Locking rings
- Operating instructions
- 2x Locking rings (on the appliance)
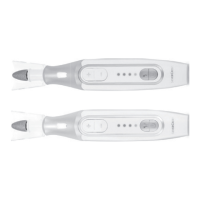
- Suction head
- USB-C port
- Intensity button (M)
- On/Off button (power symbol)
- LED display
- 4x Spare locking rings
- 12x Filters
- Oval attachment
- Small attachment
- Large attachment
- USB charging cable (USB-A to USB-C)
Charging the Integrated Battery:
Before first use, the integrated battery must be fully charged. The USB charging cable (12) and the USB-C port (3) are used only for charging the internal battery and are not suitable for data transmission. Charging takes approximately 120 minutes at a maximum input current of 500 mA. A fully charged battery provides an operating time of approximately 90 minutes. Only use a USB power adapter with protection class II (approved for household appliances, output voltage 5 V, output current max. 2 A) and the supplied USB charging cable (12).
To charge:
- Ensure the appliance is switched off by holding the On/Off button (5) for about 2 seconds.
- Connect the USB-A plug of the charging cable (12) to a suitable mains adapter.
- Connect the USB-C plug of the charging cable (12) to the USB-C port (3) on the appliance.
- Plug the mains adapter into a power outlet. The battery symbol on the LED display (6) will light up to show the charge status.
The appliance will automatically switch off 10 minutes after charging is complete. Disconnect the mains adapter and USB charging cable (12) from the appliance after charging.
Before First Use:
- Charge the battery as described above.
- Clean the appliance and attachments (9-11) as described in the "Cleaning and Care" section to remove any production residues.
The appliance is now ready for use.
Checking Compatibility:
It is recommended to test the appliance on a less sensitive area first (e.g., inner forearm) to check skin reaction. Ensure the skin is clean and free of creams or moisturizers. Proceed with facial application only if no skin reactions appear after about 30 minutes. Consult a physician if unsure about suitability.
Handling and Operation:
Selecting an Attachment:
The appliance comes with three attachments (9-11) for skin treatment:
- Small attachment (10): Treats small, hard-to-reach areas like the nose. Suitable for initial applications or sensitive skin.
- Large attachment (11): Treats large areas and can be used on all facial areas. Pay attention to the eye and mouth areas. Also suitable for blackheads.
- Oval attachment (9): Treats a somewhat larger area, particularly suitable for the sides of the nose and around the mouth. "Soft" intensity is recommended.
Fitting an Attachment with Filter:
- If an attachment (9-11) is already fitted, remove it from the suction head (2).
- To change the filter (8), pull the current filter (8) out of the suction channel of the attachment (9-11). Use tweezers if necessary.
- Insert a new filter (8) into the suction channel of the desired attachment (9-11).
- Fit the attachment (9-11) onto the suction head (2) so that the small rectangular tab on the lower part of the suction head (2) engages precisely into the matching recess in the suction channel of the attachment (9-11).
- If the filter (8) slips into the suction channel, shake the appliance lightly. For optimal function, the filter (8) must rest directly on the suction head (2).
Intensity Levels:
There are 3 intensity levels, indicated by symbols on the LED display (6) lighting up at different speeds:
- "Soft": Light suction (slow speed of symbols)
- "Normal": Moderate suction (medium speed of symbols)
- "Strong": Strong suction (fast speed of symbols)
Press the Intensity button (4) briefly to adjust the suction force.
Treatment of the Face:
Always start at the lowest intensity level and gradually increase if needed. Be cautious with sensitive areas or skin. Do not use directly around the eyes or on the lips. If uncomfortable or painful, reduce intensity, change location, reduce pressure, or stop treatment.
Before treatment, clean and dry your skin, removing any makeup or creams. Avoid saunas or tanning beds the day before and after treatment, and protect your skin from the sun.
- Fit the desired attachment (9-11) with a filter (8).
- Start the appliance by pressing the On/Off button (5) for about 2 seconds. The LED display (6) will show "Normal" intensity, and the symbols will light up.
- Press the Intensity button (4) briefly to set the desired intensity level.
- Place the attachment (9-11) opening against your facial skin. Apply just enough pressure for the attachment to make full contact without drawing in outside air. You will feel a light suction force. Keep the appliance moving; do not stay in one spot. Pass over each skin area only once.
- Treat facial areas as described in "Areas of Application."
- Press the On/Off button (5) for about 2 seconds to switch off the appliance.
Do not use the appliance more than twice per week. Uninterrupted application should not exceed 5 minutes; first treatments should not exceed 3 minutes.
Areas of Application:
Ensure skin is taut for proper suction. If necessary, use one hand to pull the treated skin area taut while moving the appliance with the other hand.
- Forehead: Place in the middle of the forehead and pull outwards towards the hairline.
- Nose: Place slightly below the upper part of the nose and pull down the sides and middle of the nose to the nostrils.
- Cheeks: Place next to the nose and pull over the cheeks.
- Temples: Place next to the eye, maintaining a distance of approx. 1-2 cm from the eye. Then pull towards the hairline.
- Mouth and chin: Place above the mouth and pull sideways towards the cheeks. Do not touch the lips directly. Place on the chin and pull upwards towards the cheeks, stopping before reaching the cheeks.
Cleaning and Care:
After use, clean your face with water and apply a soothing or moisturizing cream. Slight redness may occur but should disappear within 1-2 days. Consult a physician if issues persist. Avoid saunas/tanning beds the day before and after treatment.
Before cleaning, disconnect the USB charging cable (12) and mains adapter from the power outlet. Never immerse the appliance, cable, or adapter in water or other liquids. Do not use abrasive or corrosive cleaning agents.
- Ensure the appliance is switched off and the USB charging cable (12) is disconnected.
- Remove the used attachment (9-11) and filter (8). Filters (8) can be reused multiple times. Wash the filter in lukewarm water and let it dry before next use. Replace if still dirty or defective.
- Clean the attachment (9-11) with water and dish soap. Use a moistened cotton swab for internal cleaning if needed. Disinfect if desired. Let attachments dry completely.
- If locking rings (1) break, replace them with the spare rings (7). Additional filters (8), locking rings (1), and attachments (9-11) can be ordered.
- If dirty, pull the locking rings (1) off the suction head (2) (use tweezers if needed). Clean rings (1) in lukewarm water with dish soap.
- Wipe the area around the suction head (2) with a slightly damp cloth, then dry with a dry cloth. Clean other surfaces of the appliance only with a dry cloth.
- Place the locking rings (1) back onto the suction head (2) one by one, sliding them into the grooves.
Storage:
Store the appliance and accessories in a dry, dust-free place. Charge the battery regularly to ensure a long lifespan.