This document is an assembly and care manual for the Andover / Jefferson / Verona 7 PC Dining Set, which includes a rectangular dining table and dining chairs. The set is manufactured by Simpli Home, Wyndenhall, and Brooklyn + Max.
Function Description:
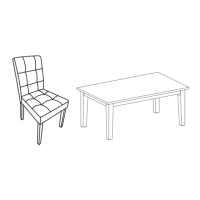
The Andover / Jefferson / Verona 7 PC Dining Set is designed for domestic use, providing a complete dining solution with a rectangular table and six dining chairs. The table, model #3AXCDNT-003, serves as the central piece for dining, while the chairs, model #AXCDCHR-004-SGL, offer seating. The assembly process involves attaching the legs to the table top and assembling the chair components (back, seat, and front legs).
Important Technical Specifications:
Dining Table (Model #3AXCDNT-003):
- Parts:
- Top (A): Quantity 1
- Leg (B): Quantity 4
- Hardware:
- Allen Key Bolt: M8 x 70mm, Quantity 8
- Lock Washer: Ø12 / Ø8 x 1.5mm, Quantity 8
- Washer: Ø19 / Ø8 x 1mm, Quantity 8
- Allen Key: Quantity 1
- Assembly: Requires 8 sets of Allen Key Bolts, Lock Washers, and Washers to secure the legs to the table top. An Allen Key is provided for tightening.
- Levelers: The table legs are equipped with levelers on the bottom, which can be adjusted to ensure stability on uneven floors.
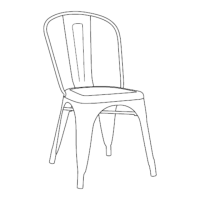
Dining Chair (Model #AXCDCHR-004-SGL):
- Parts:
- Chair Back (A): Quantity 1
- Seat (B): Quantity 1
- Front Leg (C): Quantity 2
- Hardware:
- Allen Key Screw: M8 x 50mm, Quantity 1 (for initial seat attachment)
- Allen Key Screw: M8 x 60mm, Quantity 4 (for securing seat to chair back)
- Allen Key Screw: M8 x 90mm, Quantity 4 (for attaching front legs)
- Flat Washer: Ø22mm, Quantity 9
- Allen Key: 5mm, Quantity 1
- Lock Washer: Ø13mm, Quantity 9
- Assembly:
- Step 1: Align and attach the Seat (B) to the Chair Back (A) using one M8 x 50mm Allen Key Screw, one Flat Washer (Ø22mm), and one Lock Washer (Ø13mm).
- Step 2: Secure the Seat (B) to the Chair Back (A) using four M8 x 60mm Allen Key Screws, four Flat Washers (Ø22mm), and four Lock Washers (Ø13mm).
- Step 3: Attach the Front Legs (C) to the Seat (B) using four M8 x 90mm Allen Key Screws, four Flat Washers (Ø22mm), and four Lock Washers (Ø13mm).
- Step 4: Place the chair on a flat surface and adjust the Seat (B) or Front Legs (C) if uneven, then fully tighten all bolts.
- Step 5: Close the fabric on the bottom of the chair using the zipper.
- Tools: A 5mm Allen Key is provided for all chair assembly steps.
Usage Features:
- Assembly: The product requires assembly. It is recommended that 2 people assemble the unit for ease.
- Safety: Contains small parts that can be swallowed; keep children and pets away during assembly. Plastic bags should also be kept away from children and pets to avoid suffocation.
- Assembly Surface: It is recommended to assemble the unit on a carpeted floor to prevent scratches.
- Power Tools: If using power tools, set them to low torque to avoid damaging the product.
- Tightening: Do not over-tighten Allen Key Bolts/Screws during assembly to prevent damage.
- Leveling: The dining table features adjustable levelers on its legs to ensure stability on uneven floors. The chairs also require leveling by adjusting the seat or front legs before final tightening.
Maintenance Features:
- General Cleaning: Wipe regularly with clean water and a damp, clean, soft white cloth. Mild detergent and water solution can be used for general cleaning, followed by rinsing with clean water and drying.
- Heavy Soiling: For heavy soiling, dampen a soft white cloth or soft bristle brush. Use care as scrubbing can damage the surface.
- Difficult Stains: More difficult stains can be treated occasionally, not daily. Any cleaning solution used must be removed with clean water and a clean white cloth to prevent residue from drying out, cracking, or affecting the color.
- Prohibited Cleaners: DO NOT use cleaners with corrosive ingredients such as lye, acids, or ammonia.
- Humidity Control for Wood Furniture:
- Wood furniture is susceptible to damage from swings in relative humidity (RH). Wood absorbs and desorbs water, causing it to swell and shrink, potentially leading to distortion or breakage.
- Maintain the RH in your home as close to the annual average as possible, generally within 10% up or down. De-humidify in summer and humidify in winter.
- Modern heating systems can lower interior RH in winter, causing problems for furniture. Consider keeping furniture-containing spaces cooler or using a good working humidifier with a humidistat to balance humidity.
- Dense, hard woods lose moisture less rapidly than softer woods. Sealed and lacquered furniture, especially with veneer finishes, loses moisture more slowly.
- Protection Tips for Wood Furniture:
- Use a humidifier with an automatic control system to adjust humidity levels. Avoid over-humidifying.
- Keep furniture out of direct sunlight to prevent drying out, cracking, and warping.
- Avoid placing furniture near heating vents. If unavoidable, keep the piece 3 to 4 inches away from the wall for air circulation.
- Dust with a soft dry cloth.
- Do not use liquid or aerosol products.
- To avoid marking, do not place rubber on the surface (e.g., foot pads).
- For soil build-up, wipe with a damp cloth and dry.
- Do not use abrasive cleaners.
Warranty and Support:
- Warranty: The product is guaranteed for 12 months from the date of purchase against manufacturing faults for domestic use. The warranty is invalid if the product is overloaded, neglected, improperly used, or repaired by an unauthorized agent. Heavy-duty or daily professional/commercial usage is not guaranteed.
- Customer Service: For questions, problems, assembly help, or missing parts, contact Customer Service at 1-866-518-0120 ext. 262 (Monday to Friday, 9 am - 4 pm EST) or visit www.simpli-home.com/partsrequest.
- Returns: If returning the product, contact the retailer where it was purchased.
- Information Needed for Support: Model #, Part Number or Letter, Purchased at, Date of Purchase.