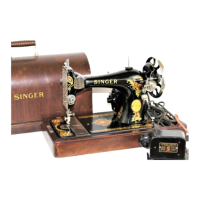
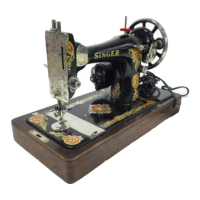
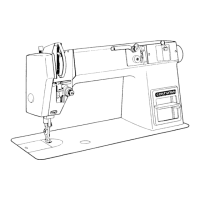
This document is an instruction manual for the Singer Sewing Machine Model 1280, covering its operation, maintenance, and various stitching capabilities.
Function Description:
The Singer Sewing Machine Model 1280 is a versatile sewing machine designed for a wide range of sewing tasks, from basic straight stitching to decorative patterns, buttonholes, and twin-needle stitching. It can be operated as a treadle machine or with an electrical speed controller.
Important Technical Specifications:
- Model: Singer 1280
- Needle Type: The manual provides a detailed "Fabric and Needle Table" (pages 17-18) to guide users in selecting the appropriate needle style (e.g., 2020, 2026, 2045, 2032) and size (e.g., 9, 11, 14, 16, 18) based on fabric type and thread. The eye of the needle must be large enough for the thread to pass freely to prevent fraying.
- Thread: The manual emphasizes using the same size and type of thread in both the needle and bobbin.
- Electrical Requirements (for electric models): The voltage and number of cycles indicated on the electrical nameplate (A) must conform to the electrical power supply. The machine is designed to use a 15-watt maximum bayonet base bulb for the sewing light.
- Stitch Length: Adjustable from 0 to 4 mm, with lower numbers for shorter stitches (best for lightweight fabrics) and 0-1 for zig-zag satin stitching.
- Stitch Width: Adjustable, with the selector moving from a straight stitch position to four wider positions for zig-zag and decorative stitches.
- Needle Positions: Center, left, and right settings are available for special stitch placement.
- Speed Control: Operated by a foot pedal (speed controller D). The harder the pedal is pressed, the faster the machine sews.
- Three-Position Switch (if applicable):
- OFF (O symbol): Machine is off.
- MIN (I symbol): Allows maximum control for special jobs.
- MAX (II symbol): Allows full speed capacity.
Usage Features:
- Treadle Machine Operation: For treadle sewing, the hand wheel knob A is loosened by turning it toward the user with the right hand while holding the hand wheel with the left. Feet are placed on the treadle, and the hand wheel is turned toward the user to initiate motion. Once accustomed, the hand wheel knob is tightened by turning it away from the user.
- Accessories: The machine comes with various accessories to aid in different sewing tasks, including:
- Transparent Bobbins (No. 172336)
- Singer Needles (Style 2020 for general sewing, Style 2045 for stretch fabrics, Style 2025 for twin-needle decorative stitching)
- Button Foot
- Zipper Foot
- Blindstitch Hem Guide
- Straight Stitch Foot and Straight Stitch Needle Plate
- Special Purpose Foot (for decorative stitching)
- Snap-in Feed Cover (for button sewing, free-motion work, darning)
- General Purpose Foot and General Purpose Needle Plate
- Spool Pin and Felt Washer (for twin-needle sewing)
- Small Spool Holder (for small diameter spools of thread)
- Changing Presser Feet: To change a presser foot, the needle is raised to its highest position, the presser foot is raised, and the toe of the foot is pressed upward until it snaps free. The new foot is centered under shank A, the presser foot lifter is lowered, and the foot screw is pressed down until it snaps into place.
- Removing and Replacing Button Foot and Presser Foot Shank: The needle is raised, the presser foot is raised, and presser foot screw A is loosened to remove shank B. To replace, the shank is hooked around the presser bar, and the screw is tightened (a coin can be used for tightening).
- Attaching Blindstitch Hem Guide: The presser foot is raised, the screw is loosened, and the guide is slipped between the screw and shank of the general purpose foot, ensuring it clears the slide plate and front of the foot. The screw is then tightened.
- Changing Needle Plates: The bobbin is removed (if it contains thread), the needle and presser foot are raised, and the slide plate is opened. The needle plate is lifted from the right side and withdrawn. To replace, it is pushed firmly to the left under clamping pin A and pressed down until it snaps into place.
- Attaching Snap-in Feed Cover: The needle and presser foot are raised, the slide plate is opened, and the general purpose needle plate is inserted. The feed cover is slid over the needle plate until points B and C align with holes, then snapped into place.
- Changing the Needle: The needle is raised to its highest position, needle-clamp screw D is loosened, and the old needle is removed. A new needle is inserted with the flat side to the back, pushed up into clamp E as far as it will go, and the screw is tightened.
- Bobbin Winding: The presser foot is raised, the hand wheel knob A is loosened, and the thread spool is placed on the spool pin with the slit B to the right. The spool holder C is pressed against the spool. Thread is snapped into guide post D, led around tension disc E, and through the bobbin. The bobbin is placed on the spindle, moved to the right, and the machine is started. Winding stops automatically when the bobbin is full.
- Threading the Bobbin Case: The bobbin is held so thread unwinds in the shown direction and inserted into the bobbin case. Thread is pulled into notch A, then into slot B, and approximately 10cm (4 inches) is drawn diagonally across the bobbin. The slide plate is closed, allowing thread to extend through the slot.
- Threading the Machine: The spool of thread is placed on the horizontal spool pin A (with slit B against the cushion). The presser foot is raised, and the take-up lever is raised. Thread is snapped into guide post 1, then into upper thread guide 2. It passes through guide 3, around tension 4 (between discs and under tension wire), through point 5, through take-up lever 6, through points 7 and 8, through guide 9, and finally through needle 10 from front to back.
- Raising the Bobbin Thread: The needle thread is held lightly, and the hand wheel is turned slowly until the needle enters and then rises from the plate, bringing up a loop of bobbin thread. The loop is opened, and both threads are drawn under the presser foot and to the left.
- Straight Stitching: The stitch pattern selector is set to the blue color bar, needle position to center, stitch width to straight, and stitch length from 1.5-4. Reverse stitching is achieved by depressing the push button in the center of the dial.
- Zig-Zag Stitching: The stitch pattern selector is set to the color bar matching the zig-zag stitch. Needle position is typically center, but left and right are available. Stitch width is adjusted from straight to wider positions. Stitch length from 1-4 gives an open zig-zag, while 0-1 is for satin stitching.
- Pattern Stitching: The pattern group selector is rotated to position the orange frame behind the desired stitch group. The stitch pattern selector is then slid to align with the color bar corresponding to the chosen stitch.
- Adjusting Stitches for Stretch Fabrics: For nylon tricot and similar knits, gentle tension is applied to the seam in front and back of the presser foot. For elasticized fabrics, firm tension is applied to stretch the seam as stitches are placed.
- Blindstitch Hems: The blindstitch hem guide is attached. The hem is prepared and folded. The hem is positioned under the foot with the soft fold against the guide's wall. Stitching is done so straight stitches fall on the hem allowance and zig-zag stitches pierce the soft fold.
- Ladder Seam: Used for knit and stretch fabrics, ideal for construction seams, necklines, pockets, and collars. Stitch width and length are adjusted, and needle thread tension should be lighter than normal.
- Multi-Stitch Zig-Zag: A versatile stitch for mending, joining, reinforcing, attaching elastic/stretch lace, and finishing seams. Stitch length is typically 0.5-1.
- Multi-Stitch Zig-Zag Bar Tacks: Used for strong bar tacks, such as for belt loops on heavy fabrics. Stitch length is 0-1.
- Patchwork Quilting: Uses a domino stitch for flexible and durable joinings. Stitch length is 0.5-1.
- Decorative Stitching: Various stitches for border designs, appliqué, twin-needle stitching, finished hems, smocking, embroidering, monograms, and topstitching. A backing fabric is recommended.
- Buttonholes: Four-step buttonholing process. The buttonhole balance knob K is used to adjust stitch density on either side of the buttonhole.
- Sewing on Buttons: Uses a zig-zag stitch. The button is positioned under the foot, and the hand wheel is turned slowly to align the needle with the buttonholes. Stitch width is adjusted for clean entry.
Maintenance Features:
- Cleaning and Oiling: The machine should be cleaned and oiled periodically, depending on use.
- Top and Bottom: Screws A, B, and C are removed from the top cover to access and oil marked areas.
- Face Plate Area: The screw is removed from the face plate to clean and oil the front interior.
- Bobbin and Feed Areas: The needle plate and bobbin case are removed to clean these areas with a soft cloth or brush.
- Removing and Replacing Bobbin Case: The slide plate is opened, and the bobbin case is removed by inserting a finger and thumb, gently lifting and pushing it away. To replace, the bobbin case is inserted, ensuring the flat tab is at the rear and the curved section is under the feed. It is then pushed firmly into place until it snaps.
- Changing the Light Bulb: The power plug must be disconnected. The screw on the face plate is removed to open it. The bulb is pressed up into the socket and turned to unlock it, then a new 15-watt bayonet base bulb is inserted and locked into position.
- Replacing the Slide Plate: The presser foot is raised, and the needle is in its highest position. The slide plate is placed in the slide way, with the front edge close to the retaining spring. A small screwdriver is used to lift each end of the spring into the side grooves on the underside of the plate. The plate is drawn gently forward to engage the spring, then closed.
- Troubleshooting (Home Service Hints): The manual provides a checklist for common issues such as needle breaks, fabric not feeding properly, skipped stitches, fabric puckers, and thread breaks, with page references for solutions.
- Motor Belt: Users are cautioned not to adjust the motor belt and to contact a Service Centre if adjustment is required.