Do you have a question about the Singer 20U33 and is the answer not in the manual?
Procedure to synchronize the rotating hook with the needle's movement for proper stitch formation.
Ensures no sidewise needle movement occurs when the machine is set for straight stitching.
Sets the timing of the feed dog's movement in relation to the needle's stroke.
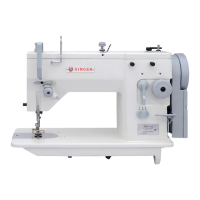
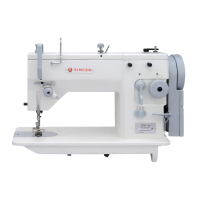
The provided document is a service manual for the SINGER 20u31/33/35 sewing machines, which are artisan models designed for both straight and zigzag stitching. This manual outlines the procedures for checking and adjusting various components to ensure optimal performance and address common sewing defects.
The SINGER 20u31/33/35 machines are versatile sewing devices capable of producing high-quality stitches across a wide range of fabrics, from delicate lingerie to heavy overcoating. Their primary function is to create both straight and zigzag stitches, offering flexibility for various sewing tasks. The machines utilize a rotating hook mechanism for thread looping and a link take-up system for consistent stitch formation. The stitch length is precisely controlled by a feed regulating dial, allowing users to select the desired stitch density. A key feature is the needle position selector, which enables the user to choose left, center, or right needle positions, enhancing the machine's adaptability for different stitching requirements. Additionally, a spring-biased stitch width selector allows for adjustment of zigzag stitch width, which can also be set to a desired fixed width.
The SINGER 20u31/33/35 machines are designed with several features that contribute to their ease of use and versatility. The stitch length is easily adjusted via a feed regulating dial, providing precise control over the appearance of the stitches. The needle position selector allows for quick changes between left, center, and right needle positions, which is crucial for accurate stitching along edges or for specific decorative patterns. The stitch width selector, with its spring-biased mechanism, offers flexibility in creating zigzag stitches of varying widths. This allows users to adapt the machine to different fabric types and design preferences. The machine's ability to handle a broad spectrum of materials, from fine to heavy, makes it suitable for a diverse range of projects, from garment construction to upholstery. The rotating hook and link take-up mechanisms are integral to the smooth operation and consistent stitch quality, ensuring reliable performance during extended use.
The service manual provides comprehensive instructions for maintaining the SINGER 20u31/33/35 machines, focusing on adjustments to correct sewing defects and ensure precise operation.
Sewing Defects and Adjustments: The manual includes a detailed table outlining common sewing defects such as thread breakage, skip stitching, looping, improper feeding, puckering, uneven zigzag stitches, and noise, along with the corresponding areas of adjustment. This helps in diagnosing and resolving issues efficiently.
Needle Bar Height Adjustment: To ensure the needle bar is at the correct height, the user is instructed to remove the face plate, set the needle position selector to "center" for straight stitching, and turn the machine pulley until the needle descends to its lowest position. The upper timing mark on the needle bar should align with the underside of the needle bar timing indicator plate. If adjustment is needed, the needle bar set screw is loosened, and the needle bar is moved up or down to align the timing mark before securely tightening the set screw.
Relation Between Needle and Rotating Hook: This section details how to time the rotating hook. The process involves setting the needle position selector to "center" and the stitch width regulator for straight stitching. The machine pulley is turned until the needle rises 2.54mm from its lowest position, and the lower timing mark aligns with the needle bar timing indicator plate. At this point, the rotating hook's point should be at the center of the needle. Adjustments involve removing the rotating hook shaft bevel gear cover, loosening the two rotating hook set screws, and adjusting the hook as required before retightening. The manual also emphasizes checking the clearance between the needle and hook point (0-0.05 mm) to prevent skip stitching.
Adjusting Sidewise Movement of Needle (Zigzag Stitching): For zigzag stitching, the needle must not move sidewise while its point is in the material or the throat plate's needle hole. The needle should only move upward or downward after completing its swing. If the needle continues to swing while entering or rising from the needle hole, adjustments are necessary. This involves turning the machine pulley to the needle bar's lowest position, removing the arm top cover, and loosening the zigzag triangular cam shaft collar set screw. The two zigzag triangular cam set screws should be parallel to the bearing face of the stitch regulator fork. If not, the arm shaft worm gear set screws are loosened, and the arm shaft worm gear is turned until the triangular cam set screws are in one of the two specified positions, then securely tightened. A dial gauge can be used to verify the absence of sidewise movement.
Adjusting Needle Location in Relation to Needle Hole in Throat Plate: This adjustment ensures the needle is properly centered in the throat plate's needle hole for both straight and zigzag stitching. The process includes fitting a needle, setting the needle position selector to "center" for straight stitching, and slowly turning the machine pulley until the needle descends into the needle hole. The needle's centering is checked, and if necessary, the throat plate is changed to a straight stitching plate for further verification. For zigzag stitching, the stitch width regulator is moved to maximum, and the left and right needle locations are checked relative to the center of the needle hole. If the needle location is offset or continues to swing, adjustments are made by loosening the bight amplitude stop plate (left) set screw and moving the plate until sidewise movement is eliminated, verified with a dial gauge.
Obtaining Maximum Zigzag Stitch Width: To achieve the maximum 9 mm zigzag stitch width, the needle position selector is set to "center," and the stitch width regulator to maximum. A light card is placed under the presser foot to make needle punctures and check the width. If 9 mm is not achieved, the bight amplitude stop plate (right) screw is loosened, and the plate is moved as needed before tightening.
Setting the Center Needle Position: For straight stitching at the center needle position, a light card is used to make a needle puncture. Then, with the stitch width regulator at maximum, punctures are made to check if the left and right needle locations are equidistant from the center. If not, the bight and needle position block set screw is loosened, and the block is moved to correct the position. If further adjustment is needed, the bight and needle position lever and lever arm are adjusted by loosening their respective set screws.
Setting the Left and Right Needle Positions: These sections detail how to ensure the needle's sidewise movement is within specified limits (1-2 mm for left, and less than 0.1 mm for right) when the stitch width regulator is moved to maximum bight. Adjustments involve turning regulating screw nuts and screws to achieve the correct movement.
Final Adjustment of Needle Location: This step involves a final check of the needle location at maximum bight in left, center, and right positions. The general-purpose throat plate is replaced with a straight stitching plate, and the needle's centering is verified. If adjustment is needed, the zigzag stitch regulator fork eccentric connection pin set screw is loosened, and the pin is turned to obtain the correct needle location before tightening.
Setting Feed Dog at Correct Height: The feed dog's teeth should project 1.02-1.09 mm above the throat plate at its highest position. If the height is incorrect, the feed lifting rock shaft crank clamping screw is loosened, and the rock shaft is turned to adjust the height before tightening.
Centralizing Feed Dog in Throat Plate Slots: The feed dog should not contact the edges of the throat plate slots and should be centrally located. For lengthwise setting, the machine is set for maximum stitch length, the feed rock shaft crank clamping screw is loosened, and the feed bar and rock shaft are moved as required before tightening. For sidewise setting, if the feed dog contacts the slot edges, two nuts on two screw centers are loosened, and the feed dog is moved left or right by adjusting the screw centers. If the feed dog contacts the slots at an angle, the bed plate is removed, the two feed dog screws are loosened, and the feed dog is set in the correct position before tightening the screws and replacing the bed plate.
Setting Presser Bar at Correct Height: When the presser bar is raised, there should be a 6.35 mm clearance between the presser foot's underside and the throat plate's top surface. When the presser bar is at its highest and the needle bar at its lowest, the presser foot should clear the needle bar's lower end. Adjustments involve removing the needle, loosening the presser bar pressure regulating thumb screw, lowering the feed dog, raising the presser bar lifter, and loosening the presser bar guide bracket set screw. A 6.35 mm thick block is placed on the throat plate, and the presser foot is brought down to rest on it. The presser bar guide bracket is ensured to be in firm contact with the lifter, then lightly tightened. After removing the block and lowering the lifter, the presser bar is checked for correct positioning, and the guide bracket set screw is securely tightened.
Timing the Feed: The feed dog's motion relative to the needle is crucial. It should rise above the throat plate when the needle rises halfway, start moving forward just before the needle reaches its highest point, and descend below the throat plate as the needle descends to the throat plate's surface. If the feed and feed lifting eccentric are disturbed, the machine pulley is turned until the second screw on the eccentric is visible. The eccentric is adjusted so the second screw's point (position screw) aligns with the V groove on the arm shaft, then securely tightened. The first screw (set screw) is also securely tightened.
Positioning Feed and Feed Lifting Eccentric, Feed Forked Connection, Feed Rock Shaft Crank, Feed Lifting Rock Shaft Crank Connecting Rod, and Feed Lifting Rock Shaft Crank: If sidewise adjustment of these parts is needed, the feed and feed lifting eccentric position and set screws are loosened, and the eccentric is moved left or right as required, ensuring no binding with the forked connection. The feed forked connection should be set squarely to the feed rock shaft by loosening its clamping screw and moving the rock shaft crank. The feed lifting rock shaft crank should be set so its connecting rod is square and functions without binding, adjusted by loosening its clamping screw.
Adjustment of Tension: Proper tension on the needle thread is essential for a balanced stitch. If a balanced stitch cannot be achieved by varying needle thread tension, the thread handling parts (slack thread regulator, take-up lever, tension discs) should be checked for smooth finish.
Thread Take-Up Spring Tension and Height: The take-up spring tension should be sufficient for action at top speed but light enough to allow full downward movement before thread is drawn through the tension discs. Tension is adjusted by inserting a screwdriver into the tension stud and turning it left to decrease or right to increase tension. The take-up spring height is checked by observing its movement as the take-up lever rises and descends. It should make a slight dip (approx. 0.8 mm) and then return to its original position.
Adjustment of Backlash: A slight amount of backlash should exist between the zigzag triangular cam gear and the arm shaft (horizontal) worm gear. To check, hold the arm shaft worm gear immovable and move the zigzag triangular cam sidewise. If backlash is too much or too little, the arm top cover is removed, the zigzag triangular cam shaft set screw is loosened, and the cam shaft is turned left (decrease backlash) or right (increase backlash) until a slight amount of backlash is achieved, then securely tightening the set screw. The machine pulley is then turned to re-check the backlash and torque.
| Type | Industrial Sewing Machine |
|---|---|
| Operation | Manual |
| Built-in Needle Threader | No |
| Maximum Stitch Length | 5 mm |
| Voltage | 220-240V |
| Stitch Type | Zigzag |
| Stitch Options | Zigzag, Straight Stitch |
| Needle Positions | Left, Center, Right |
| Presser Feet | Button sewing foot |
| Bed Size | Flat bed |