TO
SHARPEN
THE
TRIMMER
KNIVES
______________________________________
C,~Se~e~E~igi~dA6
~
--------------------------~--
--
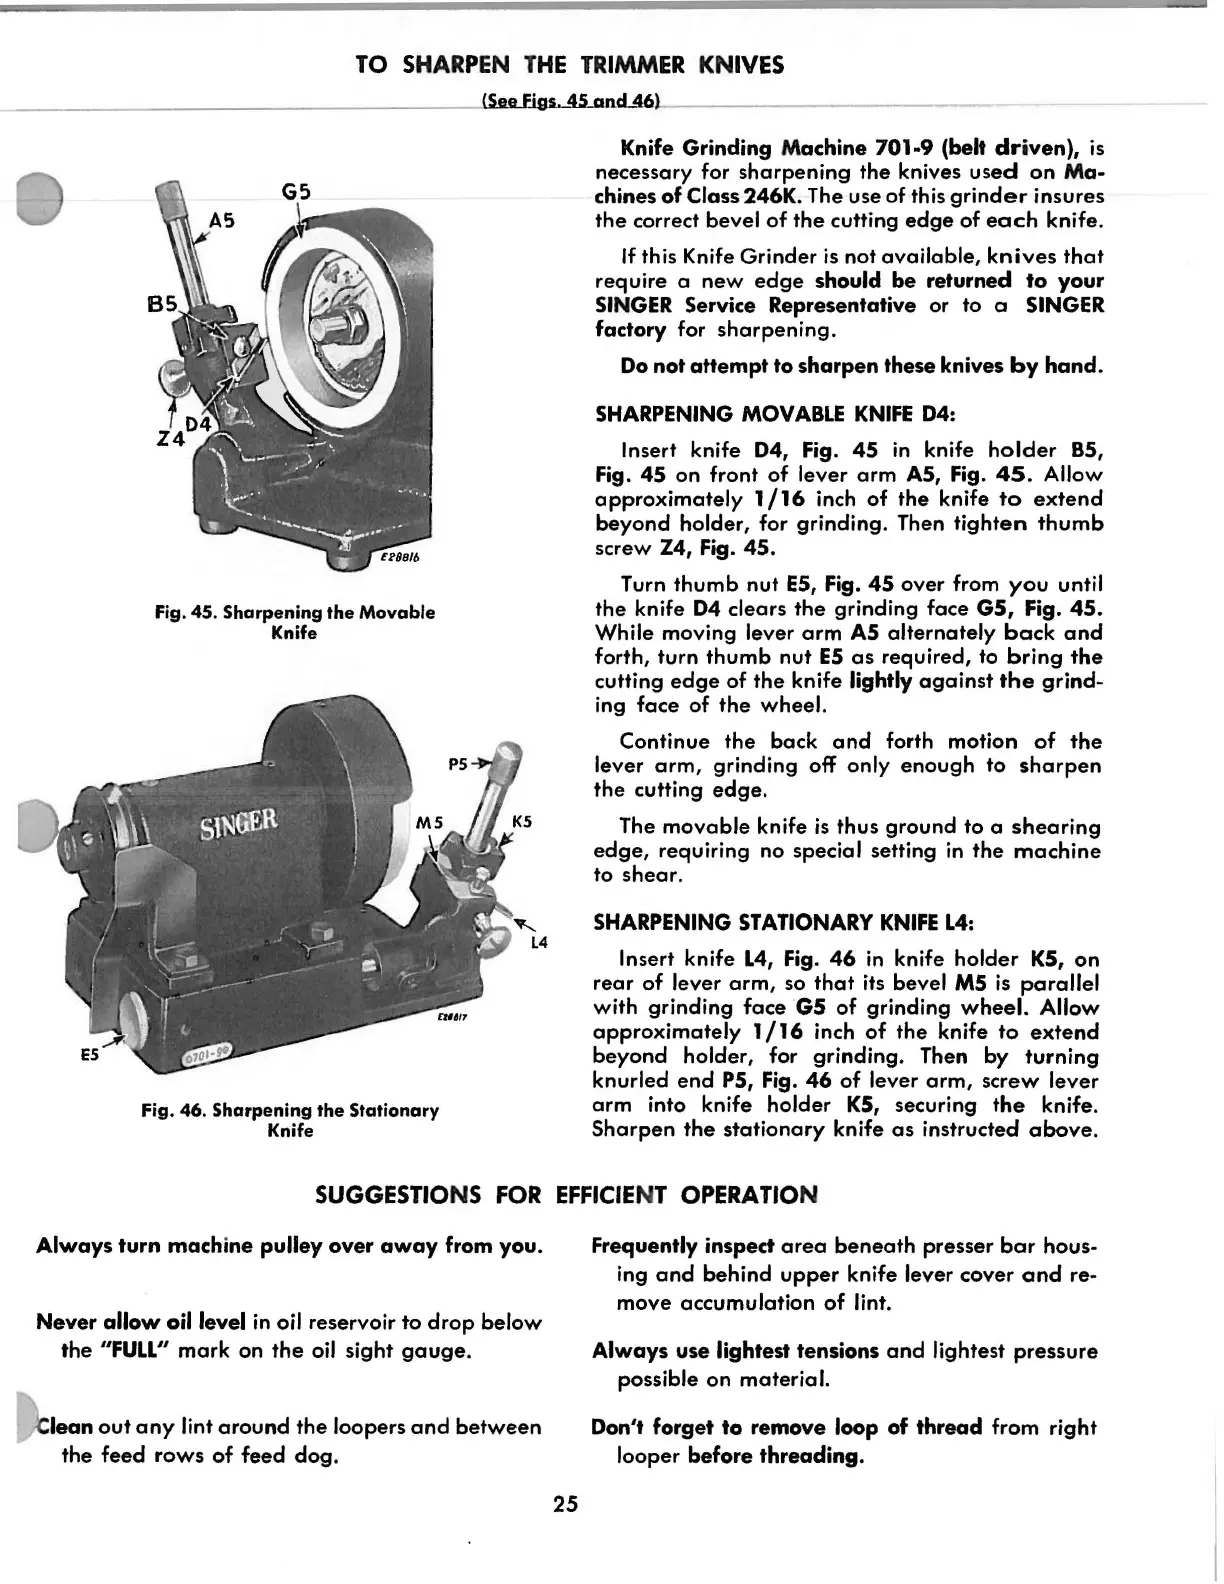
Fig. 45.
Sharpening
the
Movable
Knife
Fig. 46.
Sharpening
the
Stationary
Knife
Knife Grinding Machine
701·9
(belt
driven),
is
necessary for
sharpening
the knives
used
on
Ma·
chines
of
Class 246K. The use of this
grinder
insures
the
correct bevel
of
the
cutting
edge
of
each
knife.
If
this Knife Grinder
is
not
available,
knives
that
require a
new
edge
should
be
returned
to
your
SINGER
Service Representative or to a SINGER
factory for
sharpening.
Do
not
attempt
to
sharpen
these knives
by
hand.
SHARPENING
MOVABLE
KNIFE
D4:
Insert knife D4, Fig. 4S
in
knife
holder
BS,
Fig. 4S on front
of
lever
arm
AS, Fig.
45.
Allow
approximately
1/16
inch
of
the
knife
to
extend
beyond
holder, for grinding. Then
tighten
thumb
screw Z4, Fig. 4S.
Turn
thumb
nut
ES,
Fig.
4S
over from
you
until
the
knife
D4
clears
the
grinding face
GS,
Fig.
4S.
While moving lever
arm
AS
alternately
back
and
forth, turn
thumb
nut
ES
as
required, to
bring
the
cutting
edge
of
the knife lightly
against
the
grind-
ing
face
of
the
wheel.
Continue
the
back
and
forth motion
of
the
lever
arm,
grinding off only
enough
to
sharpen
the cutting
edge.
The
movable
knife
is
thus ground to a
shearing
edge,
requiring no special setting
in
the
machine
to
shear.
SHARPENING
STATIONARY
KNIFE
L4:
Insert knife
L4,
Fig.
46
in
knife holder
KS,
on
rear
of
lever
arm,
so
that
its bevel
MS
is
parallel
with grinding
face
GS
of
grinding
wheel.
Allow
approximately
1
/16
inch
of
the
knife
to
extend
beyond
holder, for grinding. Then by
turning
knurled
end
PS, Fig.
46
of
lever
arm,
screw lever
arm
into knife holder
KS,
securing
the
knife.
Sharpen
the
stationary
knife
as
instructed
above.
SUGGESTIONS
FOR
EFFICIE
NT
OPERATION
Always
turn
machine
pulley
over
away
from you.
Never
allow
oil level
in
oil reservoir
to
drop
below
the
11
FULL''
mark
on
the
oil sight
gauge
.
lean
out
any
lint
around
the
loopers
and
between
the
feed
rows
of
feed
dog.
25
Frequently inspect
area
beneath
presser
bar
hous-
ing
and
behind
upper
knife lever cover
and
re-
move
accumulation
of
lint.
Always
use
lightest
tensions
and
lightest
pressure
possible on material.
Don't
forget
to
remove
loop
of
thread
from right
looper
before
threading.
From the library of: Superior Sewing Machine & Supply LLC