Do you have a question about the Singer 6235 and is the answer not in the manual?
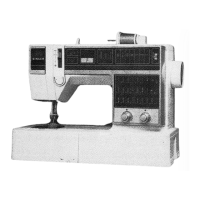
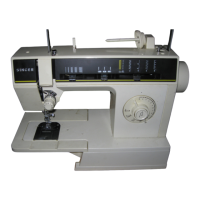
Identifies and describes the main components of the sewing machine.
Explains the location and use of the machine's built-in storage for accessories.
Guides on how to connect the sewing machine to power and its components.
Instructions on how to power on and operate the sewing machine.
A guide for selecting appropriate needle and thread combinations for different fabrics.
Instructions on how to store the sewing machine's handle.
Details on selecting and replacing the sewing machine needle.
Explains how to convert the machine for free arm sewing for easier access.
Step-by-step guide on how to change different presser feet.
Instructions for replacing presser feet that include a shank.
How to attach the darning and embroidery foot for special techniques.
Instructions for attaching the feed cover for specific sewing tasks.
Guide on how to change the needle plate for different stitches.
Detailed steps for correctly threading the sewing machine.
How to use the automatic needle threader for easier threading.
Instructions on how to wind a bobbin using the machine's winder.
Guide on how to properly insert a wound bobbin into the bobbin case.
Steps to bring the bobbin thread up through the needle plate.
How to select stitch patterns using the machine's dial.
Guide on adjusting the stitch length for different fabric types.
How to adjust thread tension for optimal stitch formation.
Instructions and tips for sewing basic seams.
Methods for maintaining straight seams while sewing.
How to use the seam guide for consistent seam allowances.
Guidance on how to sew neat square corners on fabric.
Tips and techniques for sewing curved seams accurately.
How to use the machine for mending worn or torn fabric areas.
Instructions for performing free motion embroidery.
Step-by-step guide for inserting zippers into garments.
How to adjust the stitch width for various stitch patterns.
Guide on adjusting stitch length for special stitches.
Adjusting thread tension for optimal appearance of special stitches.
How to adjust the stitch balance for specific stitch patterns.
Details on using the Zig-Zag stitch for seams, appliqué, and more.
Instructions for using the blindstitch for hemming and seams.
How to use the multi-stitch zig-zag for mending and reinforcing.
Guidance on using the "M" stitch for stretch seams and lace trim.
How to use the crescent stitch for borders and decorative edges.
Instructions for using the arrow stitch as a decorative border.
Information on using Domino, Rampart, and Satin Bead stitches.
How to use the stretch overedge stitch for stretchy seams.
Instructions for using the fagoting stitch for joining fabrics.
How to use Ric-Rac and Straight Stretch stitches for seams and topstitching.
Instructions for using the honeycomb stitch for smocking.
How to use the straight featherstitch for seams and edging.
Instructions for using the Turkish stitch for decorative hems.
How to attach the one-step buttonhole foot to the machine.
How to set the buttonhole length using the button carrier.
How to adjust the width of the buttonhole.
How to adjust the balance of the buttonhole stitching.
Instructions for sewing buttons onto fabric using the machine.
Step-by-step guide for removing and reinserting the bobbin case.
How to safely replace the machine's light bulb.
Instructions on how to clean the sewing machine to ensure reliability.
A guide to help diagnose and correct common sewing issues.
Information about optional accessories available for the sewing machine.
| Type | Electronic |
|---|---|
| Operation | Electric |
| Built-in Needle Threader | Yes |
| Drop Feed | Yes |
| Free Arm | Yes |
| Presser Feet Included | All Purpose Foot, Buttonhole Foot, Zipper Foot |