From the library of Superior Sewing Machine & Supply LLC - www.supsew.com
40
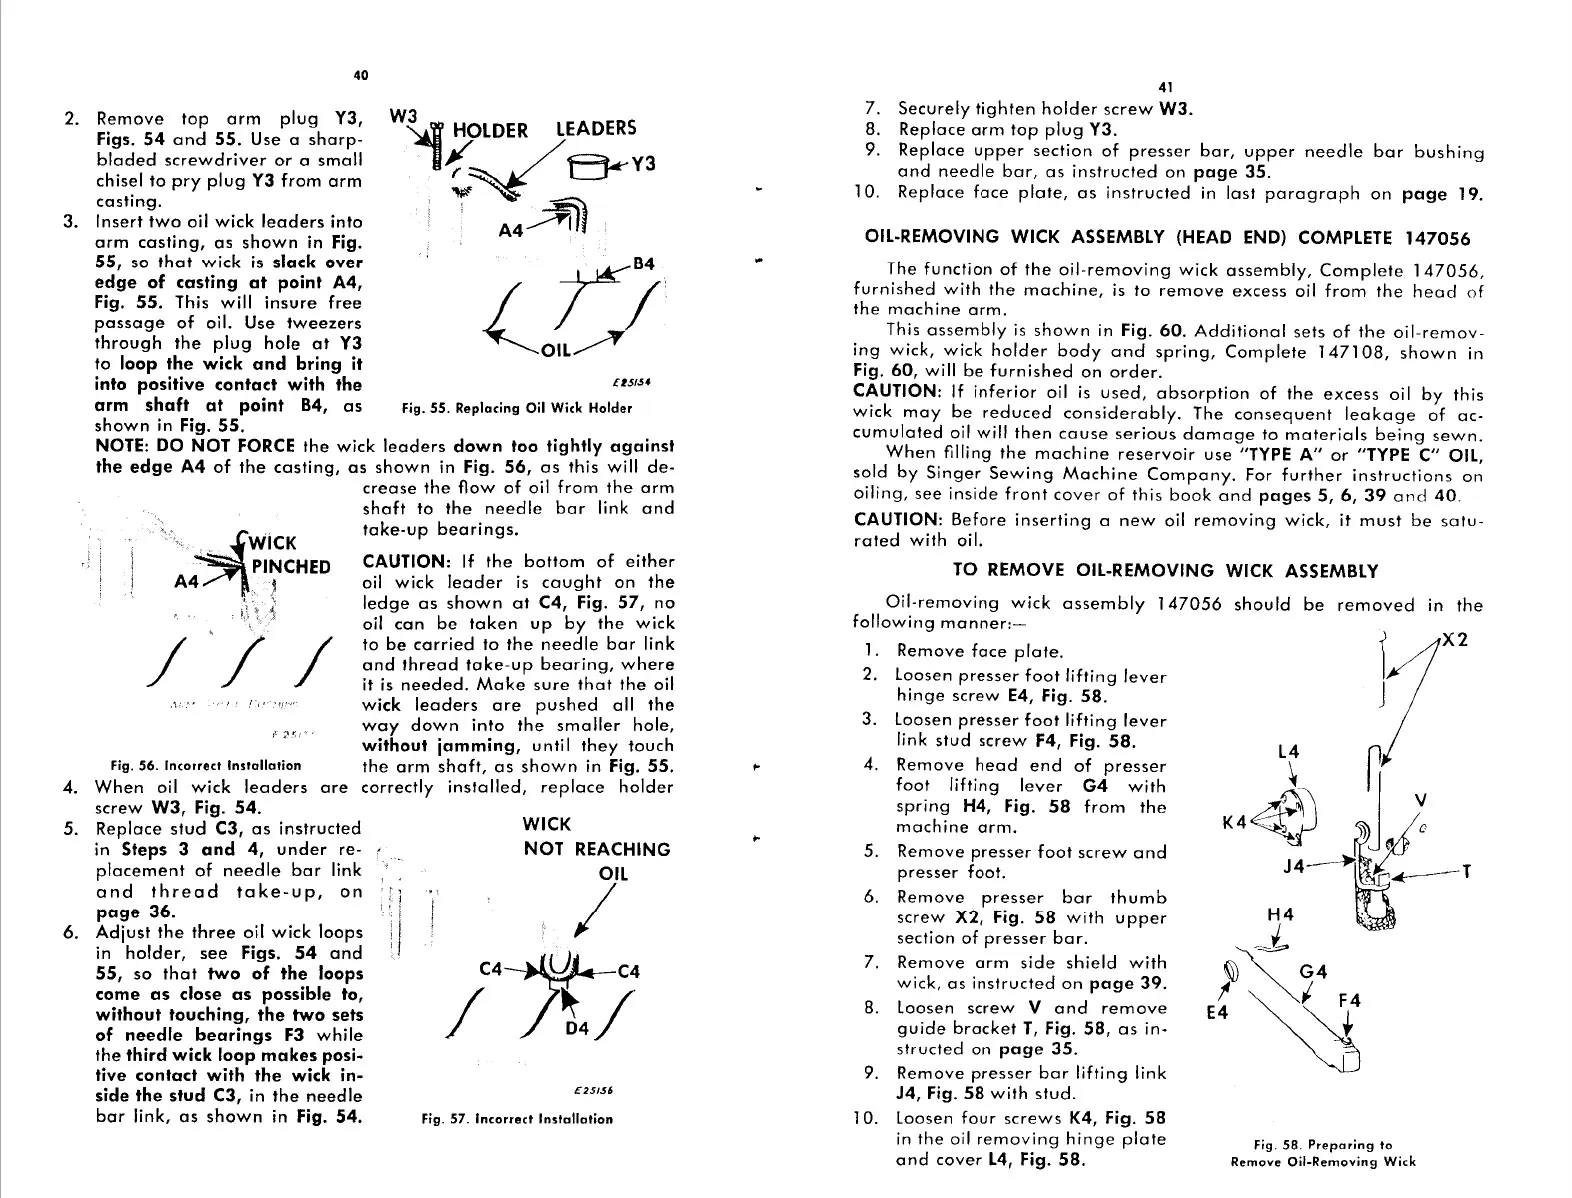
2.
Remove
top
arm
plug
Y3,
Figs.
54
and
55.
Use a
sharp-
bladed
screwdriver
or
a
small
chisel
to
pry
plug
Y3
from
arm
casting.
3.
Insert
two
oil
wick
leaders
into
arm
casting,
as
shown
in
Fig.
55,
so
that
wick
is
slack over
edge of casting
at
point A4,
Fig. 55.
This will
insure
free
passage
of
oil. Use
tweezers
through
the
plug
hole
at
Y3
to
loop the wick
and
bring it
W~
HOLDER
LEADERS
lt~E}<-Y3
i:
A4~
r
B4
I
I
'OIL~
into positive contact with the
u
5
,~•
arm shaft
at
point
B4,
as
Fig.
55.
Replacing
Oil Wick
Holder
shown
in
Fig. 55.
NOTE: DO
NOT
FORCE
the
wick
leaders
down
too tightly against
the edge
A4
of
the
casting,
as
shown
in
Fig. 56,
as
this
will
de-
crease
the
flow
of
oil
from
the
arm
shaft
to
the
needle
bar
link
and
-~WICK
PINCHED
take-up
bearings.
A4
l
'
'
Fig.
56.
Incorrect
Installation
4.
When
oil
wick
leaders
are
screw
W3,
Fig. 54.
CAUTION:
If
the
bottom
of
either
oil
wick
leader
is
caught
on
the
ledge
as
shown
at
C4, Fig. 57,
no
oil
can
be
taken
up
by
the
wick
to
be
carried
to
the
needle
bar
link
and
thread
take-up
bearing,
where
it is
needed.
Make
sure
that
the
oil
wick
leaders
are
pushed
all
the
way
down
into
the
smaller
hole,
without
jamming,
until
they
touch
the
arm
shaft,
as
shown
in
Fig. 55.
correctly
installed,
replace
holder
5.
Replace
stud
C3,
as
instructed
in
Steps
3
and
4,
under
re-
placement
of
needle
bar
link
and
thread
take-up,
on
page 36.
6.
Adjust
the
three
oil
wick
loops
in
holder,
see
Figs.
54
and
55,
so
that
two
of
the loops
come
as
close
as
possible to,
without touching, the two
sets
of needle bearings
F3
while
the
third wick loop makes posi-
tive contact
with
the wick in-
side the stud C3,
in
the
needle
bar
link,
as
shown
in
Fig. 54.
WICK
NOT
REACHING
OIL
I
;·JV
£25156
Fig.
57.
Incorrect
Installation
...
41
7.
Securely
tighten
holder
screw
W3.
8.
Replace
arm
top
plug
Y3.
9.
Replace
upper
section
of
presser
bar,
upper
needle
bar
bushing
and
needle
bar,
as
instructed
on
page 35.
l 0.
Replace
face
plate,
as
instructed
in
last
paragraph
on
page
19.
OIL-REMOVING WICK ASSEMBLY (HEAD END) COMPLETE
147056
The
function
of
the
oil-removing
wick
assembly,
Complete
147056,
furnished
with
the
machine,
is
to
remove
excess
oil
from
the
head
of
the
machine
arm.
This
assembly
is
shown
in
Fig. 60.
Additional
sets
of
the
oil-remov-
ing
wick,
wick
holder
body
and
spring,
Complete
147108,
shown
in
Fig. 60,
will
be
furnished
on
order.
CAUTION:
If
inferior
oil
is
used,
absorption
of
the
excess
oil
by
this
wick
may
be
reduced
considerably.
The
consequent
leakage
of
ac-
cumulated
oil will
then
cause
serious
damage
to
materials
being
sewn.
When
filling
the
machine
reservoir
use
"TYPE
A"
or
"TYPE
C"
OIL,
sold
by
Singer
Sewing
Machine
Company.
For
further
instructions
on
oiling,
see
inside
front
cover
of
this
book
and
pages 5, 6,
39
and
40.
CAUTION:
Before
inserting
a
new
oil
removing
wick,
it
must
be
satu-
rated
with
oil.
TO REMOVE OIL-REMOVING WICK ASSEMBLY
Oil-removing
wick
assembly
147056
should
be
removed
in
the
following
manner:-
].
Remove
face
plate.
2. Loosen
presser
foot
lifting
lever
hinge
screw
E4,
Fig. 58.
3. Loosen
presser
foot
lifting
lever
link
stud
screw
F4, Fig.
58.
4.
5.
6.
7.
8.
9.
10.
Remove
head
end
of
presser
foot
lifting
lever
G4
with
spring
H4, Fig.
58
from
the
machine
arm.
Remove
presser
foot
screw
and
presser
foot.
Remove
presser
bar
thumb
screw
X2,
Fig. 58
with
upper
section
of
presser
bar.
Remove
arm
side
shield
with
wick,
as
instructed
on
page
39.
Loosen
screw
V
and
remove
guide
bracket
T,
Fig. 58,
as
in-
structed
on
page
35.
Remove
presser
bar
lifting
link
J4, Fig. 58
with
stud.
Loosen
four
screws
K4, Fig. 58
in
the
oil
removing
hinge
plate
and
cover
L4,
Fig. 58.
t
X2
J
Lt
n
i~
V
J
4~
_
..--T
H4
°'
~
ij
G4
I
~(~4
E4
~1
Fig.
58.
Preparing
lo
Remove
Oil-Removing
Wick
 Loading...