EasyManua.ls Logo

SkyLink GS-MT User Manual

SkyLink GS-MT
2 pages
To Next Page IconTo Next Page
Page #1 background imageLoading...
Page #1 background image
Section 2 - Programming the Sensor with M-Series Main Console
1. Press the learn button on the back
of the M-Series Main Console for
3 seconds until the Zone 1 light
is ashing.
This device complies with Part 15 of the FCC Rules. Operation is subject to the
following two conditions: (1) This device may not cause harmful interference,
and (2) This device must accept any interference received, including
interferences that may cause undesired operation.
Congratulations on your purchase of the Skylink Garage Door Sensor,
Model: GS-MT. The sensor will monitor the status of your garage door and works
with the SkylinkNet Internet Hub and the Skylink M-Series Alert/Alarm System.
INSTALLATION INSTRUCTIONS
Garage Door Sensor
Model: GS-MT
Safety Information
WARNING:
Changes or modications to this unit not expressly approved by the party
responsible for compliance could void the user’s authority to operate the
equipment.
CE - DECLARATION OF CONFORMITY:
This equipment complies with the requirements relating to electromagnetic
compatibility, EN 301489-1, EN301489-3, EN300220-1, EN300220-2 and
EN60950-1. This equipment conforms to the essential requirement of the
1999/5/EC R&TTE Directive.
Parts
Description Quantity
A Garage Door Sensor 1
NOTE: You can program in total up to 4 sensors in one zone. If you try to
program the fth sensor, the rst sensor will be removed.
2. Zone 1 is selected. Press the learn
button to select the zone you want
to program the sensor.
4. Once the sensor is programmed,
the Main Console will beep once
and the corresponding zone led
will be off.
A
1B
Section 1 - Insert a battery in the Garage Door Sensor
NOTE: The battery for the Sensor is not included. Please refer to
instruction below to insert an AAA Alkaline Battery.
Learn Button
Section 3 - Programming the Sensor with SkylinkNet Internet Hub
1. Go to “More” and tap
on “System Settings”.
2. Tap on “Setup
Wizard”.
3. Tap on “Add Device”.
NOTE: Programming the sensor with the SkylinkNet Internet Hub
must be done from the SkylinkNet App.
5. Tap on “Garage
Door Sensor”.
6. Name your Sensor,
location and tap
“Continue”.
7. Tap on “Learn Now”
and follow the video to
activate the sensor.
Package Contents
Double-sided tape
1. Press both sides and open the cover of the Garage Door Sensor.
2. Insert an AAA Battery in the sensor and close the cover.
Zone LED
3. Activate the Sensor by tilting it
from vertical to horizontal.
4. Tap on “Sensors”.
B
Question and Answer IconNeed help?

Do you have a question about the SkyLink GS-MT and is the answer not in the manual?

SkyLink GS-MT Specifications

General IconGeneral
BrandSkyLink
ModelGS-MT
CategoryAccessories
LanguageEnglish

Summary

Safety and Compliance Information

Package Contents

Insert Battery in Garage Door Sensor

Open and Close Sensor

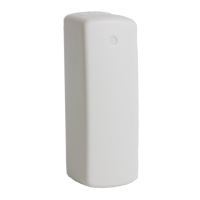
Steps to open the garage door sensor casing and re-close it after battery insertion.

Programming Sensor with M-Series Main Console

Initiate Console Programming

Press and hold the learn button on the M-Series Main Console until the Zone 1 light flashes.

Select Zone and Activate Sensor

Select the desired zone by pressing the learn button, then activate the sensor by tilting it.

Programming Confirmation

The Main Console beeps once and the corresponding zone LED turns off upon successful programming.

Programming Sensor with SkylinkNet Internet Hub

Navigate to System Settings

Access 'System Settings' from the 'More' menu in the SkylinkNet App.

Initiate Add Device Wizard

Tap 'Setup Wizard' then 'Add Device' to begin the device addition process.

Select Sensor Type

Tap 'Sensors' and then select 'Garage Door Sensor' from the device type list.

Configure Device Details

Provide a name and location for your garage door sensor and proceed.

Activate Sensor for Pairing

Tap 'Learn Now' and activate the sensor by tilting it to complete the pairing.

Testing Sensor with M-Series Alert/Alarm System

Set Console to Alert Mode

Slide the switch on the back of the Main Console to 'Alert Mode' for testing.

Activate and Deactivate Sensor

Tilt the sensor to simulate door open/closed states and observe console response.

Testing Sensor with SkylinkNet Alarm System

Simulate Door Status

Activate the sensor by tilting it to simulate the garage door opening and closing.

Install Garage Door Sensor

Mounting Location and Orientation

Mount the sensor on the garage door top panel with double-sided tape, arrow facing left.

Battery Indication and Sensor Failure

Troubleshooting Sensor Issues

Check sensor location, physical damage, console proximity, and battery for failure.

Troubleshooting M-Series Alert/Alarm System

Console Not Responding

Ensure the sensor is programmed to the control panel before use.

Erasing Individual Sensors

All sensors in a zone must be erased to remove a single sensor.

Identifying Failing Sensor

Test each sensor individually when the zone LED flashes, indicating a failure.

Warranty and Support

One Year Limited Warranty

Product guaranteed against material/workmanship defects for one year from purchase.

Customer Support Contact

Contact Skylink Customer Support via phone or email for assistance and inquiries.

Related product manuals