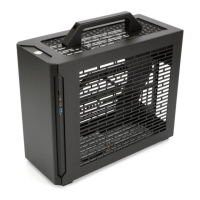
The Sliger SM580 is a compact, high-performance PC case designed for enthusiasts and builders who prioritize both small form factor and powerful components. This build guide outlines the assembly process, highlighting key features and providing detailed instructions for installing various components.
Function Description:
The SM580 serves as a chassis for a custom-built personal computer, specifically designed to accommodate high-end components within a compact footprint. Its primary function is to house and protect the internal PC hardware, facilitate cooling, and provide external connectivity. The case supports a range of components, including motherboards, power supplies, GPUs, radiators, and storage drives, making it suitable for gaming, content creation, and other demanding applications where space is a premium.
Important Technical Specifications:
Screws: The SM580 utilizes four distinct types of screws, color-coded in the guide for easy identification:
- GREEN M3 x 6mm PAN HEAD: Used for securing PCIe cards.
- RED M3 x 5mm FLAT HEAD: Employed for the chassis top assembly, rear AC inlet, SSDs (on the SSD bracket), and the SFX PSU mount bracket.
- VIOLET 6-32 x 1/4" HEX HEAD: Used for mounting the motherboard, power supplies, and radiators.
- PINK M3 x 8mm FLAT HEAD: Specifically for the power pigtail.
Panel Removal:
- Easy-Off Panels: The front and side panels feature tool-less removal via ball-stud mounting points. Users should exercise caution as panels may be tight during the first few removals.
- Top Panel: The top panel is secured with 6x M3 x 5mm FLAT HEAD screws. Two are located by the front power switch, two on the rear top edge of the case, and two on the top rear corners of each side.
Fan Support:
- Bottom Fans: The case supports bottom-mounted fans. It is recommended to install these first, before the PSU, motherboard, or GPU, to avoid installation difficulties. The guide suggests setting bottom fans to INTAKE and top fans to EXHAUST. Fan mounting screws are not included; countersunk holes are designed for KB5 head screws.
- Radiator Fans: The AIO bracket can accommodate either 120mm or 140mm radiator fans.
Motherboard Compatibility:
- The SM580 supports motherboards that require an I/O shield. Users are advised to install the I/O shield first and ensure any M.2 drives on the back of the motherboard are installed before mounting.
- Motherboards are mounted using 4x 6-32 x 1/4" HEX HEAD screws. A Phillips #2 screwdriver with a minimum 3" shaft length is recommended for installation.
Power Supply Compatibility:
- SFX PSU: The case is designed for SFX power supplies. The SFX PSU mounting bracket is secured to the case spine via 2x M3 x 5mm FLAT HEAD screws (located at the top middle of the spine, next to the motherboard corner standoff) and 2x M3 x 5mm FLAT HEAD screws behind the front panel.
- PSU Mounting: The SFX PSU attaches to its mounting bracket with 6x M3x5mm HEX HEAD screws. Note that not all SFX power supplies have all six holes. It is recommended to attach modular cables first and loosely route them. The PSU and bracket assembly are then screwed back into the case using 4x M3x5mm FLAT HEAD screws.
PCIe Card Support:
- The case supports GPUs and other PCIe cards, especially when using bifurcated/trifurcated risers. PCIe cards are mounted with 3x M3 x 6mm PAN HEAD screws.
Power Cord Options:
- Standard Mount: The power cord is installed from the rear through the power cord mount hole, passing through the cable mounting bracket. The inlet and metal plate are mounted via 2x M3x5mm FLAT HEAD screws.
- Pigtail Mount: The cord is pulled from the rear through the power cord mount hole. The cable grommet is clipped onto the power cord and then into the metal plate. The metal plate is mounted via 2x M3x5mm FLAT HEAD screws.
AIO/Radiator Support:
- Subtop Removal/AIO Install: The AIO/handle bracket is attached to the subtop with 4x M3 x 5mm FLAT HEAD screws. These screws must be removed to pull the AIO bracket out.
- Radiator Compatibility: The SM580 AIO Bracket can fit either a 240mm or 280mm radiator. The radiator should be attached with hose ports near the front of the case using up to 8x 6-32 x 1/4" HEX HEAD screws.
- AIO Bracket Reinstallation: The front flange of the AIO assembly must be on the inside of the chassis, attaching with 2x M3 x 5mm FLAT HEAD screws. The rear flange should be on the outside of the rear chassis, secured with 4x M3 x 5mm FLAT HEAD screws.
SSD Mounting:
- The SM580 includes an SSD mounting bracket behind the front panel. Each SSD attaches to this bracket with 4x M3 x 6mm PAN HEAD screws. Drives should be installed with SATA power and data connections facing down.
Usage Features:
- Tool-less Panel Removal: The front and side panels can be easily removed without tools, simplifying access to internal components for installation, upgrades, and maintenance.
- Reversible Side Panels: Side panels can be installed on either side, offering flexibility in case orientation or aesthetic preference.
- Flexible Front Panel Installation: The front panel can be installed with either end at the top or bottom.
- Optimized Airflow Recommendations: The guide provides clear recommendations for fan direction (bottom fans for intake, top fans for exhaust) to ensure efficient cooling.
- Cable Management: The case design encourages tidy cable management using zip ties or Velcro wraps to improve airflow and prevent interference with fan blades or components. Specifically, AIO water lines are routed behind the PSU mount bracket.
Maintenance Features:
- Easy Access for Cleaning: The removable panels allow for straightforward access to internal components for dusting and cleaning, which is crucial for maintaining optimal performance and longevity.
- Modular Design: The ability to remove specific brackets (like the AIO/handle bracket) simplifies the installation and replacement of components, making maintenance tasks less cumbersome.
- Clear Screw Identification: The color-coded screw system helps users quickly identify and use the correct screws for each component, reducing the risk of damage from incorrect fasteners during assembly or disassembly for maintenance.
- Pre-installation Checks: The guide advises checking for M.2 drives and CPU cooler backplates before motherboard installation, which helps prevent the need for re-disassembly during maintenance or upgrades.