6
6
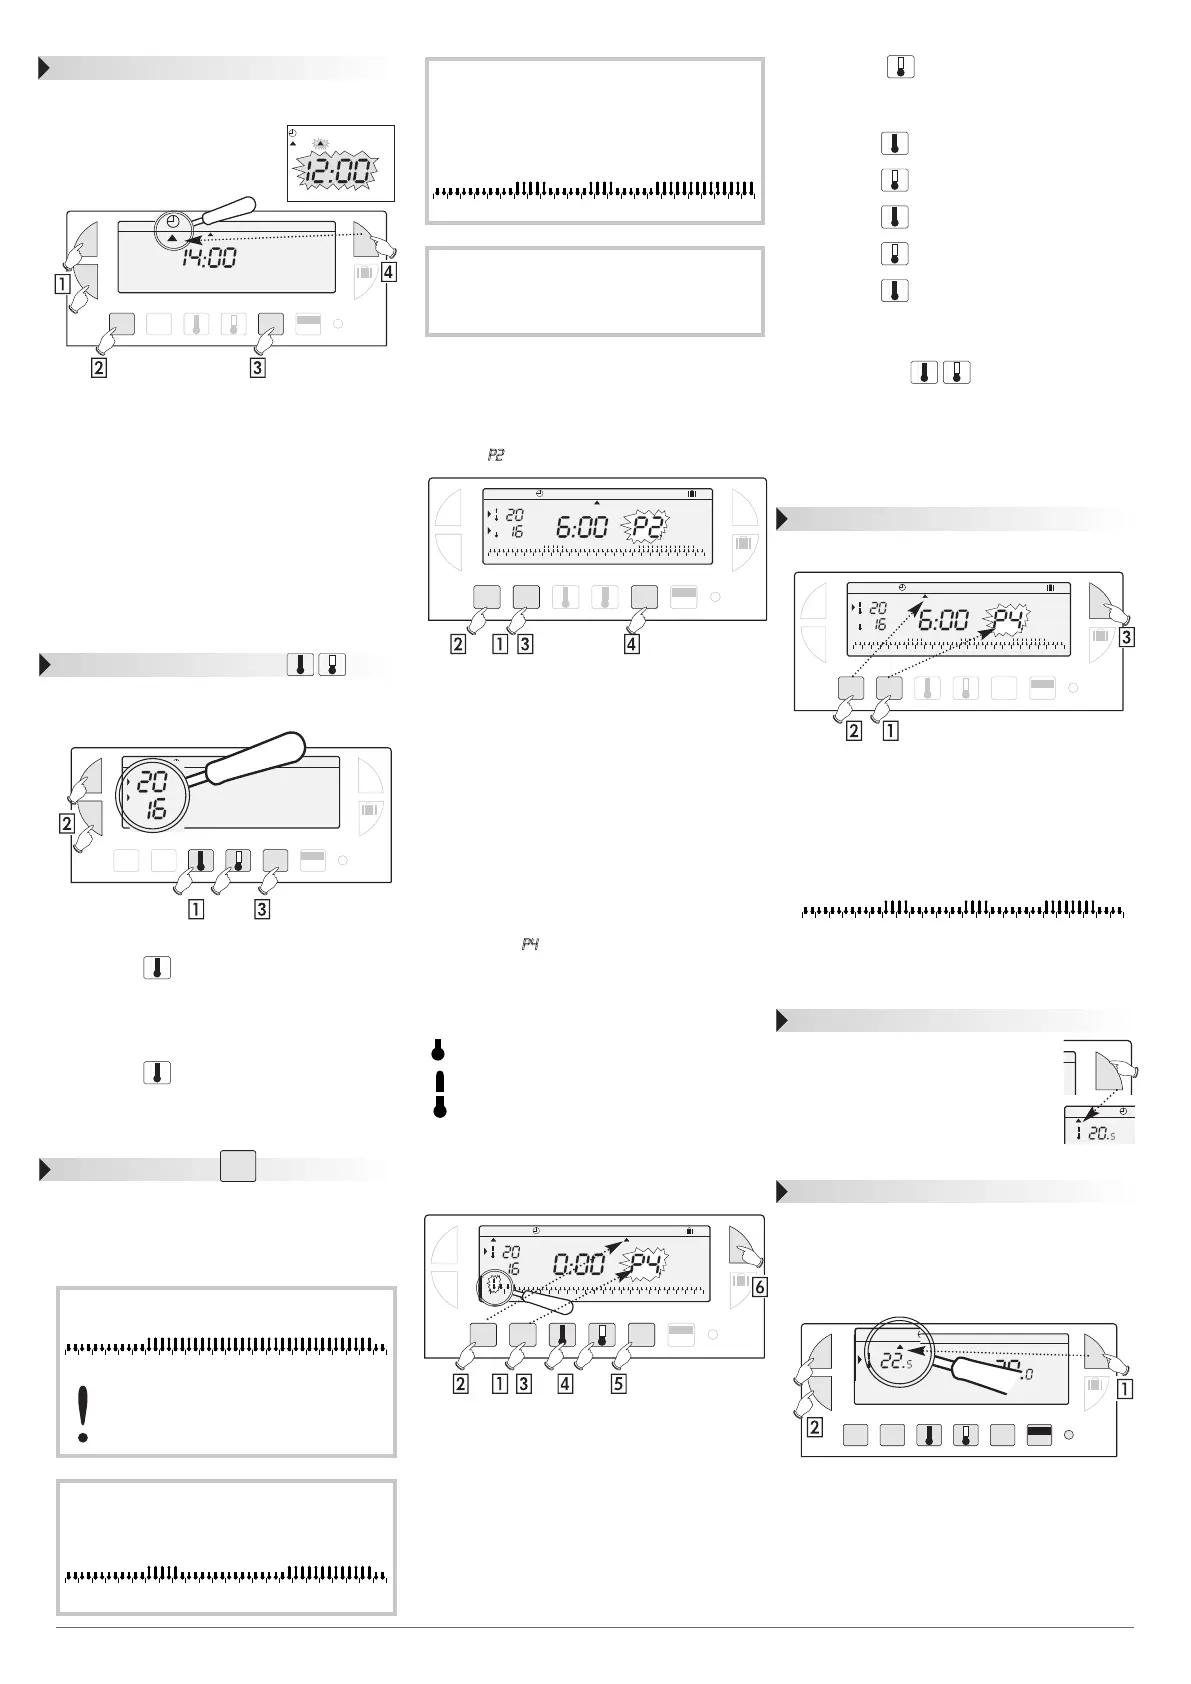
Setting current time and day
You are putting the device into operation for the
first time.
• You have just pressed the
RESET button.
• I2:00 appears and the pointer ▲
flashes under day 1 (monday).
Set the time using the +/- buttons (the num-
bers run off more quickly when the button is
pressed continuously).
Set the current day by pressing several times
on the DAYS 1-7, a pointer ▲ appears under
the corresponding day (1=monday, 2=tuesday,
3=wednesday, etc.)
Validate with the OK button.
If you wish to change the time or the day, press
the MODE button until the pointer
▲
under
the clock sign and continue as above for points
, and .
Temperature setting
Comfort and reduced temperatures are pre-set :
Comfort = 20°C, Reduced = 16°C.
Modification of comfort temperature
Press the button.
Modify the temperature with the +/- buttons.
Validate with the OK button.
Modification of reduced temperature
Press the button.
Modify the temperature with the +/- buttons.
Validate with the OK button.
Programming
You can programme your week according to 4 pro-
gramme settings : P1, P2 and P3 are pre-recorded
and cannot be modified. P4 is blank and allows you
to create a personalized programme varying
according to the day of the week.
Selection of an existing P1,P2 or P3 pro-
gramme for a day of the week (in
programming mode all modifications are
automatically validated).
exemple : P2 for wednesday
Press the PROG P1-P4 button to go into
programming mode.
The N°of the programme assigned to the day
flashes on the right-hand side of the display panel.
Press the DAYS 1-7 button until the pointer ▲
appears under the day you wish to programme
(wednesday in our example).
Press the PROG P1-P4 button until the P2
programme number flashes in the right side of
the screen.
Validate with the OK button, the following day
is automatically proposed.
Creating a P4 programme
A 24-hour profile composed of 48 thermometers
at the bottom of the display panel allows your
programme composition to be easily viewed;
A half-empty thermometer corresponds to
30 minutes at reduced temperature.
A full thermometer corresponds to 30 minutes
at reduced temperature.
exemple: programming 3 temperature periods for
friday : 6 a.m. till 8 a.m., noon till 2 a.m. and
6a.m. till 22 a.m.
From the Auto, mode press the PROG P1-P4
button.
Press the DAYS 1-7 button until a pointer ▲
appears under the day you wish to programme
(friday in our example).
Press the PROG P1-P4 button until the P4
programme number flashes in the right side of
the screen. Your display panel indicates time as
0:00 and the first thermometer flashes on the
24-hour profile.
Press the button several times to obtain
6:00 :The time displayed advances by 30 minutes
for each short press. Continuous pressing ac-
celerates the time run-off.
• Press the button several times to obtain
8:00.
• Press the button several times to obtain
I2:00.
• Press the button several times to obtain
I4:00.
• Press the button several times to obtain
I8:00.
• Press the button several times to obtain
22:00.
N.B.: if you make a mistake (e.g.11.30 instead of
12.00) use the +/- buttons to advance or return and
correct with the thermometer buttons.
Validate with the OK button, the following day
automatically appears.
Press the MODE button to return to Auto
mode.
Programme reading
You can check your programming:
From Auto mode,press the PROG P1-P4
button.
With the DAYS 1-7 button select the day
from 1 to 7 and check your programming on
the 24-hour profile at the bottom of the
display panel (see example above)
.
Press the MODE button to return in Auto
mode.
Automatic mode (Auto)
You pass into automatic mode by
pressing the MODE button until the
pointer ▲ appears under Auto.
In automatic mode the clock thermo-
stat adapts to your life style by running
the programs you have selected.
Manual mode (Manu)
Manual mode transforms your device into a simple
thermostat.
It allows you to maintain a constant temperature in
your dwelling (set to a temperature of between
5°C and 30°C).
Press the MODE button to position the pointer
▲ under Manu.
Press the + or - buttons to adjust to the desired
temperature (for instance 22.5°C).
To quit the Manu mode,press the MODE button
and reposition ▲ under Auto.
1234
Auto Manu 1234567
+
-
OK
PROG
P1-P4
DAYS
1-7
MODE
0000
h
Res
Auto Manu 1234567
¡c
¡c
+
-
OK
PROG
P1-P4
DAYS
1-7
MODE
0000
h
Res
c
c
0 1 2 3 4 5 6 7 8 9 10 11 12 13 14 15 16 17 18 19 20 21 22 23 24
Auto Manu 1234567
¡c
¡c
+
-
OK
PROG
P1-P4
DAYS
1-7
MODE
0000
h
Res
Auto Manu 1234567
¡c
¡c
+
-
OK
PROG
P1-P4
DAYS
1-7
MODE
0000
h
Res
0 1 2 3 4 5 6 7 8 9 10 11 12 13 14 15 16 17 18 19 20 21 22 23 24
Auto Manu
¡c
¡c
+
-
OK
PROG
P1-P4
DAYS
1-7
MODE
0000
h
Res
Auto Manu
¡c
+
-
OK
PROG
P1-P4
DAYS
1-7
0000
h
Res
Auto Manu 1 2 3 4 5 6 7
¡c
¡c
0 1 2 3 4 5 6 7 8 9 10 11 12 13 14 15 16 17 18 19 20 21 22 23 24
OK
MODE
PROG
P1-P4
P1 =
Comfort temperature from 6 a.m. till 11 p.m.
Reduced temperature from 11 p.m. till 6 a.m.
The default allocation of P1 is to 7 days of
the week.If this corresponds to your life
style, stay in automatic mode, otherwise,
continue.
P2 =
Comfort temperature from 6 a.m. till 8.30 a.m.
and from 4.30 p.m. till 11 p.m.
Reduced temperature from 8.30 a.m. till
4.30 p.m. and from 11 p.m. till 6 a.m
.
012345678 9 10 11 12 13 14 15 16 17 18 19 20 21 22 23 24
012345678 9 10 11 12 13 14 15 16 17 18 19 20 21 22 23 24
012345678 9 10 11 12 13 14 15 16 17 18 19 20 21 22 23 24
P3 =
Comfort temperature from 6 a.m. till 8.30
a.m., from 11.30 a.m. till 1.30 p.m. and
from 4.30 p.m. till 11 p.m.
Reduced temperature from 8.30 a.m. till
11.30 a.m. from 1.30 a.m. till 4.30 p.m.
and from 11 p.m. till 6 a.m.
P4 =
Blank programme allowing you to
create 3 comfort temperature periods
and 3 reduced periods for each day of
the week.
012345678 9 10 11 12 13 14 15 16 17 18 19 20 21 22 23 24
Auto Manu
°c
MODE
 Loading...