EasyManua.ls Logo

Smallart RP-2023 - User Manual

Smallart RP-2023
2 pages
Print Icon
To Next Page IconTo Next Page
Loading...
RP-2023
ROOM CONTROL PANEL
Doc: 00-11-01, V1.2, 20170209 Page 1 / 2
Copyright © Smallart
®
www.smallart.com.tr
RP-2023 Room Panel User Manual
Sensing element: NTC
Accuracy : ± 1
Set-point range: 5℃~35
Display range: 050
Operation environment: 045
Operating Humidity: 590%RH (non-
condensing)
Power supply: 12VDC
Rated Power: 1W
Dimensions: 86 × 86 × 13 mm ( W × H × D )
Hole pitch: 60 mm ( Standard )
Protection Class: IP30
OPERATION
On/Off: Press to turn on, press again to turn off.
Setting temperature: Press to reduce set-point, press ” to raise set-point, and 1 changed once.
Mode Selection: Press to change system working in cooling , heating , ventilation or auto
mode.
Fan Speed Selection: Press to change fan speed among (Hi)”, (Med)”, “ (Low) or (Auto).
KEY LOCKING FUNCTION SETTING:
Turn on the thermostat, Press and for 10 seconds to enable or disable key locking function.
ROOM TEMPERATURE CALIBRATING:
Turn on the thermostat, press and for 10seconds, LCD will display current temperature and
calibration temperature.
Press to reduce calibration temperature or press to increase.
FAN/AUTO FAN SELECTION:
Press for 10 seconds to enable fan or auto fan mode. In auto fan mode,AUTOwill be displayed in
clock area.
ADDRESS SETTING
Turn off the thermostat, simultaneously press and
for 5 seconds till to display “XX” and31on
clock region,press and to number the remote master address (Available range = 0~99). Press to
switch to the RP-2023 address, 32 will display on the clock region, press and to number them (Available
range from 1~32).
MOUNTING INSTRUCTION
Use the flush mounting box for each application.
SINGLE DEVICE
Open the mounting hole to its proper place using a
68 mm holesaw
Question and Answer IconNeed help?

Do you have a question about the Smallart RP-2023 and is the answer not in the manual?

Summary

Operation and Settings

Device Operation

Controls for turning the device on/off, setting temperature, selecting modes, and adjusting fan speed.

Key Locking Function

Enables or disables the key locking function by pressing specific buttons for 10 seconds.

Temperature Calibration

Procedure to calibrate room temperature by adjusting the displayed value.

Fan;Auto Fan Mode

Enables fan or auto fan mode by pressing a button for 10 seconds.

Address Setting

Configures the remote master address and the RP-2023 device address.

Mounting Instructions

Single Device Mounting

Instructions for mounting a single device using a flush mounting box and a 68 mm holesaw.

Multiple Device Mounting

Specifies hole spacing for multiple devices, requiring a minimum of 96 mm between centers.

Wire and Connecting

Wiring Diagram

Details on connecting terminals as per the wiring diagram using a screwdriver.

Cable Specifications

Use of shielded twisted-pair cable (2x2x0.34...0.75 mm2) with specific conductor types.

Termination Procedure

Guidance on inserting solid and fine-stranded conductors into terminals without damage.

Overview

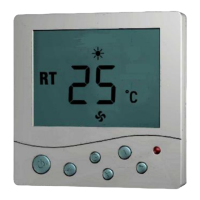
The Smallart RP-2023 is a Room Control Panel designed for temperature management and system control. It functions as a thermostat with various operational modes and user-friendly settings.

Function Description

The RP-2023 serves as a room thermostat, allowing users to control the temperature and operating mode of a heating, cooling, or ventilation system. It features an NTC sensing element for accurate temperature measurement and provides a clear digital display of both current and set-point temperatures. The device supports multiple operational modes including cooling, heating, ventilation, and auto mode, enabling flexible climate control. Additionally, it offers fan speed selection, allowing users to choose between high, medium, low, or auto fan speeds. Key locking functionality is available to prevent unauthorized changes, and a room temperature calibration feature ensures precise temperature readings. The device also supports address setting for integration into larger control systems, allowing it to be uniquely identified and controlled remotely.

Important Technical Specifications

  • Sensing Element: NTC
  • Accuracy: ± 1°C
  • Set-point Range: 5°C ~ 35°C
  • Display Range: 0°C ~ 50°C
  • Power Supply: 12VDC
  • Rated Power: < 1W
  • Dimensions: 86 x 86 x 13 mm (W x H x D)
  • Hole Pitch: 60 mm (Standard)
  • Protection Class: IP30
  • Operation Environment: 0°C ~ 45°C
  • Operating Humidity: 5% ~ 90%RH (non-condensing)
  • Communication: RS485 (requires shielded twisted-pair cable, 2 x 2 x 0.34...0.75 mm2)

Usage Features

Operation:

  • On/Off: Press the "D" button to turn the device on or off.
  • Setting Temperature: Use the "down arrow" button to reduce the set-point temperature and the "up arrow" button to raise it. Each press changes the temperature by 1°C.
  • Mode Selection: Press the "M" button to cycle through system working modes: cooling (snowflake icon), heating (sun icon), ventilation (fan icon), or auto mode.
  • Fan Speed Selection: Press the "fan icon" button to change the fan speed among high (Hi), medium (Med), low (Low), or auto.

Key Locking Function Setting:

  • To enable or disable the key locking function, turn on the thermostat, then press "M" and "up arrow" simultaneously for 10 seconds.

Room Temperature Calibrating:

  • To calibrate the room temperature, turn on the thermostat, then press "M" and "fan icon" simultaneously for 10 seconds. The LCD will display the current temperature and calibration temperature.
  • Use the "down arrow" button to reduce the calibration temperature or the "up arrow" button to increase it.

Fan/Auto Fan Selection:

  • Press the "fan icon" button for 10 seconds to enable either fan or auto fan mode. In auto fan mode, "AUTO" will be displayed in the clock area.

Address Setting:

  • To set the device address, turn off the thermostat.
  • Simultaneously press "M" and "fan icon" for 5 seconds until "XX" and "31" are displayed on the clock region.
  • Use the "down arrow" and "up arrow" buttons to number the remote master address (available range = 0-99).
  • Press the "fan icon" button to switch to the RP-2023 address. "32" will display on the clock region.
  • Use the "down arrow" and "up arrow" buttons to number the RP-2023 address (available range from 1-32).

Maintenance Features

Mounting Instruction: The RP-2023 is designed for flush mounting using a standard flush mounting box.

  • Single Device Mounting: Open the mounting hole to its proper place using a 68 mm holesaw.
  • Multiple Devices Mounting: Specify the centers of holes to be drilled in the wall, ensuring a minimum distance of 96 mm between the centers. Use a 68 mm holesaw for each mounting hole.

Installation Steps:

  1. Open the main control panel: Insert a 3.5mm screwdriver into the block 4mm along the bevel, prize up, and open the clips.
  2. Mount the back panel: Put the back panel of the thermostat into the mounting box, then fix it with the two screws provided in the packing box.
  3. Wire connections: Connect the wires to the terminals as per the wiring diagram, fixing them with a screwdriver. Ensure all wires are connected according to the wiring diagrams and kept away from water, mud, and other materials to prevent damage to the unit.
  4. Attach the cover: Put the cover on with a 30-degree angle, then fix the upper two clips. Push the places of the lower two clips, fix the cover, and complete the installation.

Wire and Connecting:

  • The device uses RS485 communication.
  • Use shielded twisted-pair cable (2 x 2 x 0.34...0.75 mm2) for wiring.
  • Inserting solid conductors: Push directly into the termination.
  • Inserting/removing fine-stranded conductors: Use the push button.
  • Important: Do not apply excessive pressure to avoid fracturing the terminals.

Smallart RP-2023 Specifications

General IconGeneral
BrandSmallart
ModelRP-2023
CategoryControl Panel
LanguageEnglish