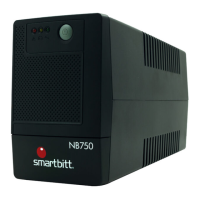
This document describes the Smartbitt SBPRM1800HUR Uninterruptible Power Supply (UPS), an intelligent line-interactive device designed to protect personal computers from various power interferences, including complete power failure. It functions as a battery backup, voltage regulator, and surge protector.
Function Description:
The Smartbitt SBPRM1800HUR UPS provides three core functions:
- Battery Backup: In the event of a power failure, the UPS automatically switches to battery power, giving users time to save their work and safely shut down their equipment.
- Surge Protection: It suppresses voltage spikes, preventing interference and malfunction of connected devices.
- Voltage Regulation (AVR - Automatic Voltage Regulation): Utilizing interactive technology, it regulates voltage fluctuations to deliver optimal and stable voltage to connected equipment, protecting them from over-voltage and under-voltage conditions.
Important Technical Specifications (Model: SBPRM1800HUR):
- Capacity: 1800 VA / 900 W
- Input Voltage: 110-120 VAC (default setting 120 VAC)
- Input Voltage Range: 81~134 VAC / 89~145 VAC
- Output Voltage Regulation (Normal Mode): 110-120 VAC (default setting 120 VAC)
- Output Voltage Regulation (Battery Mode): Default setting: 120 VAC ±5%
- Transfer Time: Typical 6 ms, 10 ms max.
- Waveform: Simulated Sine Wave
- Battery Type & Number: 12 V/9 AH x 2
- Breaker: 15A
- Charging Time: 6-8 hours to recover to 90% capacity
- Dimensions (DxWxH): 410 x 99 x 280mm
- Net Weight: 12 kgs
- Operation Altitude / Elevation: 0-2000m
- Humidity: 0-90% RH @ 0-40°C (non-condensing)
- Noise Level: Less than 45 dB
Usage Features:
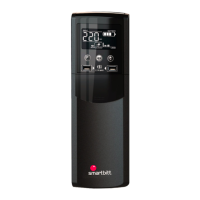
The UPS features an intuitive front panel with an LCD display and control buttons for easy operation and monitoring.
Product Overview (Front and Rear Panels):
- 1. LCD Display: Provides detailed information about the UPS status, including input/output voltage, frequency, load, battery level, estimated backup time, and fault codes.
- 2. Power Switch (ON/OFF Button): Used to turn the UPS ON or OFF by pressing and holding for 2 seconds.
- 3. Mute Button: In battery mode, pressing and holding this button for 1 second mutes audible alarms.
- 4. Up/Down Button: Used to switch between different display information on the LCD.
- 5. AC Input: Connects the UPS to utility power.
- 6. Circuit Breaker: Provides overload protection.
- 7. Surge-Protected Outlets: Outlets that offer surge protection for devices like printers, fax machines, or scanners, but do not provide battery backup during power failure.
- 8. Battery Backup Outlets: Outlets that provide battery backup, filtering, line conditioning, and surge protection for critical devices like computers and monitors.
- 9. Master Outlets: Two specific battery backup outlets.
- 10. Slave Outlets: Two outlets whose power is only available when loads are connected to the "Master Outlets." If no load is connected to the Master Outlets, the slave outlets automatically shut down.
- 11. HID USB Comm. Port: For connecting the UPS to a PC to install monitoring software (ViewPower).
- 12. Modem/Phone/Network Surge Protection (RJ45): Protects a single phone, modem, or fax line from surges.
- 13. Coax Surge Protection: Provides surge protection for coaxial cables.
- 14. USB Charger Ports: For charging USB-powered devices.
Installation Steps:
- Connect to Utility Power: Plug the AC power cord into a grounded outlet. The UPS will begin charging its internal battery. For best results, charge the battery for 6 hours before initial use.
- Plug in Equipment:
- Connect computers and monitors to the "Battery Backup" outlets (8).
- Connect printers, fax machines, or scanners to the "Surge Protected" outlets (7).
- Caution: Never connect laser printers or scanners to battery backup sockets as they can draw significant power and overload the UPS.
- Connect Modem/Phone Line (RJ45): Connect the incoming internet line to the "IN" socket and an internet line cable from the "OUT" socket to the modem input socket for surge protection.
- Connect Communication Port and Install Software (HID USB comm. port): Connect the USB cable from the UPS to a PC. Download the latest ViewPower software from
http://www.powersoftwaredownload.com and follow on-screen instructions for installation.
- Turn On The UPS: Press the ON/Mute button on the front panel.
- Note: The battery charges fully during the first five hours of normal operation. Full battery run capability should not be expected during this initial charge period.
LCD Display Modes:
- UPS Power On: All icons light up for 3 seconds.
- Standby Mode: Displays current status.
- Site Wiring Fault in Standby Mode: Indicates a wiring issue.
- AC Mode: Displays output voltage, frequency, input voltage, input frequency, output power (W), output power (VA), and estimated backup time. The AVR icon flashes every second when AVR is functioning.
- Overload in AC Mode: Alarm beeps every 0.5 seconds, and the overload icon flashes.
- Site Wiring Fault in AC Mode: Indicates a wiring issue.
- Battery Mode: Alarm beeps every 10 seconds. LCD information cycles through estimated backup time, output voltage, output frequency, input voltage, input frequency, output power (W), and output power (VA).
- Low Battery Level: Alarm beeps every second (cannot be muted), and the battery icon flashes.
- Overload in Battery Mode: Alarm beeps every 0.5 seconds, and the overload icon flashes.
- Note: The backlight is always on when any fault or warning occurs.
Fault Code Table (Displayed on LCD):
- E01 (Output short-circuited): Disconnect short-circuited loads and restart the UPS.
- E02 (Overload): Turn off the unit, remove unnecessary loads, and restart the UPS.
- E04 (Inverter/Output failure): Call for service immediately.
- E05 (Overcharge): Turn off the unit and wait for cooling, or remove excessive loads and wait for cooling.
- E06 (Battery voltage is too low): Call for service immediately.
- Note: If a fault alarm occurs, call for service immediately.
Troubleshooting:
- Nothing displayed on LCD panel:
- UPS is off: Press the power switch again to turn on the UPS.
- Battery voltage too low: Charge the battery for at least 6 hours.
- Battery fault: Replace the battery.
- UPS always on battery mode:
- Power cord loose: Re-plug the power cord.
- UPS continuously beeps:
- Check fault code for details.
- Backup time too short:
- Battery voltage too low: Charge the battery for at least 6 hours.
- Overload: Remove unnecessary loads. Reconnect equipment, ensuring the load matches UPS capability.
- Battery defect: Replace the battery.
Maintenance Features:
The UPS is designed for easy battery replacement.
Battery Replacement Steps:
- Turn off equipment: Disconnect all equipment plugged into the UPS output.
- Turn off UPS: Power off the UPS.
- Remove AC input plug: Unplug the UPS from the wall outlet.
- Remove all equipment: Disconnect all equipment from the UPS output sockets.
- Remove battery cover: Push down the front panel to remove the battery cover.
- Disconnect battery connector: Slide out the existing battery pack by grasping the pull tab.
- Caution: Do not short the positive and negative battery wires. Do not pull the battery pack out by its wires.
- Slide in new battery pack: Insert the new battery pack into the UPS.
- Verify polarity and reconnect: Ensure correct polarity and reconnect the battery connectors. Some sparking may occur, which is normal.
- Reinstall battery cover: Place the battery cover back onto the UPS. The UPS is now ready for normal operation.
- Notice: Properly dispose of old batteries at an appropriate recycling facility or return them to the supplier in the packing material for the new batteries.
Safety Instructions:
- SAVE THESE INSTRUCTIONS: This manual contains important instructions for installation and maintenance.
- Always read and follow all safety warnings and operating instructions.
- Caution - Risk of electric shock: The battery circuit is not isolated from input voltage. Hazardous voltages can occur between battery terminals and ground. Verify no voltage is present before touching.
- If any part of the battery is grounded, remove the ground connection.
- When changing batteries, install the same number and type of batteries.
- Do not dispose of batteries by burning (risk of explosion).
- Do not open or destroy batteries (escaping electrolyte is toxic and can cause injury).
- Replace fuses or circuit breakers only with the same type and amperage.
- Do not dismantle the UPS system; only specialized technical personnel should do so.
- Install the unit in a controlled environment (temperature-controlled, indoor area free of conductive contaminants). Avoid locations with standing/running water or excessive humidity.
- Do not plug the UPS input into its own output.
- Do not attach a power strip or surge suppressor to the UPS.
- FCC Class B Digital Device Compliance: This equipment complies with Part 15 of FCC Rules. It may cause radio interference if not installed/used according to instructions. To correct interference, reorient/relocate the antenna, increase separation between equipment/receiver, connect equipment to a different outlet, or consult a radio/TV technician.
- Battery Safety: Remove wristwatches, rings, and other metal objects. Use only tools with insulated grips. Wear rubber gloves and boots. Do not lay tools or metal parts on batteries. Disconnect charging source and load before installing/maintaining the battery. Remove battery grounds during installation/maintenance to reduce shock likelihood.
- Internal battery voltage is 12VDC, sealed, lead-acid 6-cell battery.
- Battery service should only be performed by qualified personnel.
- Hazardous voltage: Even when disconnected from mains, hazardous voltage may be accessible from the battery supply. Disconnect battery supply at the plus and minus poles for internal maintenance.
- To reduce overheating, do not cover cooling vents or expose the unit to direct sunlight or near heat-emitting appliances.
- Unplug the UPS before cleaning; do not use liquid or spray detergent.
- The outlet must be easily accessible and close to the equipment.
- Caution - Risk of explosion: If the battery is replaced with an incorrect type. Dispose of used batteries according to instructions.
- Do not attach medical equipment, life support equipment, microwave ovens, vacuum cleaners, etc., to the unit.