6
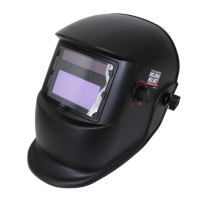
VII. DARK SHADER SELECTION
•
Select the shade level according to the welding process and the value
of the welding current by turning the potentiometer knob on the left side
of the helmet
•
The shade number can be between DIN9 to DIN13. Select a shade
number by turning the shade knob until the arrow points to the required
setting (See Shade Guide Table)
•
ALWAYS use suggested shade numbers instead of minimum shades.
•
Provide additional task lighting that suits welders' needs.
•
ALWAYS use the same shade as the welder's if you are directly
observing the welding arc.
LENS SHADE SELECTOR
Shade numbers are given as a guide only and may be varied to suit individual needs.
Process
Electrode Size in.
(mm)
Arc Current
(Amperes)
Minimum
Protective
Shade
Suggested*
Shade
No.
(Comfort)
Shielded Metal Are
Welding (SMAW)
Less than 3/32 (2.4)
3/32-5/32 (2.4-4.0)
5/32-1/4 (4.0-6.4)
More than ¼ (6.4)
Less than 60
60-160
160-250
250-550
7
8
10
11
-
10
12
14
Gas Metal
Arc
Welding
(GMAW)
and Flux Cored
Arc
Welding
(FCAW)
Less than 60
60-160
160-250
250-550
7
10
10
10
-
11
12
14
Gas Tungsten Arc
Welding (GTAW)
Less than 50
50-100
150-500
8
8
10
10
12
14
Air Carbon Arc
Cutting (CAC-A)
Less than 500
500-1000
10
11
12
14
Plasma Arc
Welding
(PAW)
Less than 20
20-100
100-400
400-800
6
8
10
11
6 to 8
10
12
14
Plasma Arc
Cutting
(PAC)
Less than 20
20-40
40-60
60-80
80-300
300-400
400-800
4
5
6
8
8
9
10
4
5
6
8
9
12
14
*As a rule of thumb, start with a shade that is too dark to see the weld zone. Then go to a lighter shade which gives sufficient
view of the weld zone without going below the minimum.