Do you have a question about the Smeg BLF01PBUS and is the answer not in the manual?
Specifies the appliance's intended purpose and suitable environments.
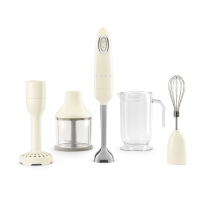
Provides in-depth descriptions of individual parts like jar and lid.
Step-by-step instructions for safely removing the blade assembly.
Instructions on assembling and operating the blender for use.
Explanation of specific features like Smooth Start and Pulse.
Guide to resolving common problems and their solutions.
This document outlines the operation, maintenance, and safety guidelines for a blender, designed for domestic use. It serves as a comprehensive guide for users to ensure safe and effective utilization of the appliance.
The blender is primarily designed for blending, emulsifying ingredients, and crushing ice. It features a powerful 600-watt motor housed in its base. The appliance is equipped with a safety lock system that prevents operation when the jar is not correctly in place, and a motor safety cut-out that trips if the motor is overloaded, ensuring user safety and appliance longevity.
The blender offers four continuous speeds (1 to 4) selectable via a control knob, allowing for precise control over blending tasks. Additionally, it includes a PULSE button for maximum blending speed, ideal for demanding tasks, which can be used for a maximum of 2 seconds at a time. The control knob also features two pre-set programs: 'Smoothie' and 'Ice Crush'. These programs automatically adjust the speed to optimize blending results for a specific duration, then turn off automatically. The 'Ice Crush' program is suitable for blending drinks with ice cubes or frozen fruit, while the 'Smoothie' program is designed for creating thick smoothies, blended drinks, and milkshakes from fruits, ice cream, and yogurt.
A unique 'Smooth Start' function initiates the appliance at a reduced initial speed, regardless of the speed set with the control knob. The speed then progressively increases until the selected speed is reached, allowing for gradual processing of ingredients and improved blending results. This feature is active when speeds between 0 and 4 are selected but does not apply to PULSE, ICE CRUSH, or SMOOTHIE programs.
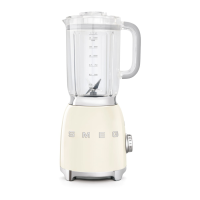
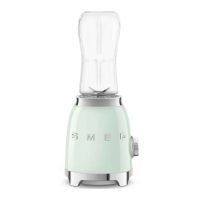
The blender jar has a capacity ranging from a minimum of 0.25 liters (1 cup) to a maximum of 1.5 liters (6 cups). It is made from Tritan™, a material that is safer, lighter, and more resistant to impacts, scratches, and heat than glass. The jar includes a handy lip for pouring and is marked in both liters and cups. The lid features a seal for a tight closure and a pouring hole in the center, facilitating the addition of ingredients during operation. The detachable blade assembly, made of stainless steel, is designed for crushing ice cubes and preparing various beverages like smoothies, milkshakes, and cocktails.
Before initial use, all stickers and labels should be removed, and the motor base cleaned with a damp cloth. The blender jar and blade assembly must be thoroughly washed and dried. To remove the blade assembly, the jar is lifted by its handle, the lid and measuring cup are removed, and the jar is turned upside down. The measuring cup is then inserted into the base of the blade assembly and turned counterclockwise to unscrew the blade assembly from the jar body.
To operate the blender, the jar is first inserted onto the motor base. Ingredients are then added, ensuring not to exceed the maximum capacity of 1.5 liters (6 cups). The lid, with the measuring cup fitted, is screwed firmly onto the blender jar. Once plugged into a power socket, a red LED will flash, indicating power is on. The desired speed or pre-set program is selected using the control knob, or the PULSE button can be pressed for manual operation. The START button initiates blending. During blending, additional ingredients can be added by removing the measuring cup and pouring them through the lid's hole. To stop the blending cycle, the START/STOP button is pressed. If a continuous speed was selected, the knob should be turned to 'O', and the blender unplugged.
For optimal results, food should be cut into cubes. The PULSE function should not be used for more than 2 seconds at a time for dry mixtures, and a spatula may be needed to push ingredients down the sides of the jar. When blending liquid and dry ingredients, liquids should be added first. Pits from fruit and bones from meat must always be removed to prevent damage to the blade assembly. Hot food should be allowed to cool to room temperature before blending.
Regular cleaning and care are essential for maintaining the blender. Before cleaning, the blender must be unplugged. The motor base should not be immersed in water or other liquids. Its external surfaces should be cleaned regularly with a soft, damp cloth and mild detergent. Cleaning products containing chlorine, ammonia, bleach, abrasive or corrosive detergents, or rough/sharp metal scrapers should not be used on metallic finishes or any part of the appliance.
The blender jar and blade assembly should be cleaned following the removal instructions. The blade assembly should only be handled using the measuring cup, and the blades themselves should never be touched directly. For convenience, the blender jar can be washed in a dishwasher without being placed upside down.
A 'Self-clean' option is available for the blender jar and blade assembly. This involves filling the jar with warm water and mild detergent, setting the control knob to '1', pressing the START button, and then pressing the PULSE button for 2 seconds at a time, repeating about 10 times. Afterward, the jar is emptied, rinsed, and thoroughly dried. The blender lid and measuring cup can be washed in warm soapy water or in the dishwasher and must be completely dried before reassembly.
In case of issues such as the motor overheating, the blender not starting, or vibrating, troubleshooting steps are provided. For instance, an overheated motor requires unplugging the blender and allowing it to cool. If the plug is not properly inserted, it should be reinserted, and adaptors or extensions avoided. If the cable is defective or the anti-slip rubber feet are worn, an authorized service center should be contacted. If the blender vibrates, it should be placed on a flat, stable surface. If the speed is too high or the load excessive, a lower speed should be selected, and the jar should not be overfilled. If the blender switches on but the blades do not turn, the jar needs to be correctly locked into its base. If the blender stops during operation and the white LED flashes, the blades may be jammed and need to be freed with a spatula after unplugging the blender. Any unresolved issues or other faults require contacting a local technical support center.
| Model | BLF01PBUS |
|---|---|
| Category | Blender |
| Type | Countertop Blender |
| Color | Pastel Blue |
| Power | 800 W |
| Capacity | 1.5 L |
| Pulse Function | Yes |
| Ice crushing | Yes |
| Body material | Plastic |
| Bowl material | Glass |
| Voltage | 220-240 V |
| Material | Plastic |
| Weight | 3.5 kg |