EasyManua.ls Logo

Smeg SE435S - User Manual

Smeg SE435S
12 pages
Print Icon
To Next Page IconTo Next Page
Loading...
Dear Customer,
Thank you for having purchased one of our products.
We are certain that this new, modern, functional and practical appliance, built with the very
highest quality materials, will meet your requirements in the best possible way. This hob is easy
to use. It is, however, important to thoroughly read the instructions in this handbook in order to
obtain the best results.
The manufacturer shall not be held responsible for any damages to persons or property
caused by incorrect installation or use of the appliance.
The Manufacturer shall not be held responsible for any inaccuracies in this handbook due to printing or
transcription errors; the designs in the figures are purely indicative. The Manufacturer also reserves the right
to make any modifications to the products as may be considered necessary or useful, also in the interests
of the user, without jeopardizing the main functional and safety features of the products themselves. This
cook top was designed to be used exclusively as a cooking appliance: any other use (such as
heating rooms) is to be considered improper and dangerous.
(01075UK)
INSTRUCTIONS AND ADVICE FOR THE
USE, INSTALLATION AND MAINTENANCE
OF BUILT-IN ELECTRIC HOBS
SMEG S.p.A.
Via Leonardo da Vinci, 4
42016 GUASTALLA - ITALIA
TIPO: PAZ04
MOD.: SE435S
Question and Answer IconNeed help?

Do you have a question about the Smeg SE435S and is the answer not in the manual?

Overview

This document provides comprehensive instructions and advice for the use, installation, and maintenance of built-in electric hobs. It emphasizes safety, proper operation, and care to ensure the appliance performs optimally and safely.

Function Description

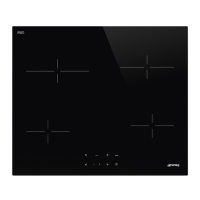
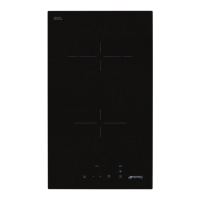
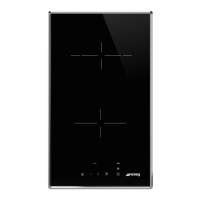
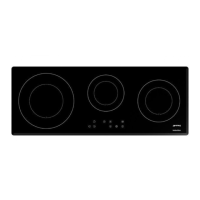
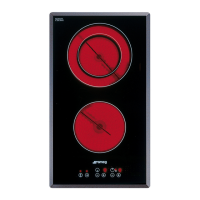
The electric hob is designed exclusively as a cooking appliance. It features multiple electric plates, which can be of three types: normal, thermostat, and rapid. These plates are controlled by either 7-position or 12-position switches, depending on the plate type, allowing for variable heat intensity. A red warning light indicates when a plate is in operation. The hob is built with high-quality materials, aiming for a modern, functional, and practical design to meet various cooking requirements.

Usage Features

The hob offers a range of heat intensities suitable for different cooking processes:

  • Off (0): Plates are switched off.
  • Weak (1 or 1-4): Ideal for dissolving butter, chocolate, or heating small amounts of liquid.
  • Low (2 or 1-4): Suitable for heating larger amounts of liquid, preparing creams and sauces requiring long, slow cooking times.
  • Slow (3 or 4-8): Used for thawing frozen foods, preparing stews, heating to boiling point, or simmering.
  • Medium (4 or 8-10): For heating foods to boiling point, or browning delicate meats and fish.
  • Strong (5 or 10-12): Recommended for escalopes and steaks, or simmering large amounts of food.
  • High (6 or 12): Best for bringing large amounts of liquid to the boil or for frying.

To ensure correct and efficient use, several guidelines are provided:

  • Always place a pan on the plate before switching it on.
  • Use pans with flat and very thick bottoms that are suited to the plate diameters. Avoid using pans smaller than the plate.
  • Dry the bottom of the pan before placing it on the plate.
  • Cook with a lid on whenever possible to save energy.
  • Turn down the heating element when it reaches boiling point.
  • Never cook food directly on the electric plates; always use a pot or container.
  • Do not operate the electric plates empty (without a container).
  • Avoid pouring liquids on the plates when they are hot.
  • The hob is not designed to work with an external timer or a remote control system.
  • Only use hob guards designed or indicated by the manufacturer.

Maintenance Features

Regular maintenance is crucial for preserving the appliance's appearance and functionality.

  • Cleaning: Always disconnect the appliance from the electricity main before any cleaning operation. Periodically wash the hot plate with lukewarm soapy water, then thoroughly rinse and dry all parts. Never wash the plates while they are still warm. Avoid using abrasive powders.
  • Special Products: To preserve the plate's clean and bright surface and prevent rust, treat it with special products easily available on the market after use.
  • Spills: Any overflowed liquid from pans must be removed immediately with a rag.
  • Burned Food: Burned food on an electric plate should be removed dry.
  • Post-Use Care: After use, pour a little lukewarm oil on the plate and wipe it with a cloth.
  • Chemical Exposure: Do not allow vinegar, coffee, milk, salted water, lemon, or tomato juice to remain in contact with the enamelled surfaces for long periods.
  • Steam Cleaning: Do not use a steam cleaning unit for stoves, hobs, and ovens.

Safety Warnings and Precautions

The manual emphasizes several critical safety warnings:

  • The appliance and its accessible parts become hot during use. Care should be taken to avoid touching heating elements.
  • Children less than 8 years of age must be kept away unless continuously supervised. Children aged 8 and above, and persons with reduced physical, sensory, or mental capabilities, or lack of experience and knowledge, can use the appliance if supervised and instructed on safe use and hazards. Children must not play with the appliance. Cleaning and user maintenance must not be performed by children without supervision.
  • Unattended cooking with fat or oil can be dangerous and lead to fire. NEVER try to extinguish a fire with water; instead, switch off the appliance and cover the flame with a lid or a fire blanket.
  • Do not store items on the cooking surfaces to prevent fire hazards.
  • If the appliance has a glass lid, it could shatter when the cooker becomes hot. Always disconnect all plates before closing the lid.
  • Immediately disconnect the appliance from the electricity main if cracks are noted on the surfaces of the plates.
  • The cooking process must be supervised continuously, especially short-term cooking.
  • Do not touch the appliance with wet or damp hands or feet, and do not use it barefoot.
  • During and immediately after operation, some parts of the cooktop are very hot; avoid touching them.
  • After using the cooktop, ensure the knob is in the closed position.
  • The appliance must not be operated with an external timer or a separate remote-control system.
  • Do not attempt to change the technical characteristics of the product, as it can be dangerous.
  • If the appliance is no longer to be used, make it inoperative before disposing of it, in conformity with current law, by making its dangerous parts harmless, especially for children.
  • The glue joining laminated plastic to furniture must resist temperatures not below 150 °C to prevent panel detachment.
  • The rear wall and adjacent surfaces must withstand a temperature of 90 °C.
  • Maintenance and repairs must only be performed by authorized personnel. In case of cable failure or cut, move away from the cable, do not touch it, unplug the device, and call an authorized service center.

Installation

Installation must be carried out by a qualified installer in conformity with current law and manufacturer's instructions. Incorrect installation can cause damage.

  • Unpacking: Check the appliance's condition after unpacking. Do not use if damaged and contact qualified personnel. Keep packaging materials away from children.
  • Mounting: The hob requires an opening in the modular cabinet according to specified measurements. If wood is installed above the hob, refer to hood manufacturer instructions for minimum distance.
  • Sealing: A special seal prevents liquid infiltration. Position seal "E" under the hob edge, ensuring it matches the outer perimetral edge. Fix the seal securely by pressing it in place.
  • Fixing: Remove the protective paper strip from the seal, hook the hob into its housings, and set it into the cabinet hole. Lock it in place with fixing screws "G".

Electrical Connections

Electrical connections must comply with specifications and provisions in force.

  • Pre-connection Checks: Verify that the voltage matches the specification plate, and the electrical system's wire section can support the load.
  • Earthing: The system must have an efficient earth connection. The manufacturer is not responsible for non-compliance.
  • Power Cable: If the appliance has no power cable, connect a cable of adequate section to the terminal strip, following the wiring diagram.
  • Socket Connection: If using a socket, fit a standard plug to the power cable (if supplied) that can bear the indicated load. Connect wires as per the diagram: L (live) = brown, N (neutral) = blue, Earth symbol = yellow-green.
  • Direct Connection: If connecting directly to the electricity main, install an omnipolar cutout between the appliance and the main, sized according to the appliance rating, with a contact opening of at least 3 mm. The earth wire must not be cut out by the switch. The connection may also be protected by a high-sensitivity differential switch.
  • Cable Positioning: The powering cable must be positioned so it never reaches a temperature of 90 °C.
  • Avoid Reductions: Never use reductions, adapters, or shunts for connection, as these can cause false contacts and overheating.
  • Accessibility: The outlet must be accessible after built-in installation.
  • Modifications: If the installation requires modifications to the home's electrical system or if the socket is incompatible, have changes performed by a professionally qualified person.
  • Conformity: All products conform to European Norms and directives regarding electromagnetic compatibility (EMC), electrical security (LVD), restriction of hazardous substances (RoHS), and EcoDesign (ERP).

Conversions

  • Changing Power Supply: The appliance may be converted from single-phase to three-phase. Disconnect from mains supply before conversions. Remove the hotplate, overturn it, unscrew screw "Z", and remove the underpart. Shift the connecting plate on the terminal according to the provided chart. Insert a supply cable of adequate section through the core hitch on the terminal board. Connect phase and earth wires to the terminal board. Fix the supply cable using a clamp. Refit the hotplate by reversing the steps.

Servicing

  • Always disconnect the appliance from the electricity main before any servicing.
  • Replacing Electrical Components: To access parts like plates, commutators, clamps, and input cable, remove the hotplate from the cabinet, overturn it, unscrew screw "Z", and remove the underpart.
  • Input Cable Replacement: If replacing the input cable, the installer must ensure the "earth" conductor is longer than "live" ones and respect the electrical connection cautions.
  • To reassemble, repeat the inverse process.
  • For repairs or adjustments, contact your Dealer or nearest After Sales Centre, specifying the type of fault and model. Only genuine spare parts are available from authorized service centers and retail outlets.

The appliance is marked according to European directive 2002/96/EC on Waste Electrical and Electronic Equipment (WEEE), providing a framework for return and recycling.

Smeg SE435S Specifications

General IconGeneral
Number of Cooking Zones4
Control TypeTouch control
Power Levels9
Total Power7.2 kW
Installation TypeBuilt-in
Number of zones4
Safety Featureschild lock
MaterialCeramic glass
Dimensions (WxD)59 x 52 cm

Related product manuals