Do you have a question about the Snapper RP21500 and is the answer not in the manual?
Emphasis on reading manual, understanding instructions, and using common sense.
Check guards, clear area of objects, wear proper footwear, safe fueling.
Avoid operating near parts, stop for hazards, react to abnormal vibration.
Procedure for stopping the engine and blade using the blade control.
Step-by-step guide for starting the engine using the rope start handle.
How to adjust cutting height using latches, and cutting recommendations.
Checking blade wear, balance, and sharpening procedures.
Procedure for adjusting the clutch linkage on self-propelled models.
Adjusting distance and tracking for optimal operation.
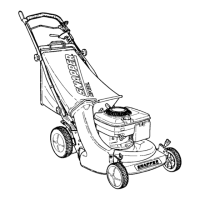
This document serves as the Safety Instructions & Operator's Manual for the SNAPPER 21" HI-VAC Walk Mowers, specifically covering Standard Models Series 0. It provides comprehensive guidance for safe operation, maintenance, and troubleshooting, ensuring users can effectively manage their lawn care tasks.
The SNAPPER 21" HI-VAC Walk Mowers are designed for residential and commercial lawn maintenance. These models are versatile, capable of performing various functions depending on the attachments used. They can discharge chopped and shredded mixed clippings (mulching), bag clippings (grass bagging), vacuum thatch (thatcherizing & grass bagging), or vacuum clippings and leaves (snapperizing & grass bagging). The manual details specific model designations, noting that a "D" prefix indicates side discharge models, an "M" prefix signifies recycling mowers, and a "P" prefix denotes self-propelled models. Engine types are also distinguished, with a "T" suffix for Tecumseh-powered models and others being Briggs & Stratton-powered. A "2" suffix indicates 2-cycle engines, and a "V" is used for engines with overhead valves.
The core function of these mowers is to cut grass efficiently and safely. The HI-VAC system is designed to create a strong vacuum effect, lifting grass blades for a cleaner, more even cut and effectively collecting clippings or thatch. The self-propelled models offer ease of use, reducing physical effort during operation, especially on larger lawns or slopes.
The manual emphasizes safety as paramount, with a dedicated section on "Important Safety Instructions." Users are warned about potential hazards and advised to read the manual thoroughly before operation. Key safety practices include keeping children and pets away from the operating area, wearing appropriate footwear and long pants, and never operating the mower barefoot or in open sandals.
Starting the engine involves specific steps: moving the engine control lever to the CHOKE position (or RUN for primer-equipped models), firmly holding the BLADE CONTROL against the UPPER HANDLE, and using back muscles to pull the ROPE START HANDLE. The BLADE CONTROL (7) stops the engine and blade when released, while the WHEEL DRIVE control (19) on self-propelled models stops forward movement.
Cutting height adjustment is a crucial feature, allowing users to tailor the mower's performance to different grass conditions. The four ADJUSTING LATCHES (1) can be pulled outward and slid into desired notches, with notch 5 being the highest cutting position and notch 1 the lowest. The manual recommends cutting no more than 1/3 of the grass height or a maximum of 2 inches. For optimal recycling, the cutting height should be set at notch 5 or 4, with the engine speed control in the fastest setting and the mower operated at the slowest ground speed.
Emptying the grass bag is straightforward: stop the engine, lift the BAG WIRE SUPPORT hooks (6) over the LOWER HANDLE (14), and then lift the BAG CONNECTOR (5) off the adaptor flange. The bag can be emptied by raising the connector end and releasing the door flap. For emptying into a trash bag, the CONNECTOR end is placed on the ground, the door flap opened, and a trash bag slipped over the BAG WIRE SUPPORT end.
The manual also provides tips for mowing and vacuuming, such as changing mowing patterns to create a smoother cut and allowing the lawn to be sprinkled after using dry-type fertilizer to avoid vacuuming it up. For self-propelled models, the GROUND SPEED CONTROL lever (12) allows users to adjust forward movement, and the WHEEL DRIVE CONTROL (19) engages the clutch for propulsion.
Regular maintenance is vital for the longevity and safe operation of the SNAPPER mower. The manual outlines a lubrication schedule, including changing engine oil every 25 hours (or as specified in the engine manual) and checking the oil level before each use. For self-propelled models, the transmission is factory-filled with SNAPPER "00" grease, and users are advised to check its condition every 25 hours by removing plug (A) and adding grease if not visible on the INPUT GEAR.
Cutting blade service is detailed, emphasizing frequent inspection for tightness and condition. The blade should be replaced if badly chipped, bent, noticeably out of balance, or has a notch worn in either tip (as shown in example B of FIG. 9). A warning is issued against operating the mower with a blade worn to the extent shown in example C, as the tip could fly off and cause injury or damage. For special recycling blades (NINJA), sharpening on a bench grinder at a 22 to 28-degree angle is recommended to restore their original shape. Safety precautions, such as disconnecting the spark plug wire and wearing gloves, are stressed during blade inspection and servicing.
Clutch linkage adjustment for self-propelled models is covered, addressing issues where excessive pressure is needed to hold the WHEEL DRIVE CONTROL lever. Proper adjustment ensures 1/16" to 1/8" clearance between the INSIDE of spring (B) hook and the INSIDE of the clutch cable "eye."
Driven disc service and adjustment are also explained. If the mower does not pull properly, users should check for grease on the drive disc, a broken or disconnected DRIVE SPRING, worn driven disc rubber ring, or worn belts. Adjustments involve ensuring the rubber ring contacts the drive disc surface 1/8" in front of the imaginary reference centerline. Driven disc replacement procedures are provided for when the rubber ring is badly chunked or worn.
Belt service includes instructions for ENGINE BELT REPLACEMENT, which involves disconnecting the spark plug wire, emptying the fuel tank, unhooking the idler arm spring, and removing the driven disc assembly. The process details how to remove the old belt and install a new one, ensuring all components are reassembled correctly.
For storage, the manual advises preparing the mower for "end of season" storage by disconnecting the spark plug wire, taping all openings to prevent water entry during washing, thoroughly cleaning the underside of the deck, lubricating exposed metal, emptying and washing the grass bag, and storing the mower in a dry, protected area. Instructions for tilting handles on both push and self-propelled models for compact storage are also provided.
The manual concludes with a list of SNAPPER walk-behind mower accessories for 19", 20", and 21" steel and cast aluminum decks, categorized by part number and model compatibility. This allows users to identify and acquire additional components for mulching, bagging, or other specific lawn care needs.
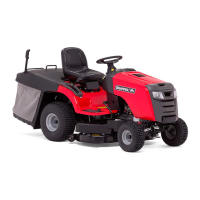
| Deck Material | Steel |
|---|---|
| Self-Propelled | Yes |
| Engine | Briggs & Stratton |
| Cutting Width | 21 in |
| Wheel Size (Front) | 8 in |
| Drive Type | Rear Wheel Drive |
| Grass Discharge | Side discharge |