Do you have a question about the SNOWJOE Pro Series and is the answer not in the manual?
Highlights critical warnings and cautions for safe operation and maintenance.
Essential safety guidelines for handling, charging, and storing batteries and chargers.
Guidelines for safe use of the charger, cords, and avoiding electrical hazards.
Specific safety instructions for operating the walk-behind snow blower.
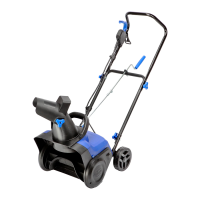
Step-by-step guide for connecting the snow blower handles.
Instructions for attaching and adjusting the discharge chute.
Detailed steps for connecting and charging the lithium-ion battery pack.
Step-by-step guide to safely start and stop the cordless snow blower.
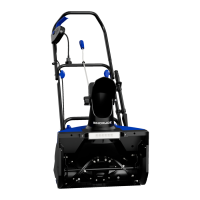
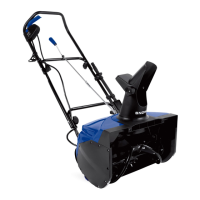
The device in question is a PRO SERIES CORDLESS SNOW BLOWER, model iON18SB-PRO-RM, designed for residential use. It operates on a 40-volt lithium-ion battery system, offering a cordless solution for snow removal.
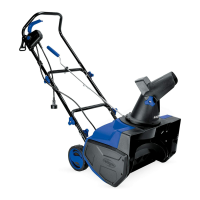
The primary function of this device is to clear snow from paved surfaces. It utilizes a steel auger with two rubber blades to collect and discharge snow. The snow blower is equipped with a 180° auto-rotate chute, allowing the user to control the direction of snow discharge, and a chute deflector to adjust the height of the snow stream. An integrated 3-watt LED light is provided for nighttime snow removal, enhancing visibility during operation in low-light conditions. The brushless motor ensures efficient performance.
Before operation, users must ensure the battery pack is fully charged. The battery pack, EcoSharp® PRO iBAT40XR, is partially charged upon receipt and requires a full charge before first use. The charging process involves inserting the battery into the iCHRG40 charger, which indicates charging status via LED lights. The battery pack features a push-button indicator to check its charge level, with three LEDs indicating high, 60% capacity, and 30% capacity, respectively. It is recommended to charge the battery frequently to avoid low discharge cycles and to "top-off" the charge before large jobs. The battery should be stored in a cool, dry place, ideally at 59°F (15°C) and at least 40% charged, to prolong its lifespan.
To start the snow blower, the safety switch button must be pressed first, followed by pulling the ON/OFF switch bar lever. Releasing the lever powers off the machine. The device is designed for use on paved surfaces; caution is advised when operating on gravel or unpaved surfaces to prevent throwing loose material. Users should maintain proper footing and balance, avoiding overreaching. The snow blower should be pushed gently and evenly, matching its throw rate, and not forced, to prevent motor damage. It is crucial to clear the work area of foreign objects like rocks, glass, nails, wire, or string before operation, as these can be picked up by the rotor blades and thrown, causing serious injury or damage. The discharge chute should never be directed at the operator, bystanders, vehicles, or windows.
The chute direction can be adjusted 180 degrees using a remote switch, and the chute deflector's height can be modified by loosening and tightening knobs. It is important to ensure the chute deflector is securely locked onto the discharge chute to prevent openings that could allow foreign objects to be thrown. The LED light can be activated via a switch on the harness and its position adjusted for optimal illumination.
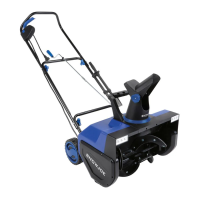
Regular maintenance is crucial for the safe and optimal operation of the snow blower. Before any maintenance, the power switch must be turned off, and the battery disconnected. Users should check bolts and screws frequently for proper tightness. After each snow removal session, the snow blower should be run for a few minutes to prevent freezing of the collector/impeller, then shut off, and residual ice and snow wiped from the unit. Rotating the chute deflector several times helps remove excess snow.
The rubber plates on the auger are wearing parts and will need replacement over time. When replacing them, users should pay close attention to the removal order and insert new plates in reverse order, securing them with nuts and bolts. The scraper bar, located at the base of the rotor housing, is also a wearing part and can be replaced by removing and re-fastening four screws.
For battery and charger care, it is essential to keep them dry and away from moisture. They should not be immersed in liquid. Dust and debris should be cleaned from charger vents and electrical contacts using compressed air. Mild soap on a damp cloth can be used to clean the battery pack and charger, avoiding electrical contacts and harsh cleaning agents or solvents. The battery pack and charger should be stored at room temperature, and the battery pack should be recharged every 6 months to 50% capacity during off-season storage to maintain optimal performance. Batteries should never be burned or incinerated and must be disposed of according to federal, state, and local regulations. The battery pack is sealed and maintenance-free, and the charger has no serviceable parts, meaning users should not attempt to disassemble them. For any repairs or replacement parts, users should contact an authorized Snow Joe® + Sun Joe® dealer or customer service.
| Power Source | Electric |
|---|---|
| Voltage | 120 V |
| Amperage | 15 A |
| Engine Type | Brushless |
| Warranty | 2 Year |