Do you have a question about the Sony Alpha FX3 and is the answer not in the manual?
Connect battery charger to wall outlet and insert battery pack.
Open battery cover and insert battery pack while pressing lock lever.
Remove camera and handle shoe caps before attaching.
Set power switch to ON, select language/area via control wheel.
Open memory card cover, insert card into Slot 1, ensure it clicks.
Access the online guide for detailed identification of camera components.
Select Movie mode, press REC button to start/stop recording.
Select shooting mode, focus, and press shutter button fully.
Press Playback button, use control wheel to select and view media.
Find detailed information on camera menu settings via the online guide.
Covers handling, monitor, continuous shooting, memory cards, tripods, and accessories.
Includes notes on network functions, Wi-Fi frequency, and temporary disabling.
Specific precautions for using the XLR handle unit and power cord.
Details on camera type, image sensor, monitor, general specs, and wireless LAN.
Specifications for XLR handle unit, battery charger, and rechargeable battery pack.
Lists trademarks for Sony technologies and general product names.
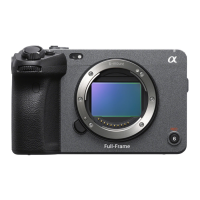
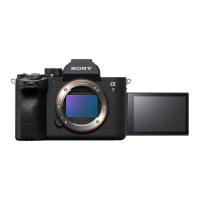
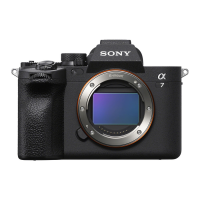
This document describes the Sony ILME-FX3, an interchangeable lens digital camera designed for professional movie shooting and still image capture. It comes with an XLR handle unit for enhanced audio capabilities and a range of accessories to support its operation.
The Sony ILME-FX3 is a versatile digital camera that supports both CFexpress Type A and SD memory cards for recording. It is equipped with an E-mount for interchangeable lenses, allowing users to select from a wide range of Sony lenses to suit various shooting scenarios. The camera's primary function is to capture high-quality movies and still images, with a focus on professional video production.
The camera features a 7.5 cm (3.0 type) TFT touch panel monitor for easy navigation and settings adjustment. It includes a power switch for turning the device on and off, a control wheel for menu navigation and selection, and dedicated buttons for MODE selection, REC (recording), and playback.
A key feature of the ILME-FX3 is its XLR handle unit, which allows for the simultaneous connection of up to four audio devices, significantly enhancing its audio recording capabilities for professional use. This handle unit attaches securely to the camera's Multi Interface Shoe.
To begin using the camera, users must first insert a charged battery pack. The battery charger connects to a wall outlet, and the CHARGE lamp indicates the charging status. Once the battery is inserted into the camera, the power switch can be set to "I" (On). Upon the first power-on, the camera guides the user through selecting the desired language and area, followed by initial settings application. Setting the date and time is also a crucial step, accessible through the MENU button under (Setup) → [Area/Date] → [Area/Date/Time Setting].
The camera supports both CFexpress Type A and SD memory cards. Users should open the memory card cover and insert the card into Slot 1, ensuring the label faces the monitor for CFexpress Type A cards or the terminal faces the monitor for SD cards. The camera allows users to change which memory card slot to use via the MENU settings under (Shooting) → [Media] → [ Rec. Media Settings] → [ Recording Media] or [☑ Recording Media]. Formatting the memory card on the camera is recommended for optimal performance, especially when using a new card.
Attaching a lens involves removing the body cap from the camera and the rear lens cap from the lens. The lens is then mounted by aligning the two white index marks on both the lens and camera. While gently pushing the lens towards the camera, it should be slowly turned in the direction of the arrow until it clicks into a locked position.
To attach the XLR handle unit, users must first remove the shoe cap from both the camera and the handle unit. The XLR handle unit then slides into the Multi Interface Shoe until it reaches the back, and the screws on either side must be securely tightened using a coin or similar tool. Before connecting or disconnecting external microphones or devices to the INPUT1 or INPUT2 jacks, the INPUT1 (LINE/MIC/MIC+48V) or INPUT2 (LINE/MIC/MIC+48V) switch must be set to a position other than "MIC+48V" to prevent loud noise or device malfunction.
To shoot movies, press the MODE (Mode) button, use the control wheel to select ►(Movie), and then press the center button. Recording starts by pressing the REC (Recording) button and stops by pressing it again. Movie recording can be initiated from any shooting mode by default.
For still images, press the MODE (Mode) button, use the control wheel to select the desired shooting mode, and then press the center button. To focus, press the shutter button halfway down. To capture the image, press the shutter button all the way down.
To switch to playback mode, press the (Playback) button. Images can be selected using the control wheel, moving to previous or next images by pressing the left/right sides of the control wheel. To play back a movie, press the center button on the control wheel.
The camera includes wireless LAN functionality. For outdoor use, it is recommended to set the Wi-Fi Frequency Band to 2.4 GHz via MENU (Network)→ [Wi-Fi]→ [Wi-Fi Frequency Band]. For situations like airplane travel, all wireless network functions can be temporarily turned off using [Airplane Mode].
The camera is designed to be dust- and moisture-resistant but is not waterproof. Users should avoid exposing the lens to strong light sources like direct sunlight, as this can cause smoke, fire, or malfunction. If the camera must be left exposed to such light, the lens cap should be attached. Direct exposure to laser beams can damage the image sensor. Users should not look at sunlight or strong light sources through the lens when it is detached, as this can cause irreversible eye damage or camera malfunction.
The camera and its accessories contain magnets that may interfere with medical devices such as pacemakers. Users with such devices should consult a doctor before use. Volume should be increased gradually to avoid sudden loud noises, especially when using headphones. The camera, accessories, and memory cards should be kept out of reach of infants to prevent accidental swallowing. Care should be taken not to obstruct the cooling fan while it is in operation.
During continuous shooting, the monitor may flash between the shooting screen and a black screen. If this causes discomfort, users should stop using the camera and consult a doctor. Recording for long periods or recording 4K movies can cause the camera body and battery to become warm, which is normal. Prolonged skin contact with a warm camera, especially in high-temperature environments or with impaired skin sensation, can cause low-temperature burns. Users should avoid touching the ventilation outlet for extended periods to prevent low-temperature burns.
Memory cards may become hot after recording; this is not a malfunction. If the overheating warning icon is displayed, the memory card should not be removed immediately. Instead, turn off the camera and wait for it to cool down before removal to prevent damage.
When using a tripod, ensure the screw is less than 5.5 mm (7/32 inches) long to securely fasten the camera and prevent damage.
Users are warned that unauthorized recording of copyrighted materials is contrary to copyright laws. When uploading and sharing images or movies with location information linked to a smartphone application, users should be aware that this information may be revealed to third parties. To prevent this, the [Location Information Linkage] function should be deactivated.
Before discarding or transferring the camera to others, users should perform a [Setting Reset] → [Initialize] operation to protect private information. Similarly, before transferring a memory card, users should use data deletion software to completely erase data, as formatting or deleting on the camera or computer may not be sufficient. Physical destruction of the memory card is recommended when discarding it.
Users should be aware that when using network functions, unintended third parties may access the camera depending on the network environment. Sony is not responsible for any loss or damage caused by connecting to such network environments.
Operating the handle or changing INPUT1/INPUT2 switch settings during recording will introduce noise into the recording. If the handle's microphone is near a speaker, acoustic feedback may occur; users should move the handle away or lower the speaker volume. The microphone surface should be clean for successful recording. The internal microphone of the camera cannot record audio input when the handle is connected and the HANDLE AUDIO ON/OFF switch is ON. The handle-attachment screws must be securely fastened to prevent damage to the Multi Interface Shoe terminal or the handle falling off.
Specific power cords are supplied for different regions (UK, Ireland, Malta, Cyprus, Saudi Arabia, other EU countries/regions). Users should use the appropriate power cord for their country/region.
The monitor is manufactured with high-precision technology, ensuring over 99.99% operational pixels. Small black or bright dots (white, red, blue, or green) may appear constantly; these are manufacturing imperfections and do not affect recorded images. If the monitor is damaged, its use should be discontinued immediately to prevent injury.
The document does not explicitly detail maintenance features but implies general care through its "Notes on use" section. This includes:
| Effective Megapixels | 12.1 MP |
|---|---|
| Image Stabilization | 5-axis in-body stabilization |
| Lens Mount | Sony E-mount |
| Dimensions | 129.7 x 77.8 x 84.5 mm |
| Sensor Type | Exmor R CMOS |
| Sensor Resolution | 12.9 megapixels |
| ISO Sensitivity | 80 to 409600 |
| Autofocus System | Fast Hybrid AF |
| Video Recording | 4K UHD up to 120p |
| Internal Recording | XAVC S, XAVC HS, XAVC S-I |
| LCD Screen | 3.0-inch touch screen |
| Connectivity | Wi-Fi, Bluetooth |
| Weight | 715g (body only) |
| Audio Input | 3.5mm microphone jack, XLR via adapter |
| Storage Media | CFexpress Type A / SD card (2 slots) |