5
CDX-GT610U/GT660U/GT660US
SECTION 1
GENERAL
This section is extracted
from instruction manual.
• LOCATION OF CONTROLS
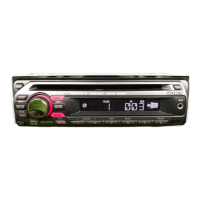
• CDX-GT610U
• CDX-GT660U: E, Chinese model/GT660US
6
Location of controls and basic operations
Main unit
Front panel removed
Card remote commander
RM-X151
Refer to the pages listed for details. The
corresponding buttons on the card remote
commander control the same functions as those
on the unit.
A OFF button
To power off; stop the source.
B DSO button 4
To select the DSO mode (1, 2, 3 or OFF).
The larger the number, the more enhanced
the effect.
C Volume control dial/select button 10
To adjust volume (rotate); select setup items
(press and rotate).
D SOURCE button
To power on; change the source (Radio/CD/
MD*
1
/USB/AUX/SAT*
2
).
E Display window
F USB terminal 9
To connect to the USB device.
G OPEN button 5
OFF
OPEN
DSPL SCRL
SEEK SEEK
PAUSE
GP/ALBM
REP SHUF
BBE MP
PUSH SELECT
123456
MODE
DSO
BTM
CAT
EQ3
SOURCE
1
q;
9 qa qd qgqs
2
qf
4 5
8
67
3
CDX-GT610U
RESET
qj qkqh
OFF
DSPL
SCRL
SEL
SOURCE
MODE
132
465
ATT
VOL
+
–
+
–
4
ws
qs
1
qg
ql
qd
wa
w;
wf
wd
7
H EQ3 (equalizer) button 10
To select an equalizer type (XPLOD,
VOCAL, EDGE, CRUISE, SPACE,
GRAVITY, CUSTOM or OFF).
I Receptor for the card remote
commander
J SEEK –/+ buttons
CD/MD*
1
/USB*
3
:
To skip tracks (press); skip tracks
continuously (press, then press again within
about 1 second and hold); reverse/fast-
forward a track (press and hold).
Radio:
To tune in stations automatically (press); find
a station manually (press and hold).
K BTM/CAT*
2
button 8
To start the BTM function (press and hold).
L MODE button 8, 10, 11
To select the radio band (FM/AM); select the
SAT tuner band (mode)*
2
; select the unit*
4
;
select the play mode*
5
.
M DSPL (display) button 8, 9
To change display items.
N Number buttons
CD/MD*
1
/USB*
3
:
(1)/(2): GP*
6
/ALBM*
7
–/+
To skip albums (press); skip albums
continuously (press and hold).*
8
(3): REP 8, 10, 12
(4): SHUF 8, 10, 12
(5): BBE MP*
9
2
To activate the BBE MP function, set
“BBE MP-ON.” To cancel, set “BBE
MP-OFF.”
(6): PAUSE*
9
To pause playback. To cancel, press
again.
Radio:
To receive stored stations (press); store
stations (press and hold).
O SCRL (scroll) button 8, 9
To scroll the display item.
P RESET button 4
Q Z (eject) button 5
To eject the disc.
R Disc slot 5
To insert the disc.
The following buttons on the card remote
commander have also different buttons/functions
from the unit. Remove the insulation film before
use (page 4).
ql < (.)/, (>) buttons
To control CD/radio/MD/USB, the same as
(SEEK) –/+ on the unit.
w; VOL (volume) +/– button
To adjust volume.
wa ATT (attenuate) button
To attenuate the sound. To cancel, press
again.
ws SEL (select) button
The same as the select button on the unit.
wd M (+)/m (–) buttons
To control CD, the same as (1)/(2) (GP/
ALBM –/+) on the unit.
wf Number buttons
To receive stored stations (press); store
stations (press and hold).
*1
When an MD changer is connected.
*2
When the SAT tuner is connected.
*3
When a USB device is connected.
*4
When a CD/MD changer is connected.
*5
When an ATRAC Audio Device is connected.
*6
When an ATRAC CD is played.
*7
When an MP3/WMA/AAC is played.
*8
If the changer/USB is connected, the operation is
different, see page 12.
*9
When playing back on this unit and a USB device.
Notes
•
When ejecting/inserting a disc, keep any USB
devices disconnected to avoid damage to the disc.
•
If the unit is turned off and the display disappears, it
cannot be operated with the card remote
commander unless
(SOURCE)
on the unit is
pressed, or a disc is inserted to activate the unit first.
Tip
For details on how to replace the battery, see
“Replacing the lithium battery of the card remote
commander” on page 15.
About USB cap
When not using the USB terminal (
F
), use the
supplied USB cap to prevent dust or dirt entering.
Keep the USB cap out of the reach of children to
prevent accidental swallowing.
6
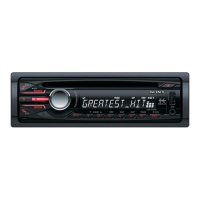
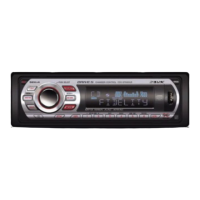
Location of controls and basic operations
Main unit
Front panel removed
Card remote commander
RM-X151
Refer to the pages listed for details. The
corresponding buttons on the card remote
commander control the same functions as those
on the unit.
A OFF button
To power off; stop the source.
B DSO button 4
To select the DSO mode (1, 2, 3 or OFF).
The larger the number, the more enhanced
the effect.
C Volume control dial/select button 10
To adjust volume (rotate); select setup items
(press and rotate).
D SOURCE button
To power on; change the source (Radio/CD/
MD*
1
/USB/AUX).
E Display window
F USB terminal 9
To connect to the USB device.
G OPEN button 5
OFF
OPEN
DSPL SCRL
SEEK SEEK
PAUSE
GP/ALBM
REP SHUF
BBE MP
PUSH SELECT
123456
MODE
DSO
BTM
EQ3
SOURCE
1
q;
9 qa qd qhqs
2
qg
4 5
8
67
3
CDX-GT660US
CDX-GT660U
qf
RESET
qk qlqj
OFF
DSPL
SCRL
SEL
SOURCE
MODE
132
465
ATT
VOL
+
–
+
–
4
wd
qs
1
qh
w;
qd
ws
wa
wg
wf
7
H EQ3 (equalizer) button 10
To select an equalizer type (XPLOD,
VOCAL, EDGE, CRUISE, SPACE,
GRAVITY, CUSTOM or OFF).
I Receptor for the card remote
commander
J SEEK –/+ buttons
CD/MD*
1
/USB*
2
:
To skip tracks (press); skip tracks
continuously (press, then press again within
about 1 second and hold); reverse/fast-
forward a track (press and hold).
Radio:
To tune in stations automatically (press); find
a station manually (press and hold).
K BTM button 8
To start the BTM function (press and hold).
L MODE button 8, 10, 12
To select the radio band (FM/AM); select the
unit*
3
; select the play mode*
4
.
M DSPL (display) button 8, 9
To change display items.
N Frequency select switch (located on the
bottom of the unit)
See “Frequency select switch” in the
supplied installation/connections manual.
O Number buttons
CD/MD*
1
/USB*
2
:
(1)/(2): GP*
5
/ALBM*
6
–/+
To skip albums (press); skip albums
continuously (press and hold).*
7
(3): REP 8, 10, 12
(4): SHUF 8, 10, 12
(5): BBE MP*
8
2
To activate the BBE MP function, set
“BBE MP-ON.” To cancel, set “BBE
MP-OFF.”
(6): PAUSE*
8
To pause playback. To cancel, press
again.
Radio:
To receive stored stations (press); store
stations (press and hold).
P SCRL (scroll) button 8, 9
To scroll the display item.
Q RESET button 4
R Z (eject) button 5
To eject the disc.
S Disc slot 5
To insert the disc.
The following buttons on the card remote
commander have also different buttons/functions
from the unit. Remove the insulation film before
use (page 4).
w; < (.)/, (>) buttons
To control CD/radio/MD/USB, the same as
(SEEK) –/+ on the unit.
wa VOL (volume) +/– button
To adjust volume.
ws ATT (attenuate) button
To attenuate the sound. To cancel, press
again.
wd SEL (select) button
The same as the select button on the unit.
wf M (+)/m (–) buttons
To control CD, the same as (1)/(2) (GP/
ALBM –/+) on the unit.
wg Number buttons
To receive stored stations (press); store
stations (press and hold).
*1
When an MD changer is connected.
*2
When a USB device is connected.
*3
When a CD/MD changer is connected.
*4
When an ATRAC Audio Device is connected.
*5
When an ATRAC CD is played.
*6
When an MP3/WMA/AAC is played.
*7
If the changer/USB is connected, the operation is
different, see page 12.
*8
When playing back on this unit and a USB device.
Notes
•
When ejecting/inserting a disc, keep any USB
devices disconnected to avoid damage to the disc.
•
If the unit is turned off and the display disappears, it
cannot be operated with the card remote
commander unless
(SOURCE)
on the unit is
pressed, or a disc is inserted to activate the unit first.
Tip
For details on how to replace the battery, see
“Replacing the lithium battery of the card remote
commander” on page 15.
About USB cap
When not using the USB terminal (
F
), use the
supplied USB cap to prevent dust or dirt entering.
Keep the USB cap out of the reach of children to
prevent accidental swallowing.
 Loading...