masterpage:Left
specdef v20060111
filename[G:\FM\Sony\0607\DAV-X10_CEL\Source\3210565321DAVX10\gb12adv.fm]
model name [DAV-X10]
[3-210-565-32(1)]
80
GB
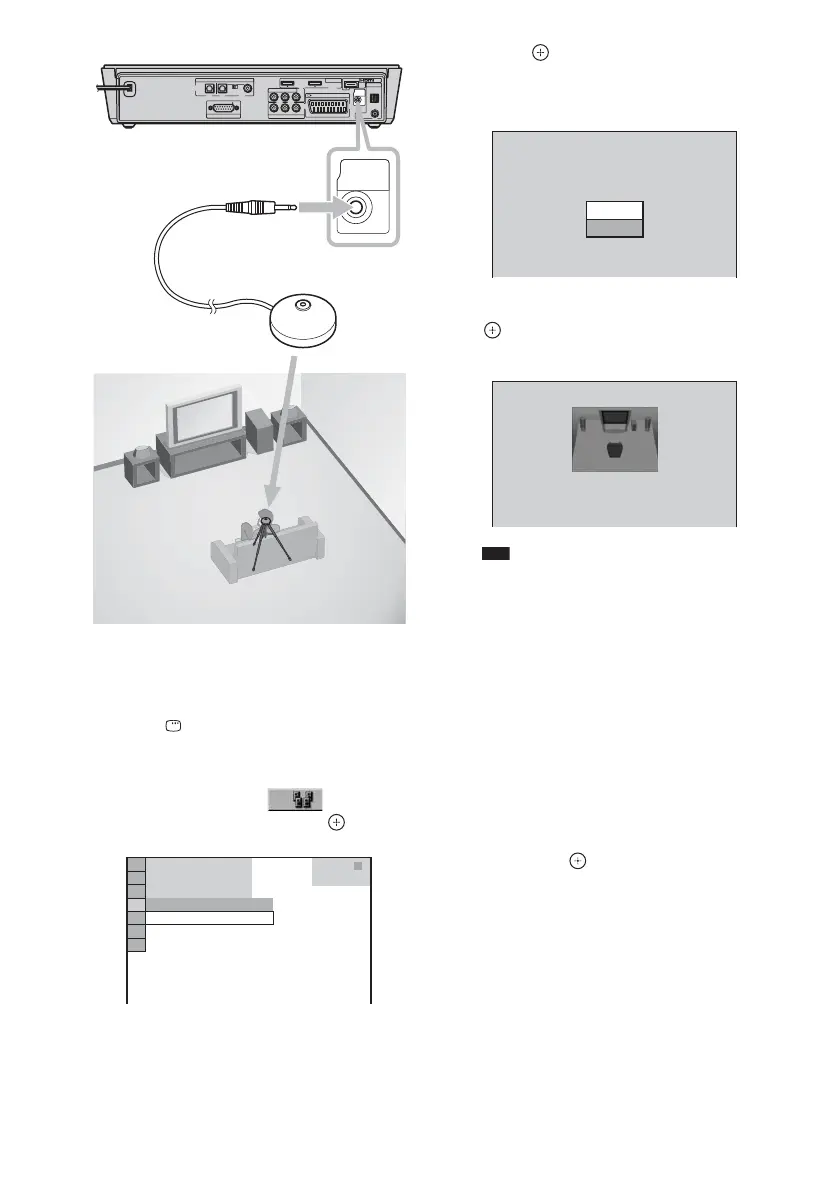
2 Press FUNCTION repeatedly until
“DVD” appears in the front panel
display.
3 Press DISPLAY when the system is
in stop mode.
The Control Menu display appears.
4 Press X/x to select [AUTO
CALIBRATION], then press .
5 Press .
The [AUTO CALIBRATION] display
appears.
6 Press X/x to select [YES], then press
to start the auto calibration.
Be quiet during the measurement.
Note
• Avoid being in the measurement area and
making noise during the measurement (about 1
minute), to avoid measurement failure. During
the measurement, test signals are output from
the speakers.
• The environment of the room in which the
system is installed may affect measurements.
• If an error message appears, follow the message,
then select [YES].
An error message appears when:
– the calibration mic is not connected.
– front speakers are not correctly connected.
– subwoofer is not connected.
7 Press C/X/x/c to select [YES] or [NO],
then press .
SPEAKER
IMPEDANCE USE 4
EURO AV OUTPUT(TO TV)
COMPONENT VIDEO OUT
Y
P
B
/
C
B
P
R
/
C
R
SAT/CABLE IN
SAT/
CABLE
TV
VIDEO
DIGITAL IN
AUDIO
R
COAXIALOPTICAL OPTICAL
L
ANTENNA
DMPORT
AM
OUT
75 COAXIAL
(DVD
ONLY)
(DVD ONLY)
21
FM
ECM-AC2
A.CAL
MIC
ECM-AC2
A.CAL
MIC
Calibration mic
Side view
START
T
0 : 0 3 : 0 4
3
(
2 8
)
1
(
4 4
)
DVD VIDEO
AUTO CALIBRATION
Connect calibration mic. Start
measurement?
YES
AUTO CALIBRATION
NO
Measuring. Please wait a moment.



 To Next Page