l'>i~@@~!O
DATE
f
SLEEP
OFF
To
cancel
Automatic
DST/SummerTime
adjustment
during
the
daylight
saving
time
(summer
time)
period
The
Automatic
DST/Summer
Time
adjustment
can
be
canceled.
Press and hold CLOCK and BRIGHTNESS/ TIME
ZONE at
the
same
time
while the clock
is
displayed.
''Auto
-+
OFF" appears in
the
display to show
that Automatic
DST/Summer
Time
adjustment
has been canceled.
The
display returns
to
the
clock.
Notes
•
The
change timing
of
Automatic
DST/Summer
Time
adjustment
employed by
the
unit
(see
above) is subjected to variation by
circumstances and
the
law in each
countryl
region. In such a case. cancel
the
Automatic
DST/Summer
Time
adjustment
and
set
the
DST display manually as necessary.
Customers
living in a
countrylregion
that does
not
use
the
daylight saving time
(summer
time)
must
cancel Automatic DST
ISummer
Time
adjustment
before using
the
unit.
•
To
activate Automatic DST
ISummer
Time
adjustment
again, press
and
hold
CLOCK
and
BRIGHTNESS/ TIME ZONE
at
the same time.
''Auto -7
ON"
appears in the display
to
show
that Automatic
DST/Summer
Time
adjustment
has
been
activated.
The
display
returns
to the
dock.
l-
+:J
VOLUME
PULL
OPEN
...
t:jJ
SLEEP
PRESET
~
o
MEMORY/
DISPLAY
+
AlARMnMESET
TUNING
o
o
MODE
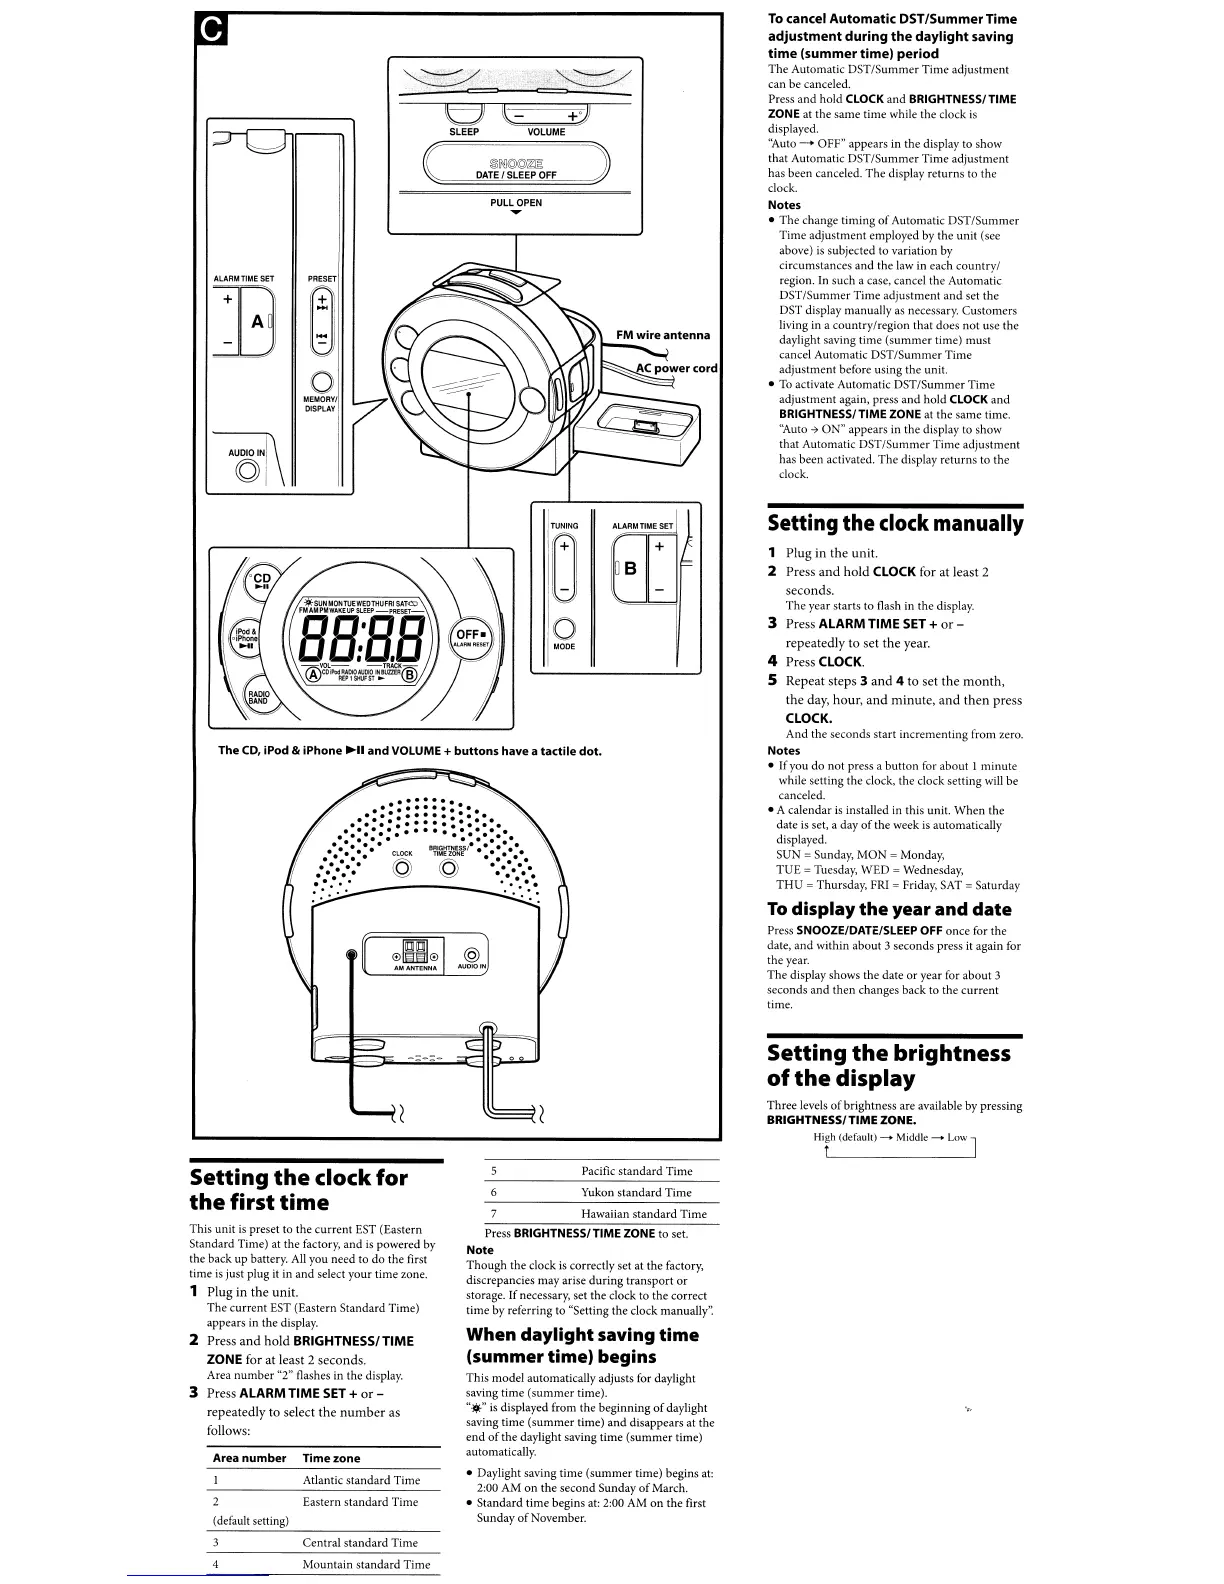
The
CD,
iPod &
iPhone
~II
and
VOLUME +
buttons
have a
tactile
dot.
Setting
the
clock manually
1
Plug
in
the
unit.
2 Press
and
hold
CLOCK for
at
least
2
seconds.
The
year starts to flash in
the
display.
3 Press ALARM TIME
SET
+
or-
repeatedly
to
set
the
year.
4 Press CLOCK.
S Repeat steps 3
and
4
to
set
the
month,
the
day,
hour,
and
minute,
and
then
press
CLOCK,
And
the seconds
start
incrementing
from zero.
Notes
•
If
you
do
not press a
button
for about 1
minute
while setting
the
dock,
the
dock
setting will
be
canceled.
• A calendar is installed in this unit.
When
the
date is set, a day
of
the
week
is
automatically
displayed.
SUN
=Sunday, MON =Monday,
TU
E= Tuesday, WED = Wednesday,
THU
=Thursday,
FRI
=
Friday,
SAT
=Saturday
To
display
the
year
and
date
Press SNOOZE/DATe/SLEEP
OFF
once
for
the
date,
and
within
about
3 seconds press it again for
the
year.
The
display shows
the
date
or
year for about 3
seconds
and
then
changes back
to
the
current
time.
Setting
the
brightness
of
the
display
Three
levels
of
brightness are available by pressing
BRIGHTNESS/TIME ZONE.
Hir
(default)
.........
Middle
.........
Low J
Setting
the
clock
for
the
first
time
This unit
is
preset to
the
current
EST (Eastern
Standard Time)
at
the factory, and
is
powered
by
the back
up
battery.
All
you need to
do
the
first
time
is
just plug it in and select
your
time
zone.
1
Plug
in
the
unit.
The
current
EST (Eastern Standard Time)
appears in the display.
2 Press
and
hold
BRIGHTNESSI TIME
ZONE for
at
least 2 seconds.
Area
number
"2" flashes in
the
display.
3 Press ALARM TIME
SET
+
or-
repeatedly
to
select
the
number
as
follows:
Area
number
Time
zone
Atlantic
standard
Time
Eastern
standard
Time
(default setting)
Pacific
standard
Time
Yukon
standard
Time
7 Hawaiian
standard
Time
Press BRIGHTNESS/ TIME ZONE
to
set.
Note
Though the clock
is
correctly set at the factory,
discrepancies
may
arise
during
transport
or
storage. If necessary, set the clock to the correct
time by referring
to
"Setting the clock manually':
When
daylight
saving
time
(summer
time)
begins
This model automatically adjusts for daylight
saving time
(summer
time).
"
...
is displayed from
the
beginning
of
daylight
saving
time
(summer
time)
and
disappears at the
end
of
the
daylight saving time
(summer
time)
automatically.
• Daylight saving
time
(summer
time) begins at:
2:00 AM
on
the
second
Sunday
of
March.
•
Standard
time
begins at: 2:00 AM
on
the
first
Sunday
of
November.
Central
standard
Time
Mountain
standard
Time