6
GB
Resetting the Unit
Before operating the unit for the first time, or after
replacing the car battery or changing connections,
you must reset the unit.
1
Press DSPL and (back)/MODE for
more than 2 seconds.
Note
Resetting the unit will erase the clock setting and some
stored contents.
Setting the area/region
After resetting the unit, the area/region setting
display appears.
1
Press ENTER while [SET AREA] is
displayed.
The area/region currently set appears.
2
Rotate the control dial to select [EUROPE]
or [RUSSIA], then press it.
3
Rotate the control dial to select [YES] or
[NO], then press it.
If the setting area/region is changed, the unit is
reset, then the clock is displayed.
This setting can be configured in the general setup
menu (page 11).
Setting the Clock
1
Press MENU, rotate the control dial to
select [GENERAL], then press it.
2
Rotate the control dial to select [SET
CLOCK-ADJ], then press it.
The hour indication flashes.
3
Rotate the control dial to set the hour
and minute.
To move the digital indication, press /
(SEEK –/+).
4
After setting the minute, press MENU.
The setup is complete and the clock starts.
To display the clock
Press DSPL.
Checking the Battery Voltage
You can check the current battery voltage. (Not
available while the source is off and the clock is
displayed.)
1
Press DSPL repeatedly until the battery
voltage display appears.
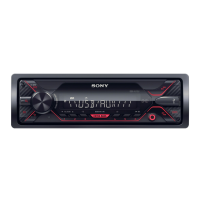
Connecting a USB Device
1
Turn down the volume on the unit.
2
Connect the USB device to the unit.
To connect an iPod/iPhone, use the USB
connection cable for iPod (not supplied).