4-190-901-31(1)
FM/AM
Digital Media Player
Installation/Connections
Installation/Connexions
Instalación/Conexiones
DSX-S200X
©2010 Sony Corporation Printed in Thailand
× 2
× 4
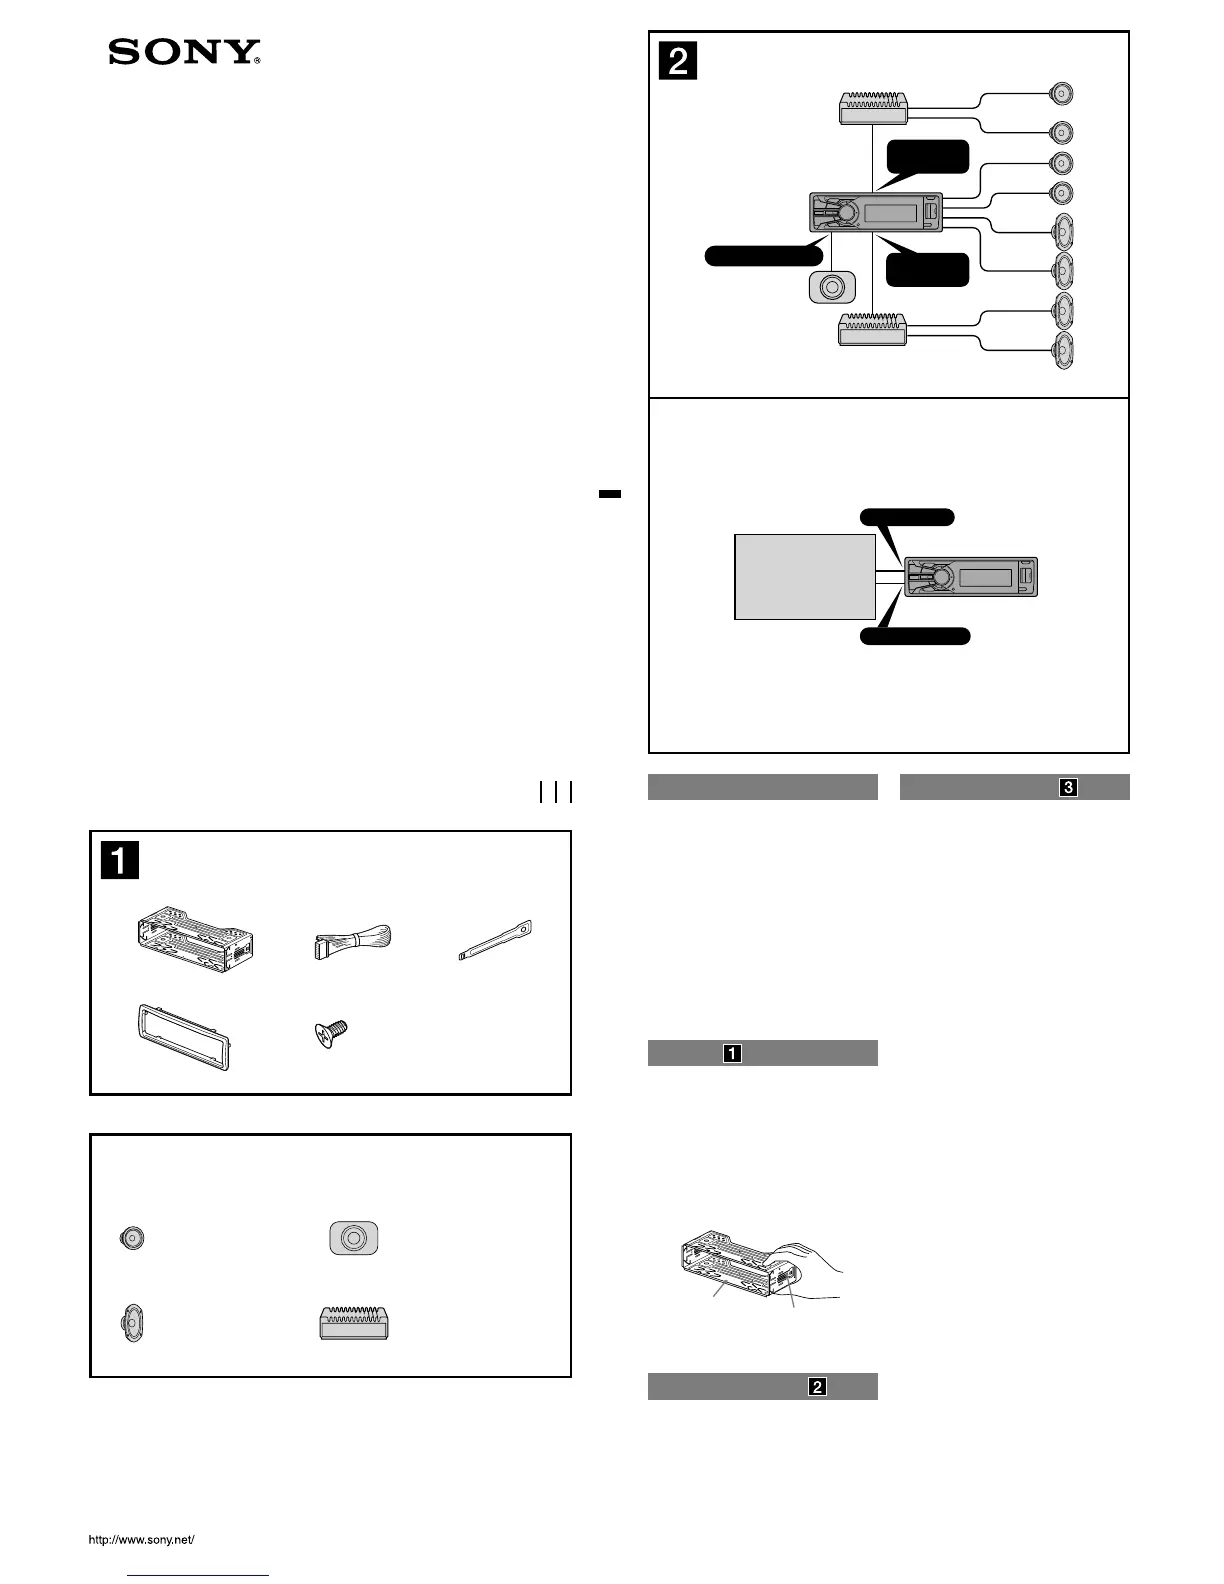
Equipment used in illustrations (not supplied)
Appareils utilisés dans les illustrations (non fournis)
Equipo utilizado en las ilustraciones (no suministrado)
Rear speaker
Haut-parleur arrière
Altavoz posterior
Power amplifier
Amplificateur de puissance
Amplificador de potencia
Active subwoofer
Caisson de graves actif
Altavoz potenciador de
graves activo
Front speaker
Haut-parleur avant
Altavoz frontal
A
B
FRONT
AUDIO OUT
REAR
AUDIO OUT
SUB OUT (MONO)
Cautions
This unit is designed for negative ground (earth) 12 V
DC operation only.
Do not get the leads under a screw, or caught in moving
parts (e.g. seat railing).
Before making connections, turn the car ignition off to
avoid short circuits.
Connect the yellow and red power supply leads only
after all other leads have been connected.
Run all ground (earth) leads to a common ground
(earth) point.
Be sure to insulate any loose unconnected leads with
electrical tape for safety.
The use of optical instruments with this product will
increase eye hazard.
Notes on the power supply lead (yellow)
When connecting this unit in combination with other
stereo components, the connected car circuit’s rating
must be higher than the sum of each component’s fuse.
When no car circuits are rated high enough, connect
the unit directly to the battery.
Parts Iist
The numbers in the list are keyed to those in the
instructions.
The bracket and the protection collar are
attached to the unit before shipping. Before mounting
the unit, use the release keys to remove the bracket
from the unit. For details, see “Removing the
protection collar and the bracket ()” on the reverse
side of the sheet.
Keep the release keys for future use as they are
also necessary if you remove the unit from your
car.
Caution
Handle the bracket carefully to avoid injuring your
fingers.
Catch
Note
Before installing, make sure that the catches on both sides of the bracket
are bent inwards 2 mm (
3
/32 in). If the catches are straight or bent
outwards, the unit will not be installed securely and may spring out.
Connection example
Notes (-A)
Be sure to connect the ground (earth) lead before connecting the
amplifier.
The alarm will only sound if the built-in amplifier is used.
Notes on satellite radio tuner (-B)
This unit does not support the XM radio tuner
XMDSON100.
Connection diagram
To a metal surface of the car
First connect the black ground (earth) lead, then connect the yellow
and red power supply leads.
To the power antenna (aerial) control lead or
power supply lead of antenna (aerial) booster
Notes
It is not necessary to connect this lead if there is no power
antenna (aerial) or antenna (aerial) booster, or with a
manually-operated telescopic antenna (aerial).
When your car has a built-in FM/AM antenna (aerial) in the rear/
side glass, see “Notes on the control and power supply leads.”
To AMP REMOTE IN of an optional power
amplifier
This connection is only for amplifiers. Connecting any other system
may damage the unit.
To the interface cable of a car telephone
To a car’s illumination signal
Be sure to connect the black ground (earth) lead to a metal surface
of the car first.
To the +12 V power terminal which is energized
in the accessory position of the ignition switch
Notes
If there is no accessory position, connect to the +12 V power
(battery) terminal which is energized at all times.
Be sure to connect the black ground (earth) lead to a metal
surface of the car first.
When your car has a built-in FM/AM antenna (aerial) in the rear/
side glass, see “Notes on the control and power supply leads.”
To the +12 V power terminal which is energized
at all times
Be sure to connect the black ground (earth) lead to a metal surface
of the car first.
Notes on the control and power supply leads
The power antenna (aerial) control lead (blue) supplies +12 V DC when
you turn on the tuner.
When your car has built-in FM/AM antenna (aerial) in the rear/side glass,
connect the power antenna (aerial) control lead (blue) or the accessory
power supply lead (red) to the power terminal of the existing antenna
(aerial) booster. For details, consult your dealer.
A power antenna (aerial) without a relay box cannot be used with this
unit.
Memory hold connection
When the yellow power supply lead is connected, power will always be
supplied to the memory circuit even when the ignition switch is turned
off.
Notes on speaker connection
Before connecting the speakers, turn the unit off.
Use speakers with an impedance of 4 to 8 ohms, and with adequate
power handling capacities to avoid its damage.
Do not connect the speaker terminals to the car chassis, or connect the
terminals of the right speakers with those of the left speaker.
Do not connect the ground (earth) lead of this unit to the negative (–)
terminal of the speaker.
Do not attempt to connect the speakers in parallel.
Connect only passive speakers. Connecting active speakers (with built-in
amplifiers) to the speaker terminals may damage the unit.
To avoid a malfunction, do not use the built-in speaker leads installed
in your car if the unit shares a common negative (–) lead for the right
and left speakers.
Do not connect the unit’s speaker leads to each other.
Note on connection
If speaker and amplifier are not connected correctly, “Failure” appears in
the display. In this case, make sure the speaker and amplifier are
connected correctly.
BUS AUDIO IN
BUS CONTROL IN
Satellite radio tuner
(XM/SIRIUS)*
Syntoniseur radio satellite
(XM/SIRIUS)*
Sintonizador de radio por satélite
(XM/SIRIUS)*
* not supplied
non fourni
no suministrado






 To Next Page