EasyManua.ls Logo

Sony Handycam DCR-VX2100 User Manual

Sony Handycam DCR-VX2100
176 pages
To Next Page IconTo Next Page
Page #1 background imageLoading...
Page #1 background image
3-087-414-11 (1)
Digital
Video Camera
Recorder
Operating Instructions
Before operating the unit, please read this manual thoroughly,
and retain it for future reference.
Owner’s Record
The model and serial numbers are located on the bottom. Record the
serial number in the space provided below. Refer to these numbers
whenever you call upon your Sony dealer regarding this product.
Model No. DCR-VX2100 Model No. AC-
Serial No. Serial No.
DCR-VX2100
©2003 Sony Corporation

Table of Contents

Other manuals for Sony Handycam DCR-VX2100

Question and Answer IconNeed help?

Do you have a question about the Sony Handycam DCR-VX2100 and is the answer not in the manual?

Sony Handycam DCR-VX2100 Specifications

General IconGeneral
TypeCamcorder
Recording MediaMiniDV Tape
Sensor TypeCCD
Image Sensor Size1/3 inch
Optical Zoom12x
Digital Zoom48x
Video Resolution720 x 480 (NTSC)
MicrophoneStereo
Maximum Aperturef/1.6
LCD Screen Size2.5 inches
Viewfinder TypeColor
Video FormatDV
Image StabilizationOptical
InterfaceIEEE 1394
Battery TypeInfoLithium
Lens TypeCarl Zeiss Vario-Sonnar

Summary

Operating Instructions

Owner's Record

Record model and serial numbers for product reference and future inquiries.

WARNING

RECYCLING LITHIUM-ION BATTERIES

Quick Start Guide

Getting Started

Using this manual

Guide on how to read the manual and understand its conventions.

Precautions on camcorder care

Lens and LCD screen/finder

Precautions for maintaining the lens and LCD screen/finder.

Checking supplied accessories

Step 1 Preparing the power supply

Installing the battery pack

Instructions for inserting the battery pack into the camcorder.

Charging the battery pack

Procedure for charging the camcorder's battery pack using the AC adaptor.

Step 2 Setting the date and time

Step 3 Inserting a cassette

To eject a cassette

Steps to remove a cassette from the camcorder.

Recording a picture

Adjusting the LCD screen

How to adjust the angle and position of the LCD screen.

Adjusting the brightness of the LCD screen

How to adjust the brightness of the LCD screen.

Adjusting the viewfinder

How to adjust the viewfinder for clear focus.

Using the zoom feature

To zoom using the zoom lever/handle zoom lever

Using the zoom lever for telephoto and wide-angle shots.

Shooting backlit subjects (BACK LIGHT)

Using the spot light function

Self-timer recording

Checking the recording

– END SEARCH / EDITSEARCH / Rec Review

Buttons for reviewing recorded footage and checking transitions.

Playing back a tape

To control the display of the screen indicators

How to toggle screen indicators on and off.

Using the data code function

Various playback modes

To view a still picture (playback pause)

How to pause playback to view a still image.

To locate a scene monitoring the picture (picture search)

How to find specific scenes using search functions.

To view the picture at slow speed (slow playback)

How to play back footage at a reduced speed.

Viewing the recording on TV

Recording a still image on a tape – Tape Photo recording

Self-timer tape photo recording

Making a tape photo recording using the self-timer function.

Shooting with all the pixels – PROG. SCAN

Using the guide frame

Using the wide mode

Using the fader function

Using special effects – Picture effect

Using special effects – Digital effect

Shooting with manual adjustment

AUTO LOCK selector

Controls automatic or manual adjustment of camcorder functions.

Adjusting exposure

How to manually adjust the camcorder's exposure settings.

Adjusting the shutter speed

How to manually adjust the camcorder's shutter speed.

Using the ND filter

Shooting with the zebra pattern

Releasing the SteadyShot function

Adjusting the white balance

Adjusting recording level manually – Sound recording level

Presetting the adjustment for picture quality – Custom preset

Using the PROGRAM AE function

Focusing manually

Interval recording

Frame by frame recording – Cut recording

Marking an Index

Quickly locating a scene using the zero set memory function

Searching for a recording by index – Index search

Searching the boundaries of recorded tape by title – Title search

Searching a recording by date – Date search

Searching for a photo – Photo search/Photo scan

Playing back a tape with picture effects

Playing back a tape with digital effects

Dubbing a tape

Using the A/V connecting cable

How to connect the camcorder to a VCR using an A/V cable for dubbing.

Using an i.LINK cable

Connecting via i.LINK for high-quality digital editing and dubbing.

Dubbing only desired scenes – Digital program editing

Preparation 1: Connecting the VCR

Steps for connecting the camcorder to a VCR for digital editing.

Preparation 2: Setting the VCR to operate by infrared rays emitter

Configuring the VCR to respond to the camcorder's infrared signals.

Preparation 2: Setting the VCR to operate with an i.LINK cable

Configuring the VCR for i.LINK connection for digital editing.

Preparation 3: Adjusting the synchronization of the VCR

Steps to synchronize the camcorder and VCR for accurate editing.

Operation 1: Making Programs

Operation 2: Performing a digital program editing (Dubbing a tape)

Using with an analog video unit and a PC

– Signal convert function

Converting analog input signals to digital for PC capture.

Recording video or TV programs

Using the A/V connecting cable

Recording TV programs or videos from other VCRs using an A/V cable.

Using an i.LINK cable

Recording TV programs or videos via i.LINK for high-quality digital transfer.

Inserting a scene from a VCR – Insert editing

Audio dubbing

Connecting the microphone with the MIC jack

Connecting an external microphone to the camcorder.

Connecting the microphone with the intelligent accessory shoe

Connecting a microphone to the intelligent accessory shoe.

Dubbing with the AUDIO L/R jacks

Dubbing audio using the camcorder's L/R jacks.

Adding an audio sound on a recorded tape

How to add new audio to an existing recording.

Superimposing a title

Making your own titles

Labeling a cassette

Erasing the cassette memory data

Erasing each item’s data separately

How to erase specific data types (index, title, date, photo) from cassette memory.

Erasing all the data in cassette memory

How to erase all data stored in the cassette memory.

Changing the menu settings

Selecting the mode setting of each item

Using a “Memory Stick” – introduction

Types of “Memory Stick”

Lists compatible types of Memory Sticks and their recording/playback support.

Inserting a “Memory Stick”

How to insert a Memory Stick into the camcorder.

To eject a “Memory Stick”

How to remove a Memory Stick from the camcorder.

Selecting the image quality mode

Image quality settings

Table detailing image quality settings and their compression ratios.

Recording still images on a “Memory Stick” – Memory Photo recording

Recording images continuously

Records still images continuously in modes like Continuous or Multi Screen.

Self-timer memory photo recording

Superimposing a still image in a “Memory Stick” on a moving picture – MEMORY MIX

Recording an image from a tape as a still image

Recording a still image from other equipment

Capturing still images from external sources like VCRs or TVs.

Copying still images from a tape – Photo save

Viewing a still picture – Memory Photo playback

Playing back six recorded images at a time (index screen)

Viewing the recorded images using a personal computer

Copying an image recorded on a “Memory Stick” to tapes

Playing back images continuously – SLIDE SHOW

Preventing accidental erasure – Image protection

Deleting images

Deleting selected images

How to delete individual images from the Memory Stick.

Deleting all the images

How to delete all unprotected images from the Memory Stick.

Writing a print mark – Print mark

Usable cassettes

Selecting cassette types

Information on compatible mini DV cassette types.

Copyright signal

Audio mode

About i.LINK

What is i.LINK?

Explanation of the i.LINK digital interface and its capabilities.

i.LINK operation with your camcorder

How to operate the camcorder via i.LINK with other devices.

Troubleshooting

In the recording mode

Common problems and solutions encountered during recording.

In the playback mode

Common problems and solutions encountered during playback.

In the recording and playback modes

Troubleshooting issues affecting both recording and playback modes.

When operating using the “Memory Stick”

Troubleshooting issues related to Memory Stick functionality.

Others

Solutions for other miscellaneous troubleshooting issues.

Self-diagnosis display

Five-digit display

Chart of 5-digit error codes and their corrective actions.

Warning indicators and messages

Warning Indicators

Explains common warning indicators and their meanings.

Tape Related Warnings

Lists warnings related to tape status and insertion.

Cassette Memory Warnings

Lists warnings related to cassette memory status.

Memory Stick Warnings

Lists warnings related to Memory Stick status.

Warning messages

Using your camcorder abroad

NTSC system

Lists countries using the NTSC TV system.

PAL system

Lists countries using the PAL TV system.

Maintenance information and precautions

Moisture condensation

Explains moisture condensation issues and how to prevent/resolve them.

Maintenance information

Removing Dust from Inside the Viewfinder

Instructions for cleaning dust from the camcorder's viewfinder.

Cleaning the video head

Procedures for cleaning the camcorder's video heads for optimal performance.

Maintenance information and precautions

Charging the built-in rechargeable battery

Instructions for charging the camcorder's internal rechargeable battery.

Precautions

General safety and operating guidelines for the camcorder.

AC Adaptor

Rechargeable battery pack

Specifications

Identifying the parts and controls

Camcorder Overview

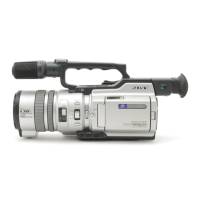
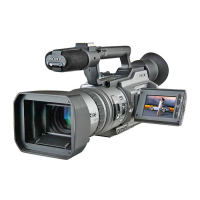
Diagram and list of camcorder controls and their functions.

Camcorder Controls

Identification of various buttons, screens, and indicators on the camcorder.

Camcorder Controls

Identification of zoom levers, switches, buttons, lens, and hood.

Lens Hood and Eyecup Attachment

Instructions for attaching and removing the lens hood with cap.

Straps and Fasteners

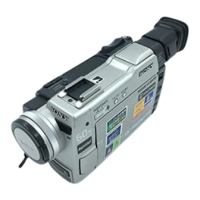
Identification of strap hooks, levers, buttons, slots, switches, and lamps.

Ports and Handles

Identification of handles, sensors, lamps, jacks, and interface ports.

Remote Commander

Transmitter and Buttons

Information about the remote control's transmitter and buttons.

Remote Commander Preparation and Display

Instructions for preparing the remote and understanding its display.

Operation indicators

Camcorder Status Indicators

Explains various operation indicators on the camcorder screen.

Quick Function Guide

Functions to adjust exposure

Lists functions for adjusting exposure based on shooting conditions.

Functions for image impact and appearance

Lists functions for enhancing image impact and natural appearance.

Functions for editing and playback

Lists functions available for editing and playback operations.

Related product manuals