Do you have a question about the Sony Hi8 EV-S2000 and is the answer not in the manual?
Space to record product details for future reference and service.
Explains the structure and conventions of the manual.
Lists items included with the VCR and instructions for unpacking.
Details the Hi8 video and Hi-Fi stereo systems for enhanced quality.
Highlights key functions like voice boost and extended timer recording.
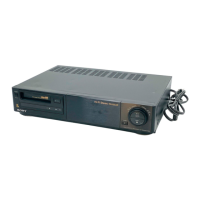
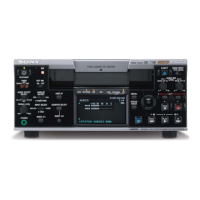
Identifies and explains the buttons and indicators on the VCR's front panel.
Explains the various indicators shown on the VCR's display screen.
Details the input and output jacks located on the VCR's rear panel.
Explains the function of each button on the RMT-V123 remote control.
Guides users to select the appropriate connection method based on their TV setup.
Steps for setting up the VCR after making A/V connections.
Provides diagrams for connecting VHF/UHF and separate antennas.
Instructions for setting the VCR's internal clock and date.
Explains when to use this hookup and its inability to record scrambled channels.
Details setting the clock and pre-programming channels for cable TV.
Describes how to record scrambled channels using a cable box.
Explains how to use an A/B switch for recording scrambled/unscrambled channels.
Covers inserting batteries, setting command mode, and controlling other equipment.
A table listing manufacturers and their corresponding remote control codes.
Step-by-step guide to program the remote for other TV brands.
Detailed example showing how to set the VCR's clock and date.
Instructions for automatically scanning and storing available channels.
Explains how to manually adjust tracking for optimal picture clarity.
Details options like Hi8 system, LANC mode, and auto stereo settings.
Explains how the VCR automatically selects the correct antenna input.
Instructions for recording or ignoring SAP broadcasts.
Covers inserting, ejecting, and handling video cassettes for playback.
Explains how to stop, pause, fast forward, rewind, and auto-play tapes.
How to use the counter to find specific recorded moments.
Explains Hi8 vs. standard 8mm recording and VCR settings.
Techniques for pausing and resuming recordings smoothly.
Allows recording without the TV interfering.
How to monitor a different channel while recording.
Step-by-step guide to preset recording schedules.
Setting up recurring daily or weekly recording schedules.
How the VCR behaves when waiting for a timer recording.
Explains how the VCR handles overlapping recording program conflicts.
How to view the programmed timer settings on the TV screen.
Steps to edit or delete existing timer recording entries.
How to use the VCR normally while it's in timer recording standby.
A fast method to set up recordings without full timer programming.
Lists buttons and their functions during quick-timer recording.
Explains still picture, picture search, and locked picture search functions.
Details double-speed and slow-motion playback modes.
How to skip scenes or advance frame by frame during playback.
Guides users on adjusting tracking for optimal picture quality in specific modes.
Instructions for adjusting the sharpness control for clearer playback.
Method to pause and rewind during recording to cut out scenes.
Steps to overwrite unwanted parts of a pre-recorded tape.
Introduces various tape editing methods available on the VCR.
Explains connections and procedures for copying tapes from another VCR.
Details the preparation and operation for recording onto a second VCR.
Shows how to connect VCRs for editing using front or rear panel jacks.
Step-by-step guide to assemble edited segments onto a new tape.
Instructions on how to insert new scenes into existing recordings.
Crucial setting for controlling VCRs via LANC or Control L/S connectors.
Explains connecting equipment using the LANC connector for control.
Details connecting equipment via the CONTROL S connector.
Explains the function of LANC MODE settings M and S for controlling VCRs.
Steps for synchronized editing using specific connectors and modes.
Details the Hi8 video system, its characteristics, and benefits.
Explains how to record and play tapes using the Hi8 system.
Discusses Hi8 tape playback on standard 8mm equipment.
How to set the RF UNIT selector for correct TV signal reception.
Step-by-step guide for attaching an F-type connector to a cable.
Instructions for connecting an external antenna using the supplied connector.
Guide for installing a band separator/mixer for antenna signals.
Solutions for power switch failures and clock reset issues.
Troubleshooting poor reception, shaky pictures, and no picture.
Solutions for timer setting failures and recording issues.
Troubleshooting remote operation and synchronized editing control problems.
Lists common on-screen messages and their meanings.
Instructions on cleaning video heads to maintain picture quality.
Technical details on video system, tape speed, recording time, and power.
Details on audio/video inputs, outputs, and connector types.
| Type | Hi8 VCR |
|---|---|
| Video Format | Hi8 |
| Remote Control | Yes |
| Tuner | No |
| Inputs | Composite Video, S-Video, Audio |
| Outputs | Composite Video, S-Video, Audio |
| Power Supply | 50/60Hz |
| Recording System | Helical scan FM |
| Playback System | Rotary helical scan |
| Video Head | Rotating two-head helical scan |