This document provides operating instructions for the Sony LBT-D107 and HST-D107 Compact Hi-Fi Stereo System. It covers various aspects of the system, including its configuration, basic sound adjustments, and operation of its different components like the turntable, tuner, and cassette deck. The manual also includes important precautions, maintenance tips, and a troubleshooting guide to help users resolve common issues.
Function Description
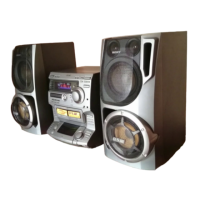
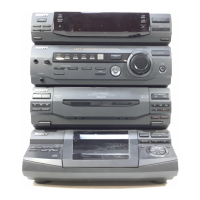
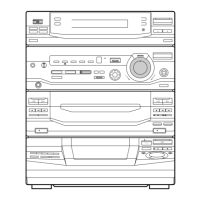
The Sony Compact Hi-Fi Stereo System is designed to provide a comprehensive audio experience, integrating multiple components into a single unit. The core of the system is the HST-D107 stereo deck receiver, which acts as the central hub for all audio sources. It includes an amplifier section for sound processing and output, and a tuner section for receiving radio broadcasts.
The system supports various audio playback methods:
- Turntable (PS-LX49P): Allows users to play analog records, offering a classic audio experience. The turntable is designed for ease of use, with features like automatic tone arm return.
- CD Player (CDP-C322M): For playing compact discs, providing high-quality digital audio. The CD player is connected to the stereo deck receiver, and its operations are managed through the system.
- Cassette Deck: Integrated into the stereo deck receiver, this component enables playback and recording of audio tapes. It supports both Type I and Type II tapes and includes features for dubbing tapes between two decks.
- Tuner: The system's tuner allows for receiving both FM and AM radio broadcasts. It includes features for automatic scanning and storing preferred stations for quick access.
- External Component Connectivity: The system also offers connectivity for other audio/video components, such as a VCR, through dedicated input jacks, expanding its versatility.
The system is equipped with a remote commander (RM-S171) for convenient control of most functions, excluding the cassette deck. This allows users to adjust settings and switch sources from a distance.
Usage Features
The manual details how to set up and operate the stereo system, emphasizing user-friendliness.
Getting Started:
- Configuration: The manual provides a clear diagram and instructions for connecting all components, including speakers, FM and AM antennas, the turntable, and the CD player. It highlights the importance of connecting the AC power cord last and notes the color-coding of plugs and jacks for easy identification of right and left channels.
- Power On/Off: Simple instructions are given for turning on the stereo deck receiver and ensuring the CD player is turned off when listening to the tuner to avoid noise.
Basic Sound Adjustments:
- Volume Control: A large VOLUME control allows for easy adjustment of the overall sound level. Users are advised to turn down the volume before switching on the unit to prevent speaker damage.
- Sound Quality (Graphic Equalizer): The system features a 5-BAND GRAPHIC EQUALIZER with controls for specific frequency ranges (100 Hz, 330 Hz, 1 kHz, 3.3 kHz, 10 kHz). This allows users to fine-tune the sound to their preference, boosting or cutting bass, accentuating vocals, brightening sound, or reducing tape hiss.
- Bass Reinforcement (DBFB): A dedicated DBFB control is available to reinforce the bass, providing a deeper and richer low-frequency sound.
- Surround Effect: The SURROUND control allows users to enjoy a surround sound effect, though it's noted that this effect does not function with monaural sound sources.
- Balance Control: A BALANCE control helps adjust the relative strength of the right and left speaker outputs, useful when speakers are not symmetrically positioned.
- Private Listening: A HEADPHONES jack is provided for private listening, automatically muting the speakers when headphones are connected.
Playing Records:
- Turntable Operation: Instructions guide users through removing the stylus cover, releasing the tone arm stopper, setting the cuing lever, placing a record, and selecting the correct speed (SPEED button).
- Playback Control: The PHONO button selects the turntable source. The REJECT button stops playback. Users can manually move the tone arm to play specific parts of a record. An adaptor is mentioned for playing 17-cm records. The automatic return mechanism of the tone arm is highlighted.
Receiving Broadcasts:
- Tuner Operation: The TUNER button selects the radio source, and the BAND SELECT button switches between FM and AM bands.
- Automatic Tuning: The DUAL MODE TUNING +/- buttons allow for automatic scanning and stopping at stations.
- Manual Tuning: For weak signals or precise tuning, manual adjustment is possible.
- Stereo Reception: The ST/MUTE button manages stereo reception, improving clarity for noisy FM stereo programs by switching to monaural.
- Station Storage: Up to 30 station frequencies can be stored in memory using a combination of letters and numbers, allowing for quick recall.
Playing Back Tapes:
- Deck Selection: The TAPE button selects the cassette deck. The TAPE SELECT button allows choosing the tape type.
- Playback Controls: Standard playback controls include play (►), stop/eject (■), fast forward (►►), rewind (◄◄), and pause (II PAUSE).
- Dolby NR: The DOLBY NR switch activates the Dolby B NR system for tapes recorded with noise reduction.
- Relay Play: The system supports relay play from Deck B to Deck A, allowing continuous playback across two tapes.
Recording on Tapes:
- Source Selection: Users can select various sources (CD, TUNER, PHONO, VIDEO) for recording onto a blank tape in Deck B.
- Recording Process: The REC button initiates recording. The DOLBY NR switch can be set to ON or OFF during recording.
- Precise Recording: Instructions are provided for starting recording precisely using the PAUSE button.
- Tape Protection: The manual explains how to protect recorded tapes by breaking off tabs and how to record over protected tapes by covering the opening with plastic tape. It also advises on handling Type II (CrO2) tapes regarding detector slots.
Dubbing Tapes:
- Dubbing Process: Instructions detail how to dub a tape from Deck A to Deck B, including inserting tapes, pressing PAUSE and play on Deck A, and pressing REC on Deck B.
- Dubbing Speed: The DUBBING SPEED button allows selecting between NORMAL or HIGH speed dubbing.
- Dolby NR for Dubbing: It's noted that the Dolby NR system does not need to be designated during dubbing, as the recording level and NR system from the original tape in Deck A are automatically applied to Deck B.
- Listening During Dubbing: Users can listen to other program sources while dubbing.
Maintenance Features
The manual provides essential maintenance guidelines to ensure the system remains in good working condition and delivers optimal sound quality.
- Cleaning the Cabinet: For external cleaning, users are advised to use a soft cloth lightly moistened with a mild detergent solution.
- Demagnetizing the Heads: To prevent magnetism buildup, which can degrade sound quality, users should demagnetize the cassette deck heads after every 20 to 30 hours of use. This requires turning off the power unit and using a commercially available demagnetizer.
- Cleaning Heads and Tape Path: Regular cleaning of the cassette deck's heads, pinch rollers, and capstans is recommended after every 10 hours of use and before recording. This involves opening the cassette holder, moistening a cotton swab with cleaning fluid or alcohol, and carefully wiping the specified components. Users are warned not to insert a cassette until all cleaned areas are completely dry.
Troubleshooting Guide
A comprehensive troubleshooting guide is included to help users diagnose and resolve common issues across the general system, tuner, cassette deck, remote commander, and turntable. Each symptom is paired with a possible cause and a suggested remedy.
General Issues:
- No power: Check if the AC power cord is securely connected.
- No sound: Ensure the VOLUME control is turned up.
- Reversed left and right sound: Verify correct speaker connections.
- Severe hum and noise: Check for loose connections and move the unit away from TV/VCR if it's nearby.
Tuner Issues:
- "TUNED" or "STEREO" indication blinks: Adjust antenna location and direction. Connect to an external antenna if the issue persists.
- Severe hum or noise: Adjust antenna location and direction. Connect to an external antenna if interference continues.
Cassette Deck Issues:
- Cannot record on tape: Check if the tape's protection tab has been removed. Cover the opening with adhesive tape if it has.
- Cannot dub tapes: Ensure the protection tab on the cassette in Deck B has not been removed.
- Unbalanced tone in higher frequencies: Verify the DOLBY NR switch is in the correct position (ON or OFF as set for recording).
- Unclear recording or playback: Clean and demagnetize the recording/playback heads.
- Excessive wow or flutter, or sound dropout: Clean the capstan and pinch roller.
- Incomplete erasure: Demagnetize the erasing head.
Remote Commander Issues:
- Remote commander does not function: Replace batteries if run down. Point the commander at the remote sensor. Remove any obstacles between the commander and the unit. Move closer to the unit if too far.
Turntable Issues:
- Tone arm skips, skates, or does not advance: Ensure the turntable is placed on a level surface.
- Poor sound quality: Clean or replace the stylus.
- Rumble or low frequency howl: Move speakers away from the turntable.
- Tone arm does not return to its armrest: Press the REJECT button.
This detailed guide aims to empower users to maintain their system and troubleshoot minor problems independently, enhancing the overall user experience.