Do you have a question about the Sony MDR-X10 and is the answer not in the manual?
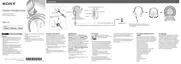
Arrange headphones with ear pads facing up on a soft surface to prevent scratches during removal.
Carefully insert a thin plastic blade between the ear pad and housing, using minimal force to avoid damage.
Use the plastic blade to gently twist and pry the ear pad upwards from the headphone housing.
Slide the blade left and twist to fully release the ear pad, then lift it away from the headphones.
Acquire new ear pads, noting specific part numbers for RED (P/N 4-430-567-01) or BLACK (P/N 4-430-567-11).
Align the tabs on the new ear pad with the corresponding eight screw holes on the headphone housing.
Gently press the ear pad down onto the housing until secure 'clicks' are heard, indicating proper seating.
Press down the foam all around the ear pad perimeter to eliminate any remaining gaps for a flush fit.
| Type | Closed, Dynamic |
|---|---|
| Impedance | 24 ohms at 1 kHz |
| Sensitivity | 106 dB/mW |
| Cable Length | 1.2 m |
| Power Handling Capacity | 3, 000 mW |
| Plug | Gold-plated stereo mini plug |
| Driver Unit | 50 mm, dome type (CCAW Voice Coil) |