EasyManua.ls Logo

Sony RDR-GX300 - User Manual

Sony RDR-GX300
2 pages
Print Icon
To Next Page IconTo Next Page
Loading...
Before hookup
©2004 Sony Corporation
Printed in Malaysia
S
E
T
T
O
P
B
O
X
C
O
N
T
R
O
L
C
A
V
L
E
I
N
O
U
T
T
O
T
V
C
O
M
P
O
N
E
N
T
V
I
D
E
O
O
U
T
Y
P
B
P
R
C
O
M
P
O
N
E
N
T
V
I
D
E
O
I
N
L
I
N
E
I
N
D
I
G
I
T
A
L
O
U
T
V
I
D
E
O
S
V
I
D
E
O
C
O
A
X
I
A
L
O
P
T
I
C
A
L
P
C
M
/
D
T
S
/
D
O
L
B
Y
D
I
G
I
T
A
L
A
U
D
I
O
R
L
1
3
S
V
I
D
E
O
1
2
I
N
O
U
T
L
I
N
E
O
U
T
V
I
D
E
O
R
L
V
H
F
/
U
H
F
A
N
T
I
N
O
PT
I
C
A
L
S
V
I
D
EO
V
I
DE
O
O
U
T
C
O
M
P
O
N
EN
T
O
U
T
D
I
G
I
T
A
L
A
U
D
I
O
O
U
T
C
O
M
P
O
N
EN
T
V
I
D
EO
O
U
T
Y
P
B
P
R
S
E
T
T
O
P
BO
X
C
O
N
T
R
O
L
C
O
M
P
O
N
E
N
T
VI
D
E
O
I
N
D
I
G
I
T
AL
OU
T
C
O
A
XI
AL
O
P
T
I
C
AL
P
C
M
/
D
T
S
/
D
O
L
B
Y
D
I
G
I
T
A
L
S
V
I
D
E
O
1
2
L
I
N
E
I
N
VI
D
EO
S
V
I
D
E
O
A
U
D
I
O
R
L
1
3
VH
F
/
U
H
F
I
N
L
IN
E
IN
I
N
O
UT
L
I
N
E
O
U
T
V
I
D
E
O
A
U
D
I
O
R
L
VH
F
/
U
HF
D
I
G
I
T
A
L
A
U
D
I
O
OU
T
C
O
M
P
O
N
E
N
T
O
U
T
A
N
T
I
N
O
P
T
I
C
A
L
S
V
I
D
E
O
C
A
V
L
E
I
N
O
UT
T
O
T
V
V
I
D
E
O
O
U
T
C
O
M
P
O
N
E
N
T
V
I
D
E
O
O
U
T
Y
P
B
P
R
S
ET
T
O
P
BO
X
C
O
N
T
R
O
L
C
O
M
P
ON
EN
T
VI
D
E
O
I
N
L
I
N
E
I
N
D
I
G
I
T
A
L
O
U
T
V
I
D
E
O
S
V
I
D
E
O
C
O
A
X
I
A
L
O
P
T
I
C
A
L
P
C
M
/
D
T
S
/
D
OL
B
Y
D
I
G
I
T
A
L
A
U
D
I
O
R
L
1
3
S
V
I
D
E
O
1
2
V
H
F
/U
H
F
IN
L
IN
E
I
N
I
N
O
U
T
L
I
N
E
O
U
T
V
I
D
E
O
A
U
D
I
O
R
L
VH
F
/
U
H
F
R
F
I
N
O
U
T
Optional
Connecting the Set Top Box controller
You can have the recorder change the channel of your cable box or satellite
receiver to the channel you want to record, just before the timer recording
starts.
Connect the Set Top Box controller(supplied), and select "Yes" in step 7 of
Setup on the next page.
Connecting a VCR or similar device
To record your video tapes to a DVD, connect an audio/video cable (not
supplied) to the LINE OUT 1 jacks on your VCR to the LINE 3 IN jacks on the
recorder. To just watch your video tapes, connect your VCR’s LINE OUT 2 jacks
directly to
any unused LINE IN jack on your TV.
NOTE
Do not connect your VCR between this DVD recorder
and your TV. If you do not first connect your
VCR to the recorder, you will be unable to watch
pictures from your recorder.
Connecting an AV amplifier (receiver)
Connecting to an AV amplifier (receiver) with audio cords will enable you to
enjoy the TVS surround effects of this recorder, while connecting with digital
cords will enable you to listen to Dolby Digital or DTS surround effects. For
further explanations, see “Connecting the Audio Cords” in the Operating
Instructions.
Cable Box /
Satellite Receiver
DVD Recorder
AV Amplifier
VCR
Place it so that the tip of the
controller is directly above
the remote control reception
window on your set top box.
to your wall jack
to your wall jack
You have a:
Cable Box with Video / Audio Output
–or–
Satellite Receiver
Connect all power
cords last!
You have a:
Cable (cable box without video / audio output)
–or–
Antenna
Television
C
O
M
P
O
N
E
N
T
V
I
D
E
O
O
U
T
Y
P
B
P
R
C
O
M
P
O
N
E
N
T
V
I
D
E
O
I
N
D
I
G
I
T
A
L
O
U
T
V
I
D
E
O
S
V
I
D
E
O
P
C
M
/
D
T
S
/
D
O
L
B
Y
D
I
G
I
T
A
L
A
U
D
I
O
R
L
V
I
D
E
O
A
U
D
I
O
R
L
S
V
I
D
E
O
1
2
I
N
O
U
T
C
O
A
X
I
A
L
O
P
T
IC
A
L
1
3
L
I
N
E
I
N
S
E
T
T
O
P
B
O
X
C
O
N
T
R
O
L
L
I
N
E
O
U
T
V
H
F
/
U
H
F
S
V
I
D
E
O
C
O
M
P
O
N
E
N
T
V
I
D
E
O
O
U
T
Y
P
B
P
R
S
E
T
T
O
P
B
O
X
C
ON
TR
O
L
C
OM
P
O
N
E
N
T
VI
D
E
O
I
N
LI
N
E
I
N
V
I
D
EO
S
V
I
D
E
O
A
U
D
I
O
R
L
I
N
O
U
T
L
I
N
E
O
U
T
VI
D
E
O
A
U
D
I
O
R
L
V
H
F
/
U
H
F
1
3
S
V
I
D
E
O
1
2
Y
D
I
GI
T
A
L
O
U
T
P
C
M
/
D
T
S
/
D
O
L
B
Y
D
I
G
I
T
A
L
C
O
A
X
I
A
L
O
P
T
I
C
A
L
L
I
N
E
I
N
D
I
G
I
T
A
L
I
N
DVD Recorder
DVD Recorder
Connect all power
cords last!
You will need:
X2 X3
(one audio/video cord is supplied) (one coaxial cable is supplied)
You will need:
X1 X3
(one audio/video cord is supplied) (one coaxial cable is supplied)
to LINE OUT
1 or 2
to LINE IN
1 or 3
to OUT TO
TV
to VIDEO OUT/
AUDIO OUT
to LINE IN
to VHF/UHF IN
to an
AC outlet
to VHF/UHF
IN
to VHF/UHF
OUT
to RF IN
to RF OUT
to LINE OUT
1 or 2
to VHF/UHF IN
to an
AC outlet
Cable Box /
Satellite Receiver
DVD Recorder
to CABLE IN
to LINE IN
to LINE OUT 1
to LINE IN 3
DVD
Recorder
TVVCR
to DIGITAL IN
(COAXIAL)
to LINE IN
(AUDIO)
to DIGITAL IN
(OPTICAL)
to SET TOP
BOX CONTROL
Connect one of the
following cords (not supplid)
audio cords
-or-
coaxial digital cord
-or-
optical digital cord
a
b
c
a
b
c
to an
AC outlet
to an
AC outlet
to DIGITAL OUT
(COAXIAL or OPTICAL)
If you don't have a cable box,
connect this coaxial cable directly to
VHF/UHF IN on the DVD Recorder.
to LINE OUT 2
to LINE OUT
(R-AUDIO-L) 1 or 2
to any unused
LINE IN jack on
your TV
Cable Box /
Satellite Receiver
DVD Recorder
Cable Box
Television
Follow the three steps below to connect, setup and make
recordings on your DVD recorder.
Quick Start Guide
RDR-GX300
Disconnect your VCR
If you have been using a VCR, you do not need to disconnect all of your
equipment. Just disconnect your VCR and connect the DVD recorder in
its place.
If you plan to use your VCR, reconnect it by following the instructions
in “Connecting a VCR or similar device” on this page.
Select a connection
Select one of the following two types of basic connections according to
the type of equipment you have.
Cable Box with Video/Audio Output
or
Satellite Receiver
Cable
(cable box without video/audio output)
or
Antenna
Proceed to Step 1 and begin!
1
2
2
1
4
4
3
3
2
4
4
1
VCR
DVD Recorder
Television
VCR
2-149-121-11(1)

Other manuals for Sony RDR-GX300

Question and Answer IconNeed help?

Do you have a question about the Sony RDR-GX300 and is the answer not in the manual?

Summary

Before Hookup

Disconnect and Reconnect VCR

Disconnect your VCR and connect the DVD recorder in its place, or reconnect your VCR.

Select Connection Type

Choose the correct basic connection based on your equipment: Cable Box/Satellite Receiver or Antenna.

Step 1 Hookup

Basic Hookup A: Cable Box;Satellite Receiver

Connect a Cable Box/Satellite Receiver with video/audio output to the DVD recorder.

Basic Hookup B: Cable Box;Antenna

Connect a Cable Box/Satellite Receiver without video/audio output or an Antenna.

Optional Connections

Set Top Box Controller

Connect the controller for automatic channel changing during timer recordings.

Connect VCR or Similar Device

Connect a VCR for recording tapes or playback through the DVD recorder.

Connect AV Amplifier;Receiver

Connect an AV amplifier for enhanced audio output, including surround sound effects.

Step 2 Setup

Initiate Easy Setup

Turn on equipment and access the Easy Setup menu for initial adjustments via TV screen.

Basic Setup Configuration

Set language, choose Manual/Auto setup, and configure clock settings for basic operation.

Set Top Box and Channel Setup

Configure Set Top Box control and select output channel or antenna input for signal reception.

TV and Audio Output Settings

Select TV type (aspect ratio) and configure AV amplifier connection for audio output.

Complete Setup Process

Finalize the initial setup by pressing ENTER when 'Finish' appears on the screen.

Step 3 Record!

Insert Disc and Prepare Recorder

Insert a recordable DVD and close the disc tray; wait for the recorder to load the disc.

Play Recorded TV Programs

Select a recorded title from the TITLE LIST and press ENTER to begin playback.

Record a TV Program

Select a channel, choose recording mode, and press REC to start recording a program.

Remove Recorded Disc

Press OPEN/CLOSE to eject the disc after writing the index for recorded contents.

Overview

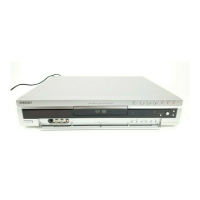
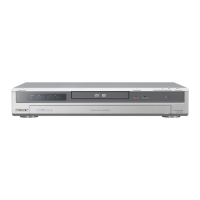
The Sony RDR-GX300 is a DVD recorder designed for home use, offering a comprehensive solution for recording television programs, transferring content from VCRs, and playing back recorded media. This device aims to integrate seamlessly into an existing home entertainment system, providing flexibility in how users consume and create media.

Function Description

The primary function of the RDR-GX300 is to record television programs onto recordable DVDs. It supports various recording modes, including HQ (highest quality, shortest recording time), HSP, SP, LP, EP, and SLP (lowest quality, longest recording time), allowing users to balance video quality with disc space. The recorder can be connected to a cable box, satellite receiver, or directly to an antenna, offering multiple sources for recording.

Beyond recording TV, the RDR-GX300 also facilitates the transfer of content from a VCR to a DVD. This feature is particularly useful for digitizing old videotape collections, preserving memories, or creating more convenient, durable copies of analog media. The device can also play back recorded DVDs and potentially other DVD formats, though specific compatibility would depend on the disc type and finalization status.

A key feature is its "Set Top Box controller" functionality. When connected, the recorder can automatically change channels on a connected cable box or satellite receiver at the start of a timer recording. This eliminates the need for manual channel switching, making scheduled recordings more reliable and convenient.

The RDR-GX300 also supports connection to an AV amplifier (receiver), allowing users to experience enhanced audio, including Dolby Digital or DTS surround effects, depending on the amplifier and the type of connection (analog audio cords or digital coaxial/optical cords). This integration enriches the home theater experience, providing immersive sound for recorded content.

Usage Features

The RDR-GX300 is designed with user-friendliness in mind, starting with a "Quick Start Guide" that simplifies the initial setup process. The guide breaks down setup into three main steps: Hookup, Setup, and Record, ensuring a smooth first-time experience.

Hookup:

The device offers two basic connection types:

  1. Cable Box with Video/Audio Output or Satellite Receiver: This setup involves connecting the cable box/satellite receiver's video/audio output to the recorder's LINE IN jacks, and then connecting the recorder's output to the TV. Power cords are connected last. This configuration is ideal for users who have a set-top box providing a clean audio/video signal.
  2. Cable (without video/audio output) or Antenna: For users without a set-top box or those connecting directly to a cable wall jack/antenna, the recorder connects via coaxial cables. The signal goes from the wall jack/antenna to the recorder's VHF/UHF IN, and then from the recorder's VHF/UHF OUT to the TV's VHF/UHF IN. This setup allows the recorder's internal tuner to receive broadcast signals.

Optional connections enhance functionality:

  • Set Top Box Controller: A small IR blaster connects to the recorder and is positioned near the set-top box's IR receiver. This enables the recorder to control the set-top box's channel changes for timer recordings.
  • VCR Connection: A VCR can be connected to the recorder's LINE IN 3 jacks for recording from videotapes to DVD. Alternatively, a VCR can be connected directly to the TV for playback, but not between the DVD recorder and TV if the user wishes to view VCR content through the recorder.
  • AV Amplifier (Receiver) Connection: The recorder can be connected to an AV amplifier using analog audio cords for basic stereo sound or digital coaxial/optical cords for Dolby Digital or DTS surround effects.

Setup:

The "Easy Setup" display automatically guides users through initial configurations upon first power-on. This includes:

  • Language Selection: Choosing the desired language for on-screen menus.
  • Clock Setting: Manual or automatic clock synchronization. The automatic setting relies on broadcast signals.
  • Set Top Box Control: Activating and testing the set-top box controller function, which involves entering the brand code of the cable box/satellite receiver.
  • Input Source Configuration: Specifying whether the input signal comes from a "Line" input (e.g., from a cable box) or an "Antenna" input, and selecting the corresponding channel.
  • TV Type Selection: Choosing between "16:9" for wide-screen TVs or "4:3 Letter Box" / "4:3 Pan Scan" for standard TVs, which affects how wide-screen images are displayed.
  • AV Amplifier Connection Type: Indicating if an AV amplifier is connected and, if so, whether it's via analog audio or digital (optical/coaxial) cords, and the preferred digital audio output format (Dolby Digital, D-PCM, or Off).
  • Tuner Preset: For antenna/cable connections, the recorder automatically searches for and stores receivable channels.

Recording:

Recording a TV program is straightforward:

  1. Insert Disc: Open the disc tray, place a recordable DVD (label side up), and close the tray. The recorder will display "LOAD" while preparing the disc.
  2. Select Channel: Use CH+/- to select the desired channel. If using a set-top box connected via Line 1, select "L1" on the recorder and then change the channel on the set-top box.
  3. Select Recording Mode: Repeatedly press REC MODE to cycle through HQ, HSP, SP, LP, EP, or SLP, balancing quality and recording time. Users can check remaining disc space via the "Disc Info" menu accessible through the TOOLS button.
  4. Start Recording: Press REC. The recorder automatically finds available space and begins recording. Press REC STOP to end recording.

Playback:

Playing recorded programs is also simple:

  1. Access Title List: Press TITLE LIST to view a menu of recorded titles.
  2. Select Title: Use the directional buttons to choose a title and press ENTER. A sub-menu appears.
  3. Start Playback: Select "Play" and press ENTER. Playback begins from the start of the title. Users can also view thumbnail pictures of recorded titles by pressing the ZOOM +/- buttons.

Disc Management:

  • Removing a Disc: Press OPEN/CLOSE. "INFO WRITE" flashes as the recorder writes an electronic index of contents to the disc. Once the tray opens, remove the disc and close the tray.
  • Finalization: For discs to be played on other DVD equipment, they may need to be finalized. This process is detailed in the operating instructions.

Maintenance Features

The manual does not explicitly detail maintenance features in a dedicated section, but general care for electronic devices applies. The RDR-GX300 is designed for typical home use, implying that regular cleaning of the exterior with a soft, dry cloth would be sufficient. Keeping the disc tray free of dust and debris is important for optimal disc reading and recording performance.

The device's software-based "Easy Setup" and "Tuner Preset" functions can be considered self-maintenance features, as they guide the user through initial configuration and channel scanning, ensuring the device is correctly set up to receive signals. The "Disc Info" screen, which displays remaining disc space, helps users manage their recording media effectively, preventing issues related to full discs.

The inclusion of a "Set Top Box controller" and the ability to connect to an AV amplifier are features that enhance the device's integration and longevity within a home entertainment system, allowing it to adapt to different setups and provide a consistent user experience without requiring frequent manual adjustments or external accessories for basic functionality.

In summary, the Sony RDR-GX300 is a versatile DVD recorder focused on ease of use, offering robust recording capabilities from various sources, VCR content transfer, and integration with home theater systems for an enhanced audio-visual experience. Its guided setup and intuitive controls aim to make media recording and playback accessible to a broad range of users.

Sony RDR-GX300 Specifications

General IconGeneral
TypeDVD Recorder
Recording FormatDVD-R, DVD-RW, DVD+R, DVD+RW
Video FormatMPEG-2
Weight3.5 kg
Remote ControlYes
Disc TypesDVD-R, DVD-RW, DVD+R, DVD+RW, CD-R, CD-RW
Audio FormatDolby Digital
Input ConnectionsComposite, S-Video, RF
Output ConnectionsComposite, S-Video, RF
Dimensions430 mm
Video Recording ModesSP, LP, EP
TunerAnalog

Related product manuals