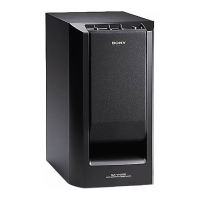
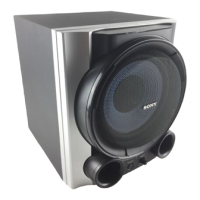
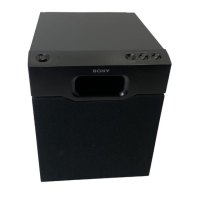
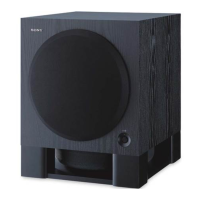
Active Subw oofer
SA-WM 250
4-252-451-12(1)
English
WARNING
To prevent fire or shock hazard, do not expose the
unit to rain or moisture.
To prevent fire, do not cover the ventilation of the
apparatus with newspapers, table-cloths, curtains, etc.
And don’t place lighted candles on the apparatus.
To prevent fire or shock hazard, do not place objects
filled with liquids, such as vases, on the apparatus.
Do not install the appliance in a confined space, such
as a bookcase or built-in cabinet.
NOTICE FOR THE CUSTOM ERS IN THE USA
This symbol is intended to alert the user
to the presence of uninsulated
“dangerous voltage” within the product’s
enclosure that may be of sufficient
magnitude to constitute a risk of electric
shock to persons.
This symbol is intended to alert the user
to the presence of important operating
and maintenance (servicing) instructions
in the literature accompanying the
appliance.
CAUTION
You are cautioned that any changes or modification not
expressly approved in this manual could void your
authority to operate this equipment.
Note to CATV system inst aller:
This reminder is provided to call CATV system installer’s
attention to Article 820-40 of the NEC that provides
guidelines for proper grounding and, in particular,
specifies that the cable ground shall be connected to the
grounding system of the building, as close to the point of
cable entry as practical.
CAUTION
Use of this applicance with some systems may present a
shock or fire hazard. Do not use with any units which
have the following marking located near output.
WARNING: HAZARDOUS ENERGY!
NOTICE FOR THE CUSTOM ERS IN CANADA
CAUTION
TO PREVENT ELECTRIC SHOCK, MATCH WIDE
BLADE OF PLUG TO WIDE SLOT, FULLY INSERT.
Owner’s Record
The model number and serial numbers are located
on the rear of the unit. Record the serial number in
the space provided below. Refer to them
whenever you call upon your Sony dealer
regarding this product.
Model No. SA-WM250
Serial No.
Precautions
On safety
• Before operating the subwoofer, be sure that the
operating voltage of your subwoofer is identical with
that of your local power supply.
• Unplug the subwoofer from the wall outlet if it is not to
be used for an extended period of time. To disconnect
the cord, pull the cord by grasping the plug. Never
pull the cord itself.
• Should any liquid or solid object fall into the
subwoofer, unplug the subwoofer and have the
subwoofer checked by qualified personnel before
operating it any further.
• AC power cord must be changed only at the qualified
service shop.
When turning on or off an amplifier or other
equipment
Lower the volume of the amplifier to minimum.
To avoid damaging the subw oofer
• Be careful in setting the volume control of the amplifier
to avoid an excessive input power.
• Do not attempt to open the enclosure or remold
speaker units and networks.
In case color irregularity is observed on t he
nearby TV screen
With the magnetically shielded type of the speaker
system, the speakers can be installed near a TV set.
However, color irregularity may still be observed on the
TV screen depending on the type of your TV set.
If color irregularity is observed...
t Turn off the TV set once, then turn it on after 15 to
30 minutes.
If color irregularity is observed again...
t Place the speakers further apart from the TV set.
When how ling occurs
Relocate the speaker or turn down the volume of the
amplifier.
On inst allation
• Do not install the subwoofer near heat sources such as
radiators or air ducts, or in a place subject to direct
sunlight, excessive dust, mechanical vibration or shock.
• Good ventilation is essential to prevent internal heat
build-up in the subwoofer. Place the subwoofer in a
location with adequate air circulation. Do not place the
subwoofer on a soft surface.
• Use caution when placing the speaker on a specially
treated (waxed, oiled, polished, etc.) floor, as staining
or discoloration may result.
On cleaning t he cabinet
Clean the cabinet with a soft cloth lightly moistened with
water. Do not use any type of abrasive pad, scouring
powder or solvent such as alcohol or benzine.
If you have any questions or problems concerning your
subwoofer that is not covered in this manual, please
consult your nearest Sony dealer.
Installation
Since the human ear cannot detect the direction and
position where the bass sound being reproduced by a
subwoofer (below 200 Hz) comes from, you can install
the subwoofer wherever you like in your room. To
obtain a better bass reproduction, we recommend you
to install the subwoofer on a solid floor where the
resonance is unlikely to occur.
Notes
• Always install the subwoofer vertically, keeping a few
centimeters away from the wall.
• Do not place an object on the subwoofer or sit on it.
• If the subwoofer is installed in the center of a room, the
bass could be extremely weakened. This is due to the
influence of the standing wave of the room. If this
happens, move the subwoofer away from the center of
a room or eliminate the cause of the standing wave, by
installing a bookshelf on the wall, etc.
2004 Sony Corporation Printed in Malaysia
Hooking Up the Syst em
Overview
Use the INPUT jacks or the SPEAKER IN terminals of the
subwoofer when you connect the amplifier.
•
If your amplifier has one of the following types of
output jacks, connect the INPUT jack and the
amplifier's jack using the supplied audio connecting
cord.
—
MONO OUT jack
— MIX OUT jack
— SUBWOOFER output jack(s)
— SUPER WOOFER output jack(s)
• If your amplifier does not have the above mentioned
output jacks, connect the speaker terminals of the
amplifier to the SPEAKER IN terminals instead.
(A)
Before you get started
•
Turn off the power of the amplifier and the subwoofer
before making any connection.
• Use the audio connecting cords that are supplied to
the respective equipment. If there are not enough
audio connecting cords to make the necessary
connections, you need to purchase some optional
audio connecting cords.
• Be sure to make connections firmly to avoid noise.
• Connect the AC power cord from the subwoofer to
a wall outlet.
• You cannot connect the CENTER output jack for use
with Dolby Pro Logic function to the subwoofer.
Bass sound is not output with some Dolby Pro Logic
modes.
Connecting t o an amplifier w ith a
single set of speaker t erm inals
(B)
If your amplifier is equipped with a single set of speaker
terminals, connect the subwoofer to the amplifier, and
then connect the front speakers to the subwoofer.
Hookups
1 Connect the subwoofer to the amplifier.
Connect the SPEAKER IN terminals of the
subwoofer to the amplifier’s speaker
terminals with the speaker cords. Be sure to
connect both L and R channels.
2 Connect the front speakers to the subwoofer.
Connect the speakers to the SPEAKER OUT
terminals of the subwoofer.
Connecting t o an amplifier w ith
double (A+B) set s of speaker
terminals
(C)
If your amplifier has double (A+B) sets of speaker
terminals, connect both the subwoofer and the front
speakers to the amplifier.
Hookups
1 Connect the front speakers to the amplifier.
Connect the speakers to your amplifier’s
SPEAKER A terminals.
2 Connect the subwoofer to the amplifier.
Connect the SPEAKER IN terminals of the
subwoofer to the amplifier’s SPEAKER B
terminals using the supplied speaker cords.
When using the double (A+B) sets of speakers, make
sure that you select the “A+B” position with your
amplifier.
Note
When you are using SPEAKER A terminal (front
speaker) only or when the power of the amplifier is
turned off, turn down the volume or turn off the power
of the subwoofer. Otherwise, hum noise may be heard.
Connecting t o an amplifier w ith a
special jack for a subw oof er
If your amplifier has a special jack for a subwoofer (such
as MONO OUT jack, MIX OUT jack, SUBWOOFER jack
or SUPER WOOFER jack), connect the INPUT jack of the
subwoofer to one of those jacks.
Hookups
(D)
Connect the MONO OUT jack of your amplifier to the
INPUT jack of the subwoofer with the supplied audio
connecting cord.
Note
If the output level of your amplifier is not large enough,
the sound may not be loud enough. In this case, connect
the speaker terminals of the amplifier directly to the
SPEAKER IN terminals of the subwoofer.
Connecting t he AC pow er cord
•
Connect the AC power cord from the subwoofer and
from your amplifier to a wall outlet.
• Make sure that power to the subwoofer is turned off
before you plug in or unplug any power cord.
Listening to the Sound (
E
)
1 Turn on the amplifier and select the program
source.
2 Press POWER.
The subwoofer turns on and the POWER
indicator lights up in green.
3 Play the program source.
Adjust the VOLUME so that sound from the
front speakers is not distorted.
If it is distorted, the sound from the
subwoofer will also be distorted.
Notes
•
Never set the amplifier’s tone control (BASS, TREBLE,
etc.) or the equalizer output to a high level or input
sinewaves of 20 Hz to 50 Hz recorded on a
commercially-available test disc or special sound (bass
sound of electronic musical instrument, pop noise of
analog disc turntable, sound with abnormally
enhanced bass, etc.) in a high level to this unit. These
actions may cause damage to the speakers.
When a special disc containing abnormally enhanced
bass is played, noise may be output in addition to the
original sound. In such a case, reduce the sound level.
• The subwoofer output signal (DOLBY digital signal)
of the digital surround processor sold singularly is set
10 dB higher by Dolby laboratories Licensing
Corporation. In the case of using normally, adjust the
subwoofer level.
Adjusting the Sound
(F)
You can adjust the sound of the subwoofer to suit the
sound of your front speakers. Reinforcing the bass sound
gives you a greater sense of atmosphere.
1 Adjust the cut-off frequency.
Turn the CUT OFF FREQ control, depending
on the reproduction frequencies of your front
speakers.
Refer to the following when adjusting.
1 Typical very small sized speakers: 5 – 7 cm
dia.
2 Typical small sized speakers: 8 –15 cm dia.
3 Typical medium sized speakers: 16 –24 cm
dia.
4 Typical large sized speakers: more than 25
cm dia.
To make the most of the low level converter
function of Dolby digital, turn the CUT OFF
FREQ as high as possible when playing back
the Dolby digital.
2 Adjust the volume level of the subwoofer.
Turn the LEVEL control so that you can hear
the bass sound a little more than before. To
increase the volume, turn the LEVEL control
clockwise. To reduce the volume, turn the
LEVEL control counterclockwise.
3 Play your favorite song and movie.
Male vocal tunes and voice containing bass
sounds are most suitable for adjustment.
Turn the volume for front speakers to the
same level as usual.
4 Select the phase polarity.
Use the PHASE selector to select the phase
polarity.
5 Repeat steps 1 to 4 to adjust for your
preference.
Once you have adjusted the subwoofer to the
settings you want, use the VOLUME control
on the amplifier to adjust the volume of the
subwoofer with that of the other speakers.
You don’t need to adjust the subwoofer
settings when you change the volume level
of the amplifier.
Notes
• If the sound distorts when you turn on the bass
reinforcement from your amplifier (such as, DBFB,
GROOVE, the graphic equalizer, etc.), turn off the bass
reinforcement and adjust the sound.
• Do not turn the volume of the subwoofer to maximum.
Doing so may weaken the bass sound. Moreover,
extraneous noise may be heard.
• Selecting NORMAL or REVERSE with the PHASE
selector reverses the polarity and may provide better
bass reproduction in certain listening environments
(depending on the type of front speakers, the position
of the subwoofer and the adjustment of the cut-off
frequency). It may also change the expanse and
tightness of sound, and effect the feeling of the sound
field. Select the setting that provides the sound you
prefer when listening in your normal listening position.
Setting the speaker (G)
To prevent speaker vibration or movement while
listening, attach the supplied foot pads to the speaker.
Troubleshooting
If you experience any of the following difficulties while
using the subwoofer, use this troubleshooting guide to
help you remedy the problem. Should any problem
persist, consult your nearest Sony dealer.
There’s no sound.
•Check that this subwoofer and components
are connected correctly and securely.
•Turn LEVEL clockwise to turn the volume
up.
•Reset the level.
The sound has suddenly stopped.
•The speaker cords may have short-circuited.
Connect the cords properly.
The sound is distorted.
•The input signal is imperfect.
•
The input signal level is too high.
•Set the CUT OFF FREQ as high as possible
when playing back the Dolby digital.
Severe hum or noise is heard.
•Connect the ground wire of the turntable
properly.
•The contacts between the plugs of the
connecting cords and the corresponding jacks
have not been made properly. Connect the
plugs firmly.
•The audio system is picking up some noise
from a TV set. Move the audio system away
from the TV set or turn the TV set off.
Specifications
AUDIO POWER SPECIFICATIONS
POWER OUTPUT AND TOTAL HARMONIC
DISTORTION:
With 6 ohm loads, from 28 – 200 Hz; rated 100 watts,
minimum RMS power, with no more than 0.8 % total
harmonic distortion from 250 milliwatts to rated
output.
System
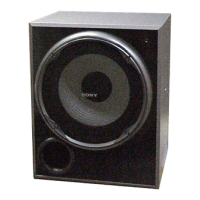
Type
Active Subwoofer (magnetically shielded design)
Speaker unit
Woofer: 20 cm dia. (8 in.), cone type
RM S output
100 W (6 Ohms, 40 Hz, 10% THD)
Frequency range
28 Hz – 200 Hz
High frequency cut-off frequency
50 Hz – 200 Hz
Phase selector
NORMAL, REVERSE
Inputs
Input jacks
INPUT: input pin jack
SPEAKER IN: input terminals
Output jacks
SPEAKER OUT: output terminals
General
Power requirements
Australian models: 240 V AC, 50/60 Hz
Other models: 120 V AC, 60 Hz
Power consumption
100 W
Dimensions
Approx. 290 x 355 x 387 mm
(11
3
/
8
x 14 x 15
1
/
4
in.) (w/h/d)
M ass
11.5 kg (25 lb 6 oz)
Supplied accessories
Foot pads (4)
Audio connecting cord (1 phono – 1 phono),
2 m (6 ft 6
1
/
2
in.) (1)
Speaker cords, 2.5 m (8 ft 2
1
/
2
in.) (2)
Design and specifications are subject to change
without notice.
INPUT
SPEAKER IN
IN OUT
INPUT
L
SPEAKER
L
R R
Amplif ier
This subwoofer
IN OUT
L
SPEAKER
L
R R
SPEAKER
This subwoofer
IN OUT
L
SPEAKER
L
R R
Front Speaker (R) Front Speaker (L)