Installation instructions for the SOS
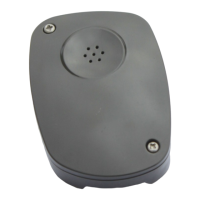
Remote Microphone
The remote microphone will allow you to put the microphone up to 50 feet
way from the SOS 12 unit. The SOS 12 must be purchased separately to use
the remote mic. Allowing the SOS unit to be installed inside a cabinet, in side
the guard shack or any other out of the way location.
1. Remove the face place of the SOS Remote Mic.
2. Find a locaon INSIDE the fence, up on a pole or another
locaon that individuals can not easily get to. Do not put
the unit inside the gate operator enclosure or next to any
noisy machinery that will interfere with the sensor picking up
the sound of the siren.
3. Using the screws provided, mount the SOS Remote Mic with
the microphone facing the oncoming emergency vehicle.
The enclosure has four pre-drilled holes for mounng.
NOTE: If mounng the SOS onto metal, do not allow
metal shaving to remain in the enclosure.
Mounng Holes
Mounng Holes