EasyManua.ls Logo

South Shore Step One 3107-209 User Manual

South Shore Step One 3107-209
23 pages
To Next Page IconTo Next Page
Page #1 background imageLoading...
Page #1 background image
THANK YOU FOR CHOOSING SOUTH SHORE!
MERCI DE CHOISIR SOUTH SHORE!
GRACIAS POR ELEGIR SOUTH SHORE!
1-800-290-0465
service@southshore.ca
www.southshore.ca
Live Chat available Clavardage en ligne disponible
DAMAGED OR MISSING PART? NEED ASSISTANCE FOR ASSEMBLY?
PLEASE CONTACT US DIRECTLY!
PIÈCE BRISÉE OU MANQUANTE?BESOIN D’ASSISTANCE POUR ASSEMBLAGE?
S’IL VOUS PLAIT CONTACTEZ -NOUS!
ESTA DAÑADA O LE FALTA ALGUNA PIEZA? NECESITA AYUDA CON EL
ENSAMBLE?
POR FAVOR CONTACTENOS DIRECTAMENTE!
PRODUCTION CODE CODE DE PRODUCTION
CODIGO PRODUCCION
**
**This number should be kept for all service requests.
**Ce numéro devra être conservé pour toute demande de
service.
**Este numero debera guardarlo para cualquier solicitud de
servicio.
Question and Answer IconNeed help?

Do you have a question about the South Shore Step One 3107-209 and is the answer not in the manual?

South Shore Step One 3107-209 Specifications

General IconGeneral
BrandSouth Shore
ModelStep One 3107-209
CategoryIndoor Furnishing
LanguageEnglish

Summary

Assembly Instructions

Product Identification

Product model and article number for reference.

Warranty Information

Details on the 5-year warranty coverage.

Pre-Assembly Preparation

Important reading and preparation guidelines before assembly.

Required Tools

List of necessary tools for assembling the furniture.

Step 1: Panel F Component Attachment

Attaching hardware to panel F using specific fasteners.

Step 2: Panel H and N1 Assembly

Securing panels H and N1 with designated hardware.

Step 3: Drawer Slide Installation on H

Installing drawer slides onto panel H with specific hardware.

Step 4: Connecting Base Panels

Joining panels F, H, and N1 to form a base structure.

Step 5: Side Panel Fastener Placement

Placing specific fasteners onto the side panels C and C1.

Step 6: Attaching Side Panels

Attaching side panels using screws and specific hardware.

Step 7: Drawer Slide Mounting on Sides

Mounting drawer slides onto side panels C and C1.

Step 8: Support Bracket Attachment to N

Fastening a support bracket to panel N with screws.

Step 9: Panel N and N2 Fastening

Attaching panels N and N2 using specific hardware.

Step 10: Main Frame Assembly

Connecting the main frame components together.

Step 11: Support Beam Installation

Securing support beams labeled XL with screws.

Step 12: Frame Bracket Attachment

Fixing brackets to the assembled frame structure.

Step 13: Top Panel Placement

Positioning the top panels B and B1 onto the frame.

Drawer Slide Separation

Instructions on how to separate the components of a drawer slide.

Step 14: Drawer Slide Attachment to Base

Attaching drawer slides to base panels S and S1.

Step 15: Dowel Attachment to Drawer Panel R

Inserting dowels into the drawer panel R.

Step 16: Drawer Connector Attachment

Securing connectors to drawer base panels S and S1.

Step 17: Drawer Side and Base Assembly

Joining drawer side panels with the base panel.

Step 18: Securing Drawer Sides to Base

Fastening drawer side panels to the base using specific hardware.

Step 19: Drawer Front to Sides Connection

Connecting the drawer front panel to the sides.

Step 20: Hardware on Drawer Front T

Attaching hardware to the drawer front panel T.

Step 21: Securing Drawer Front with Screws

Fastening the drawer front panel using screws and connectors.

Step 22: Attaching Drawer Sides to Front

Securing the drawer sides to the drawer front panel.

Step 23: Drawer Assembly and Securing

Detailed steps for assembling and securing drawer components.

Step 24: Drawer Pull Attachment

Installing drawer pulls onto the assembled drawers.

Final Drawer Insertion

Instructions for inserting assembled drawers into the main frame.

Hardware and Assembly Guides

Hardware Component List

Comprehensive list of all hardware components with their respective codes.

Key Assembly Reminders

Key points to remember during the assembly process.

Additional Hardware List

Maintenance Tips

Cleaning and Care Instructions

Guidelines for cleaning and maintaining the furniture's finish.

Environmental and Usage Precautions

Advice on avoiding damage from sunlight, liquids, and chemicals.

Warranty and Customer Support

5 Year Limited Warranty Details

Explains the terms and conditions of the 5-year limited warranty.

Customer Service Contact Information

Provides contact details for customer service in various regions.
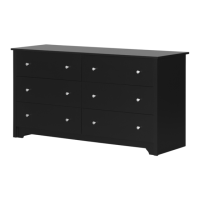
Related product manuals