This document is an owner's manual for a portable basketball system, providing detailed instructions for assembly, usage, and maintenance in English, French, German, and Spanish.
Function Description:
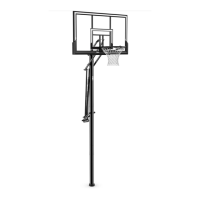
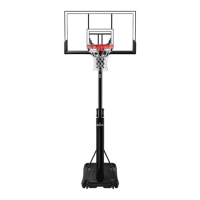
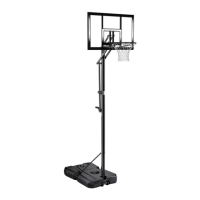
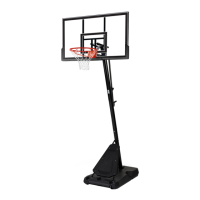
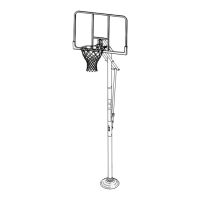
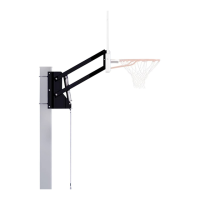
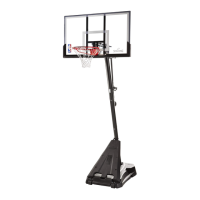
The device is a portable basketball system designed for recreational use. It consists of a backboard, a rim, a net, a multi-section pole, an elevator assembly for height adjustment, and a wheeled base for portability. The system allows users to adjust the height of the backboard and move the entire unit to different locations.
Important Technical Specifications:
- Assembly: Requires adult assembly, typically 3 to 4 hours, and two capable adults for certain procedures.
- Height Adjustment: The system features a screw-jack assembly for raising and lowering the backboard. The manufactured height indicator range is 7-1/2 to 10 feet (2.3 to 3 meters). Adjusting the height beyond this range (over 10 feet or under 7-1/2 feet) can damage the internal adjustment mechanism. The minimum operational height to the bottom of the backboard is 6' 6" (1.98m).
- Base Filling: The base MUST be filled completely with water AND sand at ALL times for stability. Approximately 37 gallons (140 liters) of water or 400 lbs (181 kg) of sand are required. In sub-freezing climates, 2 gallons (7.6 liters) of non-toxic antifreeze should be added if using water, or sand can be used instead, which does not require antifreeze. The cap (41) for the base must be tightened completely and securely to prevent leakage.
- Pole Sections: The system uses multiple pole sections (top, middle, and bottom) that must be correctly identified and assembled with a specific overlap of 3 1/2 inches (9 cm) between sections to ensure structural integrity.
- Hardware: The manual includes a comprehensive parts list and hardware identifiers for bolts, screws, nuts, washers, and other components. It notes that the hardware kit is designed for more than one style of basketball system, so not all hardware will be used.
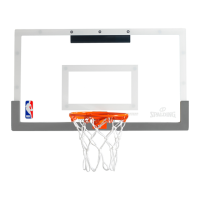
- Backboard Type: The system may come with either a glass or acrylic backboard. If equipped with an acrylic backboard, it should be examined for damage upon receipt, as cracks can lead to sudden breakage.
- Rim Type: The manual details the installation of a "Slam Jam Rim" to the backboard.
- Tools Required: Essential tools include Wrenches (3/8", 1/2", 9/16"), Socket Wrenches and Sockets (3/8", 1/2", 5/16", 9/16", 3/4") with an extension, a Tape Measure, a Wood Board (scrap), a Sawhorse or Support Table, a Hammer or Mallet, Safety Glasses, a Flat-Head Screwdriver, a Phillips-Head Screwdriver, and a Center Punch. Optional tools include large and small adjustable wrenches and a portable drill with torque adjustment and an 11/64" drill bit for pre-drilling on some backboards.
Usage Features:
- Height Adjustment: The backboard height is adjusted by rotating a crank handle.
- Moving System: To move the system, the backboard height must first be adjusted to its lowest position. While holding the pole, the system is rotated forward until the wheels engage with the ground, allowing it to be moved to the desired location. Afterward, it should be carefully rotated upright, and its stability checked. Extreme caution is advised when moving the system across uneven surfaces or placing it on a sloped surface, as it may tip over.
- Safety Warnings: The manual emphasizes several critical safety warnings:
- DO NOT HANG on the rim or any part of the system.
- Keep players' faces away from the backboard, rim, and net during play, especially during dunking activities.
- Do not slide, climb, shake, or play on the base or pole.
- Keep hands and fingers away from moving parts when adjusting height or moving the system.
- Do not allow children to move or adjust the system.
- Remove jewelry before playing to prevent entanglement in the net.
- Ensure the surface beneath the base is smooth and free of sharp objects to prevent punctures and tipping.
- Do not use the system during windy or severe weather conditions; store it in a protected area.
- Never play on damaged equipment.
- Keep the pole top covered with a cap at all times.
- Do not leave the assembly unattended when empty, as it may tip over.
- Do not allow anyone to stand or sit on the base or add ballasting to the base while moving.
Maintenance Features:
- Regular Inspection: Periodically inspect for loose small parts, proper ballast, loose hardware, excessive wear, and signs of corrosion. Repair any issues before use.
- Corrosion Prevention: Keep organic material away from the pole base. Check the pole system for signs of corrosion (rust, pitting, chipping) and repaint with exterior enamel paint if necessary. If rust has penetrated through the steel, replace the pole immediately.
- Winterization: To prevent water in the tank from freezing, add 2 gallons (7.6 liters) of non-toxic antifreeze in sub-freezing weather, or empty the tank completely and store it. Salt should not be used.
- Protective Film: For backboards with protective film, carefully cut and peel it away from the board prior to attaching the rim.
- Screw Protectors: If screw ends are exposed after installation, place screw protectors (5) over them to prevent injury.
- Cleanliness: Collect any metal shavings that may have fallen onto the floor or driveway during assembly to prevent injury.
- Fastener Tightening: All hardware from specific assembly steps should be tightened completely after assembly is finished, but not overtightened to avoid stripping screws.