INTRODUCTION
Congratulations on your purchase of the OG Series of outdoor speakers. The OG Series speakers have been designed to provide
excellent performance in all types of outdoor environments. To be sure that you optimize the performance of your OG Series
speakers, please read this manual carefully.
CAUTION
Although they are designed to withstand the elements, there are precautions you should take to optimize the long-term perfor-
mance of your speakers. Keep soil and wood chips from covering the speaker grille. If soil accumulates on the grille, it can be
rinsed away with low water pressure. Chemicals commonly used in the yard can potentially damage parts of the speaker. Avoid
spraying such chemicals onto or near the speaker. Also avoid placing the speakers where the grille area will come in direct con-
tact with spray from sprinklers.
SPEAKER PLACEMENT
• If you desire music over a wide area, it is best to have a larger number of speakers playing at low volume, rather than a few
speakers playing at high volume. Keep this in mind when designing your outdoor system.
• Ideally, you should place the speakers as close to the primary listening area as possible. The perceived volume of the speaker
decreases rapidly as it is moved further from the listener.
• Direct burial wire or conduit for new yard construction must be run to the location of the speakers. Keep in mind that patios,
walls and other features in your yard may be difficult to get around when wiring.
SPEAKER INSTALLATION
• Each OG Series has a two-conductor 16 AWG speaker wire exiting the bottom. This wire should be connected to a similar wire
run that comes from your audio system.
• When attaching the wire to the OG Series speaker, it is critical that a high quality connection is achieved. A poor connection
may lead to corrosion and a decline in or loss of performance. For best results, use the set of weatherproof wirenuts included
with the speaker. Another option is to use a watertight direct burial box or crimp or solder the wires together and use a heat
shrink tube to seal each connector.
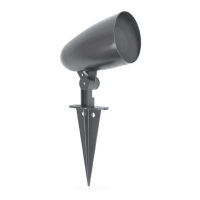
• There are through holes on both the stake and speaker enclosure in case you choose to attach an anti-theft security harness.
See Figure 1 and 5.
• The words "Speaker Faces This Way" are printed on the stake. This will tell you which direction your speaker will be facing when
attached to the stake. See Figure 1.
Follow steps 1-4 and see Figure1-6 for detailed illustrations of the installation process.
1. Insert the stake into the ground by hand. See Figure 1. NOTE: To avoid damaging or braking the stake, DO NOT use a metal
hammer or any hard object. If the soil is too hard to put in by hand, use your foot to continue inserting the stake into the ground.
See Figure 2.
2. Attach the speaker wire to the wire run coming from your audio system (observing the proper polarity with your amplier: + to +
and - to -.
3. Attach the OG series speaker to the stake using the security knob. Turn the security knob clock wise, but do not tighten it
completely. See Figure 3 and 4.
4. Tilt the OG series speaker to the desired angle then continue turning the security knob until it is fully tightened. See Figure 5
and 6.
1
 Loading...