5. Reassemble the valve. Allen head cap screws must be
replaced with the hex head screws included with the pilot
assembly kit. Before completely tightening the locknut or
cap screws, rotate the pilot valve to properly align the
inlet, outlet and external equalizer connections. Join
these connections and tighten the locknut of the
(S)ORIT-12 to 30 ft. lbs. A torque value for the cap screws
on the (S)ORIT-15 and -20 is not recommended, but uni-
formity of compression from the four cap screws is impor-
tant. Screw the flange down evenly and firmly. The pilot
replacement is now complete.
T-Seal
for
(S)ORIT-12, 15
Gasket
for
(S)ORIT-20
NOITCNUFLAMESUACYDEMER
eruliaF
nepoot
.nepotroptolipgnidlohlairetamngierofrotriD.1 .troptolipnaelcdnaelbmessasiD.1
.eruliafliocevlavdionelostoliP.2 htiwlioc1-CKMehtesU.liocevlavdionelosecalpeR.2
.egatlovreporpeht
tonseoD
etaluger
setalugerro
ylhsigguls
ehtfotelniehtotdeilppusecruoserusserphgihehT.1
teltuoehtevobaisp05tsaeltaebtsumevlavtolip
.TIRO)S(ehtfoerusserpnoitcus
.ecruosrewopevlavtolipetacol-eR.1
,ecnatsidelbaredisnocfosienilylppustolipehtfI.2
.ruccoyamgnisnednoc
ehtmorfsetanigiroenilylppusfiroenilylppustolipetalusnI.2
.enilegrahcsidehtfopotehtottievomreviecerehtfopot
eruliaF
esolcot
tsorfedrof
.deggulprotuhsdehcnipenilylppuserusserphgiH.1 .enilylppuserusserphgihnaelcroecalpeR.1
seodydobevlavdnarotpadaneewtebteksagrolaes-T.2
ehtfotuodeelbnacerusserp,sruccosihtfI.laeston
.evlavtolipehtybdeilppusebnacnahtretsafrebmahc
emitynadecalperebdluohsesehT.teksagrolaes-TecalpeR.2
.ydobevlavehtmorfdevomersiylbmessatolipeht
dnanotsipneewtebdegdolrehtielairetamngierofrotriD.3
eveelsehtnignirocsevissecxeropu-gnahgnisuaceveels
ehtfotuodeelboterusserphgihehtgniwollanotsipehtro
.notsipehtevobarebmahc
.eveelsehtdnanotsipehtecalperyrassecenfironaelC.3
.lairetamngierofhtiwdeggulptolipotreniartstelnI.4 .reniartsecalperronaelC.4
tolipehtnilioybdetcirtsersitoliphguorhtwolftnaregirfeR.5
hcumootroenilylppusdeppartaoteudrehtieenilylppus
.metsysehtnilio
dnaneposititahterusebotenilylppustolipehtkcehC.5
.partlionasaevrestonseodtitahtdna
ecruoserusserprewolamorfsetanigiroerusserpylppustoliP.6
.tsorfedrofdesusinaht
ehtfopotehtmorfsetanigiroecruoserusserptolipehtfI.6
ehtevomtsorfedrofgnisolctonsievlavehtdnareviecer
.enilegrahcsidehtotecruoserusserpylppustolip
Page 4 / BULLETIN 90-21-1
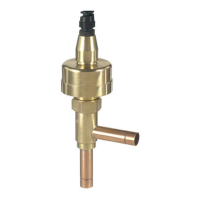
FIGURE 2
PRINTED IN U.S. OF A. 35-1199
PISTON REPLACEMENT
SERVICE TIPS
(S)ORIT-12:
1. Remove the pilot assembly from the adaptor as described
in Steps 1 and 2 of the pilot replacement instructions.
2. Remove the locknut and replace the adaptor, tetraseal,
piston assembly and bottom spring. Reassemble the
valve and tighten the locknut to 30 ft. lbs.
3. Reinstall the pilot assembly. Place a wrench on the bot-
tom connection of the pilot valve and turn clockwise until
the pilot assembly is firmly in place. Do not attempt to
align the three pilot valve connections at this time.
4. Loosen the locknut and rotate the pilot valve to properly
align the inlet, outlet and external equalizer connec-
tions. Join these connections and tighten the locknut to
30 ft. lbs.
(S)ORIT-15 & 20:
1. Disconnect the three connections of the pilot valve and
remove the four cap screws. The complete pilot assembly
adaptor and body flange can now be lifted off the main
valve body.
2. Replace the piston assembly, body sleeve and bottom
spring.
3. Install a new gasket and reassemble the valve. Before com-
pletely tightening the cap screws, rotate the pilot valve to prop-
erly align the inlet, outlet and external equalizer connections.
Join these connections and tighten the cap screws. A torque
value for the cap screws is not recommended but uniformity of
compression from the four cap screws is important. Screw the
flange down evenly and firmly.
 Loading...