Do you have a question about the Stadium SYDNEY and is the answer not in the manual?
Explains how to activate and deactivate the microphone mute function.
Guides on adjusting microphone input level for optimal performance and avoiding distortion.
Provides guidance on optimal microphone placement for best frequency response and sound.
Lists the operating systems and hardware requirements for the microphone.
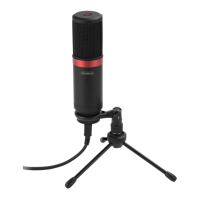
Details the items included in the microphone package.
Provides contact details for technical support and warranty information.
The Stadium Sydney USB Microphone is a versatile audio input device designed for a wide range of applications, from professional recording to casual gaming and podcasting. This user guide provides comprehensive instructions for setting up and using the microphone with both Mac OS X and Windows operating systems, ensuring a smooth and optimal audio experience.
The Stadium Sydney USB Microphone is a plug-and-play audio device that connects directly to your computer via a USB cable. It is designed to capture high-quality audio with a cardioid pickup pattern, which means it primarily picks up sound from the front, minimizing background noise from the sides and rear. This directional characteristic makes it ideal for situations where you want to focus on a single sound source, such as a speaker, singer, or instrument. The microphone is suitable for various uses including voiceovers, vocal recordings, music recording, gaming, and podcasting. Its USB connectivity eliminates the need for external audio interfaces or complex setups, making it a convenient solution for both beginners and experienced users. The microphone also features a mute button on top, allowing for quick and easy muting and unmuting of the audio output.
The microphone is designed for ease of use across different operating systems. For Mac OS X users, the setup involves plugging the USB cable into the computer, which automatically recognizes the device. To select the Sydney as the audio input, users navigate to System Preferences, then Sound, and finally the Input tab, where they can choose "SYDNEY USB" from the list of devices. The guide also mentions that recording software like Audacity, a widely used free program, can be used for recording and editing sounds.
For Windows XP users, the setup process begins by plugging in the USB cable, after which the computer recognizes the device. To set the Sydney USB as the default recording device, users access the Control Panel from the START menu and then select "Sounds and Audio Devices." Within this section, under the Audio tab, users can choose "SYDNEY USB" as the default device for sound recording. The guide further explains how to adjust the computer volume and mute the microphone through the Wave In window, ensuring precise control over the audio input.
Windows Vista users follow a similar process, starting with plugging in the USB cable and then navigating to the Control Panel and selecting "Sound." Within the Sound preferences, users go to the Recording tab and ensure that "SYDNEY USB Mic" is set as the default recording device, indicated by a green check mark.
For Windows 7/10 users, the initial steps are identical: plug in the USB cable, and the computer will recognize the device. To configure the Sydney USB as the default recording device, users access the Control Panel from the START menu, then select "Sound." In the Sound window, they navigate to the Recording tab and choose "SYDNEY USB" as the default device. The guide then instructs users to double-click the "SYDNEY USB" icon to open the Microphone Properties window, where they can access the Levels tab to adjust the microphone level (loudness). This allows users to fine-tune the input sensitivity to prevent distortion or insufficient volume.
The microphone's cardioid pattern is a key usage feature, ensuring that the primary sound source is captured clearly while minimizing ambient noise. This is particularly beneficial for voice-centric applications like podcasts and voiceovers, where clarity and focus on the speaker are paramount. For musical applications, the directional pickup helps isolate instruments or vocals, leading to cleaner recordings. The included tripod folding desk stand provides a stable base for the microphone, allowing for convenient placement on a desk or other flat surface during use.
While the manual does not explicitly detail maintenance features in a dedicated section, it provides information that implies certain aspects of care and longevity. The microphone is described as having a "durable metal body and mesh grill," suggesting a robust construction designed to withstand regular use. This durable build contributes to the device's longevity and reduces the likelihood of damage from minor impacts or handling.
The mute button on top of the microphone serves as a functional control and also indicates its active status through illumination. This simple mechanism is a user-friendly feature that requires no specific maintenance other than ensuring its proper functioning.
The guide emphasizes the importance of correctly setting software levels to achieve optimum performance and prevent distortion. This is a crucial aspect of maintaining audio quality and indirectly contributes to the perceived "health" of the microphone's output. By adjusting the microphone level through the control panel or recording software, users can prevent overloading the input, which could otherwise lead to poor sound quality. This proactive adjustment is a form of operational maintenance that ensures the microphone performs at its best.
Proper positioning of the microphone is also highlighted as essential for achieving the best frequency response. The guide advises users to speak directly into the microphone with the "STADIUM" logo positioned towards the mouth, at a distance of about 1 to 40mm for optimal recording. This guidance on placement, while not a direct maintenance task, helps users maximize the microphone's performance and prevent issues that might arise from improper usage, such as muffled sound or excessive background noise. Experimenting with different mic placements is encouraged to find the best sound for a particular setup, which can be seen as a continuous optimization process rather than a one-time maintenance event.
The fact that the microphone is "Windows and Mac compatible, no drivers needed" simplifies its use and reduces potential software-related issues that might require troubleshooting or updates, thereby minimizing a common area of technical maintenance for users. The USB type B cable, a standard connector, also implies easy replacement if the cable were to be damaged, rather than requiring specialized parts.
In summary, the Stadium Sydney USB Microphone is designed for straightforward operation and robust performance across various platforms and applications. Its user-friendly setup, directional audio capture, and durable construction make it a reliable choice for anyone seeking a high-quality USB microphone.
| frequency range | 30-18.000Hz |
|---|---|
| max SPL | 94dB |
| sampling rate | 16 bit, 48kHz |
| sensitivity | -36dB +/- 2dB |
| S/N ratio | 74dB |
| mic gain | −16dB (45dB Max) |
| power supply | Computer USB power |
|---|---|
| power output | USB Powered, 100 mA |
| USB cable length | 1.8M |
|---|---|
| included item | 1 x USB Microphone, 1 x Tripod folding desk stand |