14
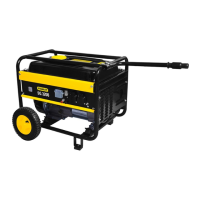
- Open the petrol cock (16) by turning it down.
- Move the ON/OFF switch (12) to position "I”.
- Turn the electric starter (15) with the key to the “START”
position until the motor has started.
- Push the choke lever (13) back again after the engine
has started.
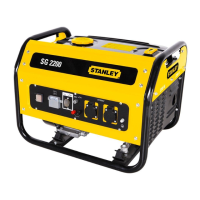
Ï#ONNECTINGÏCONSUMERSÏTOÏTHEÏGENERATOR
Connect the equipment you want to use to the socket-
outlets (3/4)
)MPORTANTÏ
- These sockets may be loaded continuously (according
S1value) and temporarily (according S2 value).
- Do not connect the generator to the domestic power
network as this may result in damage to the generator
itself or to other electrical appliances in your home.
Note: Some electrical appliances (power jigsaws, drills,
etc.) may have a higher level of power consumption
WHENÏUSEDÏINÏDIFlCULTÏCONDITIONS
Ï3WITCHINGÏOFFÏTHEÏENGINE
- Before you switch off the generator, allow it to run
BRIEmYÏWITHÏNOÏCONSUMERSÏSOÏTHATÏITÏCANÏCOOLÏDOWNv
- Move the ON/OFF switch (12) to position "O”.
- Close the petrol cock.
Ï/VERLOADÏCUTOUTÏFORÏSOCKETOUTLETS
)MPORTANTÏ4HEÏGENERATORÏISÏlTTEDÏWITHÏANÏOVERLOADÏCUT
out.
4HISÏSHUTSÏDOWNÏTHEÏSOCKETSÏÏ9OUÏCANÏRESTARTÏTHEÏ
sockets (3/4) by pressing the overload cut-out (7).
)MPORTANT If this happens, reduce the electric power
you are taking from the generator or remove any
defective connected appliances.
)MPORTANTÏDefective overload cut-outs must be replaced
only by overload cut-outs of identical design and with the
same performance data. If repairs are necessary, please
contact your customer service center.
Ï#LEANINGÏMAINTENANCEÏANDÏSTORAGEÏ
Switch off the motor and pull the spark plug boot
from the spark plug before doing any cleaning and
maintenance work on the equipment.
Important: Switch off the machine immediately and
contact your service station:
- In the event of unusual vibrations or noise.
Ï)FÏTHEÏENGINEÏAPPEARSÏTOÏBEÏOVERLOADEDÏORÏMISlRES
8.1 Cleaning
- Keep all safety devices, air vents and the motor
housing free of dirt and dust as far as possible. Wipe the
equipment with a clean cloth or blow it with compressed
air at low pressure.
- We recommend that you clean the device immediately
EACHÏTIMEÏYOUÏHAVEÏlNISHEDÏUSINGÏIT
- Clean the equipment regularly with a moist cloth and
some soft soap. Do not use cleaning agents or solvents;
these could attack the plastic parts of the equipment.
Ensure that no water can seep into the device.
Ï!IRÏlLTERÏ&IGÏ
In this connection, please also read the service
information.
Ï#LEANÏTHEÏAIRÏlLTERÏATÏREGULARÏINTERVALSÏANDÏREPLACEÏITÏIFÏ
necessary.
Ï/PENÏBOTHÏCLIPSÏANDÏREMOVEÏTHEÏAIRÏlLTERÏCOVERÏ&IGÏ
Ï2EMOVEÏTHEÏlLTERÏELEMENTSÏ&IGÏ
- Do not use abrasive cleaning agents or petrol to clean
the elements.
Ï#LEANÏTHEÏELEMENTSÏBYÏTAPPINGÏTHEMÏONÏAÏmATÏSURFACEÏ
)NÏCASESÏOFÏSTUBBORNÏDIRTÏlRSTÏCLEANÏWITHÏSOAPYÏWATERÏANDÏ
then rinse with clear water and air dry.
- Assemble in reverse order.
Ï3PARKÏPLUGÏ&IGÏ
Check the spark plug (item 29) for dirt and grime after 20
hours of operation and if necessary clean with a copper
wire brush. Thereafter service the spark plug after every
50 hours of operation.
- Pull off the spark plug boot with a twist.
- Remove the spark plug with the supplied spark plug
wrench.
- Assemble in reverse order.
8.4 Changing the oil and checking the oil level
BEFOREÏUSINGÏTHEÏMACHINEÏ&IGÏ

 Loading...