5
ENGLISH
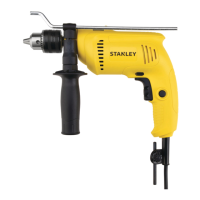
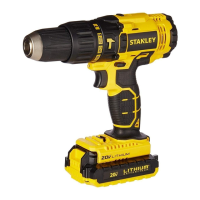
2. Lock-on button
3. Forward/reverse button
4. Drilling mode selector
5. Chuck
6. Depth stop
7. Side handle
Assembly
Warning! Before assembly, make sure that the
tool is switched off and unplugged.
Fitting the side handle and depth stop (g.A,B)
u Turn the grip counter clockwise until you can slide the side
handle (7) onto the front of the tool as shown (g.A).
u Rotate the side handle into the desired position.
u Insert the depth stop(6) into the mounting hole as shown
(g.B).
u Set the drilling depth as described below.
u Tighten the side handle by turning the grip clockwise.
Fitting a drill bit (g.C)
u Open the chuck by turning the sleeve (5) counter clock-
wise.
u Insert the bit shaft (9) into the chuck (drill bit not included).
u Insert the chuck key(10) into each hole (8) in the side of
the chuck and turn clockwise until it is tight.
Removing and retting the chuck (g.D)
u Open the chuck as far as possible.
u Remove the chuck retaining screw, located in the chuck,
by turning it clockwise using a screwdriver.
u Tighten an Allen key into the chuck and strike it with a
Impact as shown.
u Remove the Allen key. Remove the chuck by turning it
counter clockwise.
u To ret the chuck, screw it onto the spindle and secure it
with the chuck retaining screw.
Use
Warning! Let the tool work at its own pace.Do
not overload.
Warning! Before drilling into walls, oors or
ceilings, check for the location of wiring and
pipes.
Selecting the direction of rotation (g.E)
For drilling and for tightening screws, use forward (clockwise)
rotation For loosening screws or removing a jammed drill bit,
use reverse (counter clockwise) rotation.
u To select forward rotation, push the forward/reverse button
(3) to the left position.
u To select reverse rotation, push the forward/reverse button
(3) to the right. Warning! Never change the direction of
rotation while the motor is running.
Selecting the drilling mode
u For drilling in masonry, set the drilling mode selector (4) to
the position.
u For drilling in other materials and for screwdriving, set the
drilling mode selector to the position.
Setting the drilling depth (g.B)
u Slacken the side handle (7) by turning the grip counter
clockwise.
u Set the depth stop(6) to the desired positon. The maxi-
mum drilling depth is equal to the distance between the tip
of the drill bit and the front end of the depth stop.
u Tighten the side handle by turning the grip clokwise.
Switching on and off
u To switch the tool on, press the variable speed switch(1).
The tool speed depends on how far you press the switch.
As a general rule, use low speeds for large diameter drill
bits and high speeds for smaller diameter drill bits.
u For continuous operation, press the lock-on button (2) and
release the variable speed switch. This option is available
only at full speed in both forward and reverse modes.
u To switch the tool off, release the variable speed switch. To
switch the tool off when in continuous operation, press the
variable speed switch again and release it.
u Based on the different applications, turn around the speed
dial(11) to control the maximum speed.
Drilling in metal
Start drilling with slow speed and increase to full power while
applying rm pressure on the tool. A smooth even ow of metal
chips indicates the proper drilling rate. Use a cutting lubricant
when drilling metals. The exceptions are cast iron and brass
which should be drilled dry.
NOTE: Large [5/16" (8 mm) to 1/2" (13 mm)] holes in steel can
be made easier if a pilot hole [5/32" (4 mm) to 3/16" (5 mm)]
is drilled rst.
Drilling in wood
Start drilling with slow speed and increase to full power while
applying rm pressure on the tool. Holes in wood can be made
with the same twist drills used for metal. These bits may over-
heat unless pulled out frequently to clear chips from the utes.
Work that is apt to splinter should be backed up with a block
of wood.
Features
This tool includes some or all of the following features.
1. Variable speed switch

 Loading...