Setting the Timer/Alarm
The unit can be used as an alarm clock, whereby the selected source - CD, TUNER, USB or SD CARD - starts playback at a preset time. NOTE: Make
sure the clock is set before using the Timer.
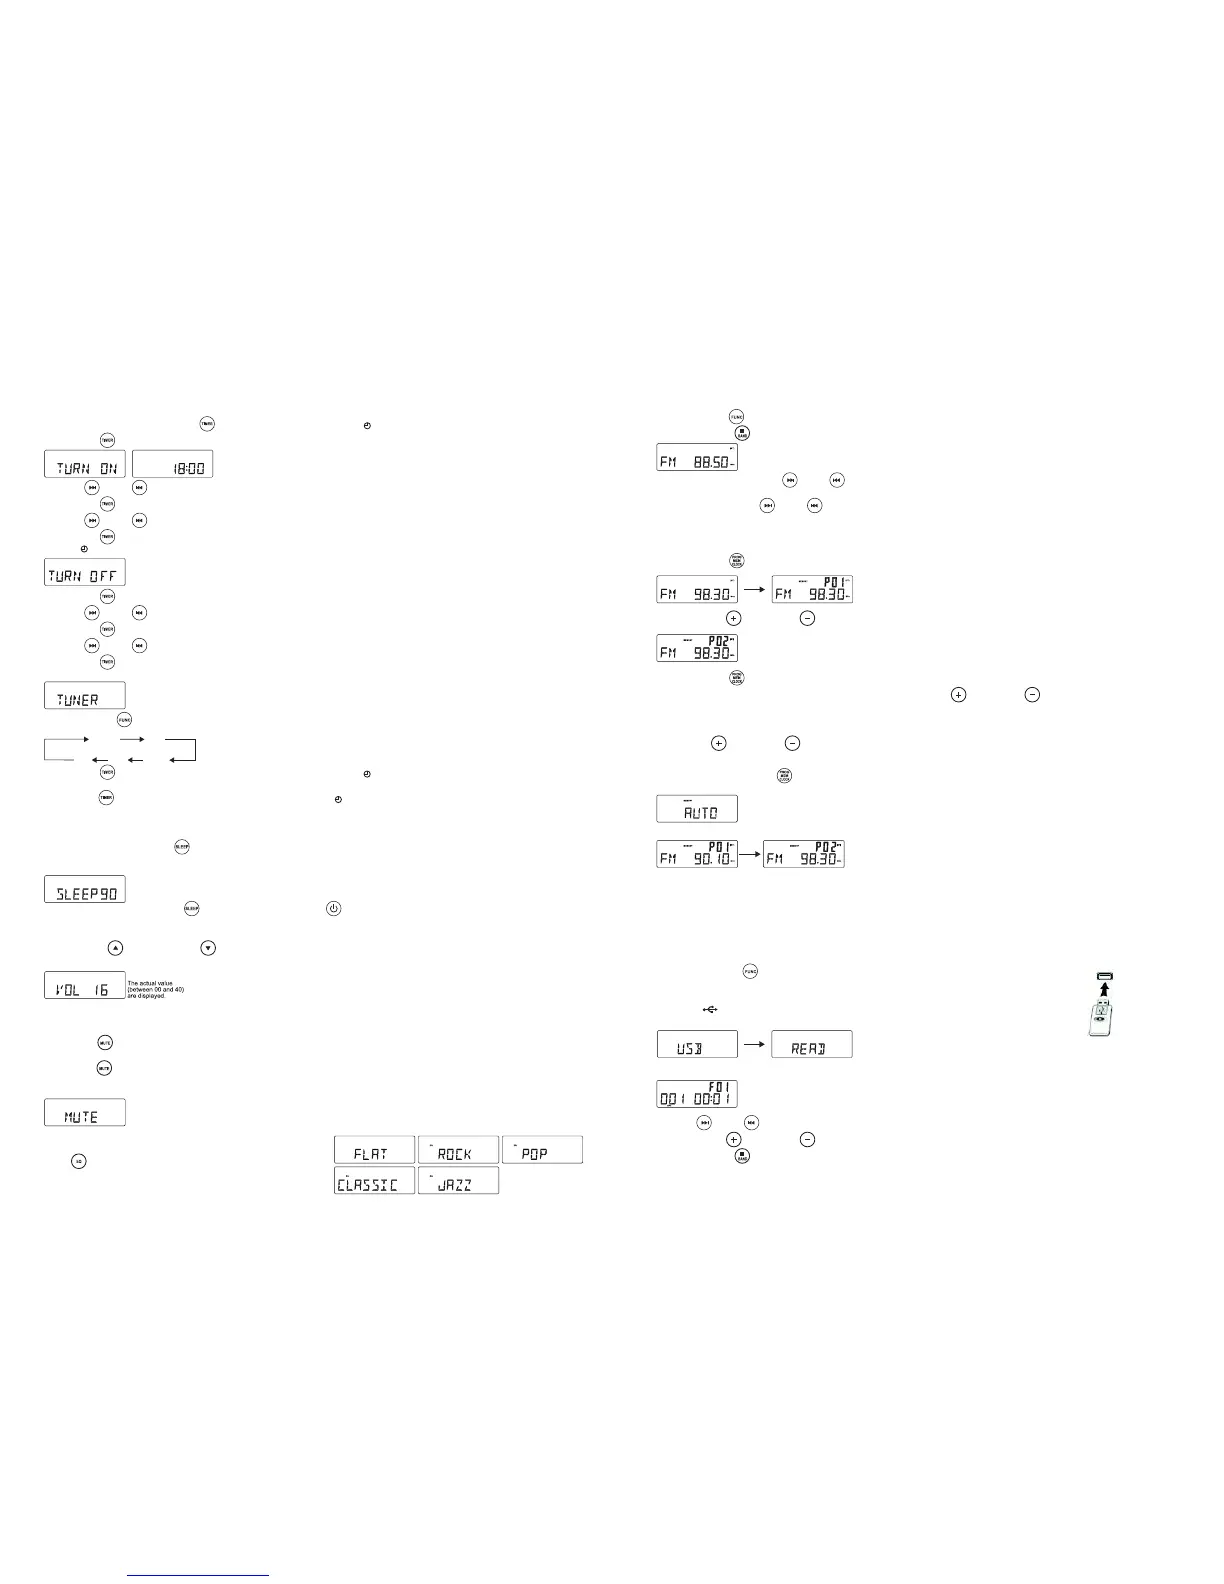
1. In Standby mode, press and hold TIMER / on the Remote over 1 second, the icon " " and message TURN ON start flashing on the display.
Press TIMER / again on the Remote to begin the SYSTEM POWER ON timer setting.
2. Press FF / or FB / repeatedly to set the Hours.
3. Press TIMER /
on the Remote to enter the Minutes setting mode.
4. Press FF / or FB / repeatedly to set the Minutes.
5. Press TIMER / on the Remote again to begin the SYSTEM POWER OFF timer setting.
The icon " " and message TURN OFF start flashing on the Display.
6. Press TIMER /
on the Remote again to begin timer setting.
7. Press FF / or FB / repeatedly to set the Hours.
8. Press TIMER /
on the Remote to enter the Minutes setting mode.
Press FF / or FB / repeatedly to set the Minutes.
9. Press TIMER / on the Remote again to begin setting the source to wake up by.
The default is TUNER mode. The word TUNER starts flashing.
10. Press FUNCTION /
to select the wake up source.
If TUNER mode is selected, the unit will wake you up with the last tuned in Radio Station.
11. Press TIMER / on the Remote again to complete the timer on/off setting.The icon " " will stay on the LCD Display to show the timer is set.
Note: The wake up sound level will increase gently to the preset volume level.
12. Press TIMER /
on the Remote Control to turn the timer on or off. The icon " " will be either on or off.
SLEEP
You can set a certain period of time after which the set will switch automatically to Standby Mode.
On the Remote Control, press SLEEP /
repeatedly to select the desired time period options (in Minutes):
- The Display shows in sequence: SLEEP 90, 80, 70, 60, 50, 40, 30, 20, 10.
- The Display briefly shows the selected option and returns to its previous status.
To cancel the Sleep Timer, press SLEEP / again to 00 , or press POWER / to switch the unit into Standby Mode.
VOLUME CONTROL
Press VOLUME UP / / VOLUME DOWN / on the remote control to adjust the volume. on the Remote Control or turn the Volume Control Knob
to adjust the Volume.
MUTE
You can temporarily switch the sound off without switching the unit off.
1.
Press MUTE /
on the Remote Control to switch the sound off, playback continues without sound.
2. To switch the sound on again:
- press MUTE / again.
- adjust the volume controls.
- change the source.
EQ
Press EQ /
on the Remote Control to select the desired EQ Mode.
There are 5 modes of preset EQ:
RADIO
AM-FM Tuning
1. Press FUNCTION / to set the unit to TUNER mode.
2. Press STOP/BAND / repeatedly to select your desired waveband. FM or AM(MW)
3. Auto Tuning Press and hold FF /
or FB / until the frequency begins to scroll and the radio automatically tunes into a station with sufficient
reception. If a station in received in Stereo, (ST) shows on the Display. Repeat step 3 if necessary until you find the desired station.
4. Manual Tuning Press FF / or FB / briefly and repeatedly until a station is found.
Programming Radio Stations
You can store up to a total of 40 radio stations (FM and AM) into memory, manually or automatically (Autostore):
1. Tune into your desired station.
2. Press PROGRAM / to activate programming, the icon MEMORY and P01 will start flashing.
3. Press PRESET + /
or PRESET / to allocate a number from 1 to 20 stations.
4. Press PROGRAM / to confirm the setting, the Display shows the preset number Waveband and the Frequency of the preset station.
5. Repeat steps 1-4 to store other stations you wish to listen to. Press PRESET + / or PRESET / once or repeatedly until the desired
preset station is displayed.
To Listen to a Preset Station
Press PRESET + / or PRESET / once or more until the desired preset station in displayed.
Automatic programming of Radio Stations:
Automatic programming will start with preset 1, from this preset number upwards, previously programmed tuned in Radio Station will be erased.
1. Press and hold the PROGRAM /
button until Auto appears on the Display.
- the word memory will start flashing.
- Any available radio stations are programmed.
- After all stations are stored, the last preset station will then be played.
ANTENNA
For FM Reception, the unit is provided with an FM WIRE ANTENNA - move the wire until reception is clear and without interference. For AM (MW)
Reception, the unit is provided with a directional built-in ferrite antenna - rotate the set to find the position in which the best reception is obtained.
W
ARNING: Do not connect the EXTERNAL FM WIRE ANTENNA to any outside antenna.
USB & SD-CARD OPERATION
USB Operation:
1. Press the FUNCTION / button to set the unit to USB Mode.
2. Plug-in a USB mass storage device or Flash Drive (not supplied).
Insert the plug of the MP3 device or Flash drive with MP3 songs (none supplied) direct into the USB port.
Do not use a USB extension cable. When plugging in a device with a USB plug, ensure the USB symbol
(if present) " " is facing upwards, making sure it is fully inserted.READ is displayed as the system
scans the contents of the USB device.
3. Track No. 1 of the Root folder (Folder 1) will play back automatically after the unit has finished reading the contents of the USB device.
4. Press FF /
or FB / once or repeatedly until the desired track number appears on the Display.
5. Press PRESET + /
or PRESET / to select the desired Album.
6. Press STOP/BAND /
to stop playback.
7. When finished playing back the songs, ensure you first switch the Power Off or you switch to another Mode before pulling the USB Plug out straight.
5 6
CARDCD
TUNER AUX
USB
 Loading...