A) Un-finalizing a CD-RW disc
1. Select the CD 2 function and place the “CD-RW” disc you would like to un-finalize in the CD 2 tray.
2. With the CD 2 player stopped (18), press the “ERASE“ button (27) (or ERASE on the remote) – the display will
show “UNFin-d”.
3. Then press the “CD 2 Play/Pause ” button (19) to start erasing - “bUSY“ will appear on the CD Recorder
display during erasing.
4. When the unit has finished un-finalizing the recorded disc, the display will show the total number of tracks and
total playing time of the disc and the “NO TOC” indicator will appear on the display.
B) Erasing one Track
1. Select CD 2 function and place the un-finalized CD-RW you wish to delete one track from in the CD 2 tray.
2. With CD 2 stopped (18), press the “ERASE“ button once - “ Er “ and the last track number will appear on the
CD Recorder operation display.
3. Press the “CD 2 Play/Pause ” button (19) to erase the last track – while erasing, “bUSY“ will show on the CD
Recorder display.
4. When finished erasing, the track erasing display will show the total track numbers and the total playing time of the
disc and the “NO TOC” indicator will appear on the display.
5. Repeat steps 2 to 4 to continue erasing more tracks.
C) Erasing all Tracks
1. Select CD 2 function and place the un-finalized CD-RW you wish to erase all tracks from in the CD 2 tray.
2. With CD 2 stopped (18), press the CD “ERASE“ button (27) twice - “Er ALL“ will appear on the CD Recorder
operation display.
3. Press the “CD 2 Play/Pause ” button (19) to start erasing all the tracks on the CD-RW - “bUSY” will show on
the display during erasing.
4. Once erasing has finished, the CD Recorder operation display will show “000 00:00“ to confirm the erasing
process is complete.
Notes:
- Once the tracks are erased, this cannot be undone.
- It is not possible to erase one track at a time on this unit from a copied CD-RW disc recorded on another system,
but it may be possible to erase all tracks.
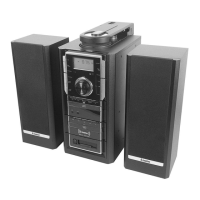
BLUETOOTH CONNECTION AND PLAYBACK
1. Select the function button (24) to select “BT” mode.
2. The Bluetooth LED indicator (2) will be flashing while your device is searching and waiting to connect to
Bluetooth.
3. Switch the Bluetooth function of your Bluetooth device on (such as a mobile phone) and select the Bluetooth
equipment code “SMC2014” to connect.
4. When the Bluetooth device has connected successfully, the Bluetooth LED will no longer be flashing but will still
be on.
5. Start playback of the music on your Bluetooth device and enjoy the music through the speakers of the main unit.
6. Adjust the volume as required.
AUX-IN CONNECTION & PLAYBACK
Connect another audio device, e.g. a (portable) CD or Cassette Player, or other tape player, MP3 player, iPod® or
Radio to this system via a cord with 3.5mm dia. plugs (not supplied). Connect one end of this cord to e.g. the
3.5mm dia. Headphone Jack (or other output socket) on the external device and the other end to the Aux-in jack (16)
on the front panel of this unit.
When connected in this way it is possible to either play back or record the music stored on the connected device.
1. Press the Function button (24) to select AUX mode.
2. Plug the external device’s connection lead into the Aux-in jack (16) of this unit.
3. Start playing back the music on your external device and adjust the volume by turning the VOLUME knob (10)
(volume level ranges from 0 – 30 on the display) or press the VOL -/+ buttons on the Remote Control (56).
Notes: If you experience any sound distortion, reduce the volume level on your auxiliary device.
Please unplug the external device when you have finished playing the music.
LINE-OUT CONNECTION
You can connect this system to another Hi-Fi system and play the music through the Amplifier and speakers of that
unit, or connect it to a PC for computer encoding.
Connect the two plugs of an RCA cable (not supplied) from the Line Out socket on the rear of the cabinet (40) to the
Auxiliary Input socket of the other unit/PC.
E-11
 Loading...