Flight Manual STEMME S 10 Date of Issue Oct. 10, 1990 page: 22
Amendment No.: -- Date: --
LBA-approved
A4010013_08a-22/13.11.2015 14:34:00/14:34
4.1 Introduction
This section provides a checklist as well as a description of the normal operating procedures. Normal
operating procedures in connection with additional equipment are described in section 9.
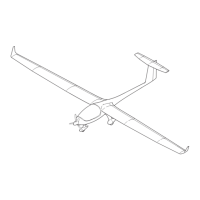
4.2 Rigging and De-rigging
• Clean and grease all bolts and bushings as well as the control connections.
• Place fuselage on lowered landing gear. Examine locking of folding struts of the landing gear legs. Put
flap lever in position "L".
• Remove side cowlings and the cover between the wings.
• Rest inner wing on the fuselage. Take care not to jam fuel lines and connecting cables.
• Insert wing pins with operating lever (on-board tools) against the stop in the bushings of the inner wing
and secure.
• Connect the operating rods for flaps, aileron and air brake on both sides and secure push-wedges of the
quick connectors with spring pin through the control pinholes.
• Connect wing tank quick connectors to the fuselage mounted fuel lines. To guarantee good sealing, the
connecting elements must be clean.
• Insert plug for the electrical connector of the fuel sender unit into the bushing in the wing root rib; lock
bayonet connector.
• Push left wing into the spar pocket of the inner wing leaving 5 cm unengaged.
• Connect aileron push rods and secure the push wedge of the quick connector with a spring pin through
the control pinhole. If position lights are fitted, plug in connectors.
• Push outer wing in further and observe the engagement of the wing pin in the bushings of the inner wing.
When bolts are snugly fitted to the bushings, insert the main bolt in direction of flight using the rigging tool
and push until the safety pin is flush with the opening in the main bolt. Extract the rigging tool. The safety
pin, which is sticking out on the upper side of the wing will then insert itself under spring load and fits flush
with the upper side of the wing to secure the main bolt of the outer wing.
• Proceed in same manner when rigging right hand outer wing