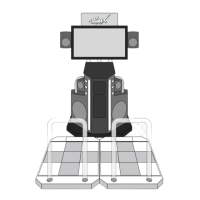
Stepmaniax Machine Setup
6. On the front of each stage, remove
the two screws securing the power
outlet. Once disconnected, remove the
remainder of the power outlet.
7. Take the stage connection assembly
and plug the two power and two USB
cables into the connections on the
lower front of the main cabinet. The
order of the plugs does not matter.
Attach the tube to the main cabinet
using 4 screws.
8. Take the stage connection assembly’s
two separate ends and on each stage
connect the new DC Power Plug and
the Micro USB cable into the power plug
and Master Control Unit.
9. Reattach the top plates removed in step
3, but do not install the top center screw
10. Place the metal end of the stage
connection assembly against the stage,
and using the remaining center screw
attach the assembly directly to the
stage. Install the additional 2 screws on
the front of the stage, further securing
the connection assembly.
11. Place the marquee onto the top of the
monitor assembly and secure with 4
screws.
Plug the marquee’s power plug in after
securing.