Thanks for choosing the SteriPEN Classic 3
and congratulations on your purchase!
Classic 3 is built to be safe, simple and
straightforward. If after reading this guide, you have
any questions or your SteriPEN doesn’t operate as
described in this manual, please contact us. We love
hearing from you! We are here to troubleshoot and
make sure you have a working device. Call
888-826-6234 (204-374-4506) or email
support@steripen.com.
Also, be sure to visit us online and register your
Classic 3 for all the latest news and special deals:
www.steripen.com/register.
Thanks again and happy travels!
P.S. Don’t forget to recycle the packaging!
While Classic 3’s battery compartment is designed
to be highly water-resistant, it is not waterproof.
Avoid submerging Classic 3’s battery end in water.
Classic 3’s battery performance may be adversely
affected by cold weather. In temperatures below
32ºF/0ºC carry the unit close to your body or warm up
batteries before use. If batteries are too cold, Classic 3’s
LED indicator may give low battery signal. Warm up
batteries and treat again.
Make sure to wipe dry after each use.
When not in use, Classic 3 should be kept in a safe
place that is clean and dry. It should not be exposed
to temperatures above 120°F/49°C or below -4°F/-20°C.
Also, when storing for long periods of time, remove
batteries to keep them from inadvertantly draining.
To clean Classic 3, wash with a soft cloth and a mild
soap solution. Rinse soap from device and dry with
a clean, soft cloth.
If Classic 3’s bulb is cracked, chipped or damaged,
don’t use it. Return it to the store or contact SteriPEN
for repair. Email us at support@steripen.com or call
888-826-6234 (207-374-4506). Do not try to fix it
yourself.
Classic 3 runs on disposable
alkaline batteries, lithium
batteries, or rechargeable nickel metal hydride
(NiMH) AA batteries with a 2300mAh capacity.
For best results, always use quality, name brand
batteries, like Energizer® or Sanyo Eneloop®.
A flashing or steady red indicator means treatment was
unsuccessful. See “Classic 3 LED Indicator Guide.”
Be sure to wipe bottle threads dry before drinking.
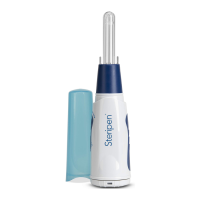
1 Battery cap
2 Indicator LEDs
3 Activation button
4 Water sensor pins (2)
5 UV lamp
6 Lamp cover
Specifications
Treatment size: ½ or 1 liter
Treatment time: 48 or 90 seconds
Lamp life: 8,000 activations
Number of liter treatments per set of
batteries: (numbers are approximate)
lithium - 150
alkaline - 50
rechargeable - 100
Minimum bottle opening: 22mm
Weight: 83g
Weight with batteries: Lithium: 141g;
Alkaline: 178g; Rechargeable: 191g
Length with lamp cover: 186mm
Maximum diameter: 43mm
THANK YOU
FOR PURCHASING
THE BEST-SELLING
PORTABLE UV PURIFIER
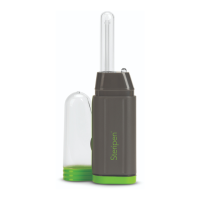
CLASSIC 3’s ANATOMY
1 Remove lamp cover.
Twist cover gently and pull away
from lamp. Take care to keep the
water sensor pins dry prior to
activating.
EASY TO USE BATTERY GUIDE
2 Press activation button.
Once for half-liter treatment, twice
for liter treatment. LED(s) will flash
green to indicate unit is ready.
3 Submerge in clear water and stir.
When water sensor pins detect water,
lamp will illuminate. When treatment
is complete and successful, lamp will
turn off and green indicator(s) will flash.
Remove battery cap by rotating
counterclockwise so that cap
arrow points to open lock icon ( ).
Install AA batteries with polarities
as shown in battery compartment.
For best performance, replace all
batteries at the same time.
Replace battery cap by aligning
cap with open lock icon. Then,
rotate cap clockwise until arrow
points to closed lock icon ( ).
CARE & CLEANING
CLASSIC 3 LED INDICATOR GUIDE
The Classic 3’s three LED indicator lights let you
know the status of your SteriPEN and the water
purification process. Green blinking LED(s)
indicates succesfull water treatment. The red
LED indicates unsuccessful water treatement,
low battery level, battery replacement needed,
or UV lamp replacement needed.
LED PATTERNS
Successful water
treatment
SUCCESSFUL UNSUCCESSFUL
Successful water
treatment,
batteries low
Successful water
treatment, UV lamp good
for less than 100 uses
Not submerged
in water in time
Replace or
recharge batteries
Water not
detected
Replace UV lamp,
UV lamp damaged
(One liter = two green LEDs, half liter = one green LED.)
If LED indicators show normal signals, but the lamp does not illuminate,
do not consume. Contact SteriPEN support.
www.steripen.com
facebook.com/steripen
@steripen
SPPF.UG.140909
Hydro-Photon, Inc.
PO Box 675
262 Ellsworth Road
Blue Hill, Maine 04614 USA
Toll Free USA: 1-888-SteriPEN
(+1) 207-374-5800
info@steripen.com
www.steripen.com
© 2014 Hydro-Photon, Inc.
Classic 3
L'aventure vous attend
Classic 3
User Guide