98
MODEL: SFLW75 | PRODUCT CODE: 701331 | 07/2020MODEL: SFLW75 | PRODUCT CODE: 701331 | 07/2020
Safety Instructions (Cont.) Safety Instructions (Cont.)
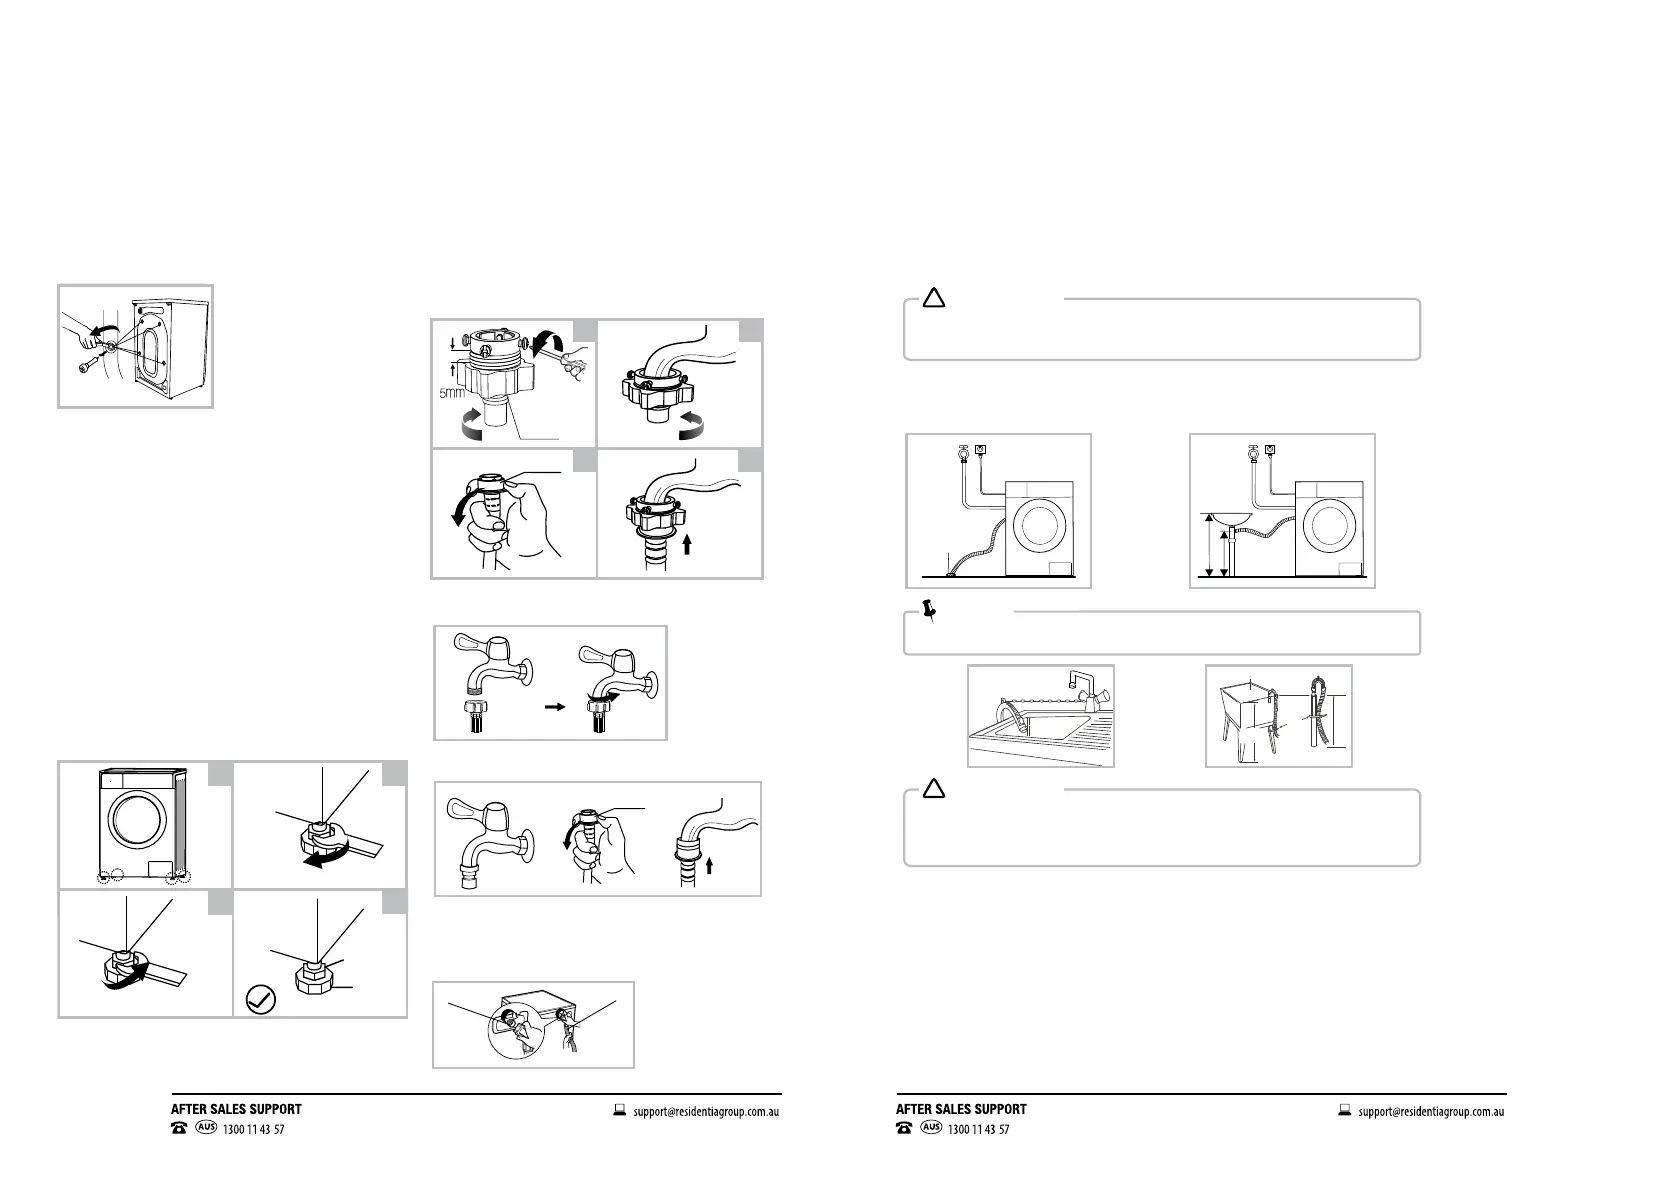
REMOVING THE TRANSPORTATION BOLTS
Before using this washing machine, transport bolts
must be removed from the backside of this machine.
Please take the following steps to remove the bolts:
• Loosen all bolts with a spanner and then
remove them.
• Use the plugs (supplied) to plug the holes.
• Keep the transport bolts for future use.
LEVEL ADJUSTING
• If the oor is obviously uneven, your appliance feet
need to be adjusted. If your appliance isn’t level, it
will cause your appliance to vibrate, and potentially
move from its position.
• Once you’ve positioned your washing machine,
press down from the top in all four corners to
ensure that it’s completely stable (i.e. not rocking in
any direction). Also use a spirit level to ensure that it
is completely level in all directions.
• Should you need to make adjustments, use a
spanner to turn the appliance legs until it makes
contact with the oor. Turn the leg using one hand
and then fasten the nut up against the appliance
cabinet, to lock the leg in place.
• After making any adjustments to the appliance legs,
re-check to ensure it is level and no rocking
occurring.
CONNECTING WATER SUPPLY HOSE
• Do not kink, crush, modify or sever the water inlet
hose
• For the model with hot valve, connect it to hot
water tap with hot water supply hose. Energy
consumption will decrease automatically for some
programs.
Connect the inlet pipe as indicated, There are two ways
to connect the inlet pipe.
1. Connection between ordinary tap and inlet hose.
2. Connection
between
screw tap
and inlet
hose.
Connect the inlet pipe to the inlet valve at the backside
of the product and fasten the pipe tightly clockwise.
THE DRAIN HOSE
Before using this washing machine, transport bolts must be removed from the backside of this machine.
Please take the following steps to remove the bolts:
• Loosen all bolts with a spanner and then
remove them.
• Use the plugs (supplied) to plug the holes.
• Keep the transport bolts for future use.
OPERATION IN CASE OF EMERGENCY
In the event of an emergency you should:
• Switch o washing machine power
• Switch the machine o at the isolation switch or at the fuse box.
• Call the After Sales Support Team on: 1300 11 HELP (4357)
Some minor faults can be xed by referring to the instructions given in the Troubleshooting section
of this manual.
1.Check if the legs are closely attached to the cabinet. If not, please turn them to
their original positions tighten the nuts.
2.Loosen the lock nut turn the feet until it closely contacts with the floor.
3.Adjust the legs and lock them with a spanner, make sure the machine is steady.
Levelling the washing machine
• The lock nuts on all four feet must be screwed tightly against the housing.
Connect Water Supply Hose
Connect the inlet pipe as indicated, There are two ways to connect the inlet pipe.
1.Connection between ordinary tap and inlet hose.
• To prevent leaka
ge or water damage, follow the instructions in this chapter
Do not kink, crush, modify or sever .
!
• water inlet hose
• For the model equips hot valve,connect it to hot water tap with hot water supply
hose. Energy consumption will decrease automatically for some program.
2
3
4
1
Raise
Lower
Lock nut
foot
Warning!
!!
Warning!
!!
9
9
INSTALLATION
Loosen clamp nut and
four bolts
Tighten clamp nut Press slide bushing,
insert inlet hose into
connecting base
slide bushing
2
3
41
Connection finished
clamp nut
Tap with threads and inlet hose
Special tap for washing machine
2.Connection between screw tap and inlet hose.
slide bushing
Installation
Before installing the machine, the location characterized
follows shall be selected:
1.Rigid, dry, and level surface
2.Avoid direct sunlight
3.Sufficient ventilation
4.Room temperature is above 0℃
5.Keep far away from the heat resources such as coal or gas.
as
Unpacking the washing machine
1. Remove the cardboard box and styrofoam packing.
2. Lift the washing machine and remove the base packing.
3. Remove the tape securing the power supply cord and drain hose.
4. Remove the inlet hose from the drum.
Make sure the small triangle
foam is removed with the bottom one together. If not, lay the unit down with side
surface, then remove the small foam from the unit bottom manually.
Please take the following steps to remove the bolts:
1.Loosen 4 bolts with spanner and then remove them.
2.Stop the holes with transport hole plugs.
3.Keep the transport bolts properly for future use.
Remove transport bolts
•
•
Stability is important to prevent the product from
wandering!
Make sure that the product should not stand on
the power cord.
Warning!
!!
•
•
Packaging material (e.g. Films, Styrofoam) can be
dangerous for children.
There is a risk of suffocation ! Keep all packaging
well away from children.
Warning!
!!
•
• product
you
You must remove the transport bolts from the backside before using the product.
You’ll need the transport bolts again if you move the , so make sure
keep them in a safe place.
Warning!
!!
8
INSTALLATION
w
w
W> 20mm
Installation area
Warning!
!!
10
Drain Hose
There are two ways to place the end of drain hose:
1.Put it into the water trough. 2.Connect it to the branch drain pipe of
the trough.
•
• If drain hose is too long, do not force it into washing machine as it will cause
abnormal noises.
When installing drain hose, fix it properly with a rope.
•
• Position drain hose properly ,otherwise damage might result of water leakage.
Do not kink or protract the drain hose.
Water
trough
Min.60cm
100cm
Max.
Trough
Hos e Retai ner
Bind
Max .100c m
Min .60cm
Min .60cm
Max .100c m
If the machine has • drain hose support, please install it like the following .
Warning!
!!
Warning!
!!
Note!
10
INSTALLATION
water supply hose
water Inlet valve
Connect the other end of inlet pipe to the inlet valve at the backside of product
and fasten the pipe tightly clockwise.
Warning!
!
There are two ways to place the end of drain hose:
1.Put it into the water trough. 2.Connect it to the branch drain pipe of
the trough.
•
• If drain hose is too long, do not force it into washing machine as it will cause
abnormal noises.
When installing drain hose, fix it properly with a rope.
•
• Position drain hose properly ,otherwise damage might result of water leakage.
Do not kink or protract the drain hose.
Water
trough
Trough
Hose Retainer
Bind
Max.1 00cm
Min.6 0cm
Min.6 0cm
Max.1 00cm
If the machine has • drain hose support, please install it like the following .
Warning!
!
Warning!
!
Note!
10
INSTALLATION
water supply hose
water Inlet valve
Connect the other end of inlet pipe to the inlet valve at the backside of product
and fasten the pipe tightly clockwise.
 Loading...