EasyManua.ls Logo

STRIKEMASTER LITHIUM LAZER - User Manual

STRIKEMASTER LITHIUM LAZER
6 pages
Print Icon
To Next Page IconTo Next Page
Loading...
LITHIUM LAZER
TM
Owners Manual
Battery must be fully charged
prior to fi rst use. Ice depth, blade
condition, loose blade bolts, and
battery maintenance can all a ect
the total number of holes you will get
on a full charge.
It is recommended that everyone
who uses this product read
the StrikeMaster Lithium Lazer
owner’s manual.
ATTENTION: PRIOR TO FIRST USE
When charging the internal 50 volt
battery using the StrikeMaster
2 amp battery charger, ALWAYS
connect the charger to a standard
110 volt wall outlet before
connecting to the battery.
SM14
!!
y charged
A
T
T
ENTION: PRIOR TO FIRST US
E
When charging the internal 50 v
us
in
g
th
e
St
Y
S
!
!
Question and Answer IconNeed help?

Do you have a question about the STRIKEMASTER LITHIUM LAZER and is the answer not in the manual?

Summary

Attention: Prior to First Use

Read Owners Manual

Recommendation for all users to read the StrikeMaster Lithium Lazer owner's manual before operation.

Initial Battery Charge

Battery must be fully charged prior to its first use for optimal performance.

Charger Connection Procedure

Always connect the charger to a wall outlet before connecting it to the battery.

General Safety Attention

Safety Instruction Symbol

This symbol points out important safety instructions that could endanger personal safety or property.

Important Safeguards

Assembly Instructions

Blade Guard and Bolts

Carefully remove blade guard and ensure blade bolts are tight using an 8mm wrench.

Collar Bolt Removal

Remove the metric allen wrench taped to the auger neck and unscrew the collar bolt.

Line Up Holes

Ensure large and small holes from each component line up before installing the collar bolt.

Install Collar Bolt

Insert collar bolt into the large hole and through the drive shaft threads into the small hole.

Operation

Starting the Auger

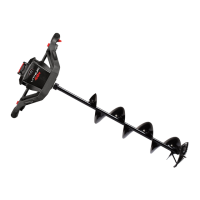
Press the main power switch until the LED is on, then press the black starter button to begin rotation.

Proper Storage

Do not lay down or store the auger where electrical components contact snow, water, or moisture.

Battery Removal

Remove the battery when the auger is not in use. Store battery in a warm location for optimal performance.

Battery Charging & Monitoring

Charger Connection

Always connect the charger to a 110 volt wall outlet before connecting to the battery.

Charging Environment

Always charge the battery at room temperature; allow cold batteries to warm up before charging.

Charging Phase Indicator

During charging, the light will be red. Charge until the light on the charger turns green.

Disconnecting Charger

Remove the charger plug from the wall outlet first, then disconnect the charger from the battery.

Battery Status Indicator

Push the battery indicator button to check the level of battery power while in use.

Replacement Battery Installation

Installing the Battery

Slide the battery into guides on the powerhead until it stops, then press both battery release buttons.

Removing the Battery

Press both battery release buttons while pulling the battery straight up to remove it.

Battery Storage

Off-Season Storage

Fully charge the battery and store it in a dry location at 60-75 degrees F.

Battery Maintenance

To maintain battery life, put it on the charger for 10-15 minutes every two months.

Battery Disposal

Recycle lithium-ion batteries at a recycling center or call 1-877-2-RECYCLE for information.

Limited Warranty

Warranty Obligation

Obligation limited to repairing or replacing defective parts within the warranty period, evidenced by receipt.

Warranty Exclusions

Does not apply to negligent use, misuse, alteration, accidents, or lack of periodic maintenance.

Wear and Tear Parts

Parts subject to normal wear and tear, like blades and batteries, are not covered by warranty.

Liability Limitation

Company is not liable for damages arising from use or inability to use the product.

Warranty Service

Service Center Information

Visit the website for up-to-date warranty service centers.

Overview

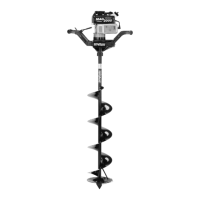
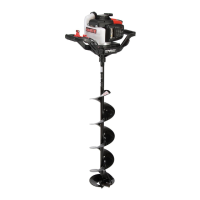
The StrikeMaster Lithium Lazer is a power ice auger designed for ice fishing, offering a blend of performance, durability, and user-friendly features. This device is specifically engineered to drill holes in ice efficiently, making it a valuable tool for ardent anglers.

Function Description:

The primary function of the StrikeMaster Lithium Lazer is to provide a powerful and reliable means of drilling holes through ice for fishing. It utilizes a 50-volt lithium battery to power its motor, which in turn drives the auger (drill) unit to cut through ice. The device is designed for ease of use, with a simple starting mechanism and features that enhance safety and operational efficiency. It aims to offer a superior ice fishing experience by reducing the physical effort typically associated with manual augers and providing consistent performance.

Important Technical Specifications:

  • Power Source: 50-volt lithium battery.
  • Charger: StrikeMaster 2 amp battery charger, designed for use with a standard 110-volt wall outlet.
  • Charging Time: Approximately 2 hours for a completely discharged battery.
  • Battery Storage Temperature: Recommended 60-75 degrees F (15-24 degrees C) for off-season storage.
  • Auger Blades: Lazer Blades, designed for efficient ice cutting.
  • Motor: Lithium Lazer motor.
  • Weight: Not explicitly stated, but implied to be manageable for operation by individuals over 100 lbs.
  • Construction: Features a metal collar and plastic collar for securing the auger to the powerhead.

Usage Features:

  • Ease of Assembly: The auger unit attaches to the powerhead via a collar bolt. Users are instructed to align holes, insert the drive shaft, and secure with the collar bolt. Grease is recommended for the inside collar and transmission output shaft.
  • Simple Operation: To start, the main power switch on the front of the motor cover is pressed until an LED light indicates "Its Ready To Drill." The black starter button is then pressed to begin auger rotation. Releasing the button stops the auger.
  • Battery Indicator: A Battery Status Indicator is mounted on top of the battery, allowing users to check the charge level by pushing a button.
  • Battery Installation/Removal: The battery slides into guides on the powerhead until it stops, and is fully seated by pressing both battery release buttons. To remove, both release buttons are pressed while pulling the battery straight up.
  • Safety Guidelines: Emphasizes reading the manual before operation, not using the product for unintended purposes, avoiding unauthorized attachments or alterations, and ensuring children or individuals under 100 lbs do not operate it. It also warns against contact with moving parts, operating under the influence, and continuing use in case of mechanical/electrical failure. Users are advised to maintain a firm stance and grip due to the considerable cutting force.
  • Cold Weather Operation: Recommends allowing a cold battery to warm up for at least an hour before charging to ensure a complete charge.
  • Storage Recommendations: Advises against laying down or storing the auger in positions where electrical components are exposed to snow, water, or moisture. When not in use, the battery should be removed and stored in a warm location for optimal performance.

Maintenance Features:

  • Blade Maintenance: Users are instructed to carefully remove the blade guard and ensure blade bolts are tight using an 8mm closed-end wrench. Dull blades can affect drilling efficiency.
  • Collar Bolt Check: The collar bolt, which secures the auger to the powerhead, should be checked and tightened firmly before and after every use.
  • Battery Charging Protocol: The battery must be fully charged prior to first use. When charging, the charger should always be connected to a 110-volt wall outlet before connecting to the battery. The charger automatically stops charging when the battery is full, indicated by a green light. It's crucial not to leave the charger connected to the battery for more than 24 hours.
  • Off-Season Battery Storage: For off-season storage, the battery should be fully charged and stored in a dry location at 60-75 degrees F. To maintain battery life, it's recommended to put the battery on the charger for 10-15 minutes every two months.
  • Battery Recycling: Lithium-ion batteries that no longer hold a charge should be recycled at a local recycling center or by calling 1-877-2-RECYCLE.
  • Warranty: The product comes with a limited warranty, with specific coverage periods for different components (e.g., 30-day for wear & tear parts, 90-day for 12-volt battery, 1-year for StrikeMaster parts, 2-year for Solo engine, 3-year for Honda engine, and 1-year for Lithium Lazer motor and 50-volt Lithium Lazer battery). Warranty registration is required online or via USPS within 30 days of purchase. The warranty does not cover negligent use, misuse, alterations, accident damage, or lack of periodic maintenance. Customers are responsible for shipping to repair centers.
  • Preventive Maintenance: The manual emphasizes that continued satisfying performance is assured by applying a minimum amount of preventive maintenance.

STRIKEMASTER LITHIUM LAZER Specifications

General IconGeneral
BrandSTRIKEMASTER
ModelLITHIUM LAZER
CategoryFishing Equipment
LanguageEnglish

Related product manuals