The Para-Cushion model 303 Back is an emergency parachute system designed and manufactured by Strong Enterprises, a division of S.E. Inc. This manual provides detailed instructions for its packing, maintenance, and safe operation.
Function Description
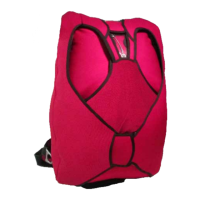
The Para-Cushion model 303 Back is a personal emergency parachute system intended for use in aircraft to provide a safe descent in the event of an in-flight emergency. It is designed to be worn on the back and is equipped with a Diaper-equipped 26ft. Mid-Lite Canopy. The system is designed for quick deployment and reliable performance in an emergency situation.
Important Technical Specifications
General:
- Model: Para-Cushion model 303 Back
- Part Number (Harness and Container Assembly): 124105
- Part Number (Mid-Lite Canopy): 420550
- FAA Approval: Originally certified in 1973 under TSO C-23b, standard category. Subsequent approvals in 1992 and 1999 under TSO C-23c, category B (in accordance with AS 8015A and FAR 21, Subpart O).
- Operational Limitations: When using the 26 ft. Mid-Lite Canopy (Strong Enterprises Part Number 420550), this Para-Cushion is limited to use by persons up to 254 lbs (115kg) fully equipped (person, clothes, and equipment including parachute) at up to 150 knots IAS.
- Repack Interval: PCB 303 is subject to a 180-day inspection and repack cycle. FAR 91.15 requires that "no pilot of a civil aircraft may allow a parachute that is available for emergency use to be carried in that aircraft unless it is an approved type and...it has been packed by a certificated and appropriately rated parachute rigger within the preceding 180 days." An FAA Senior or Master parachute rigger with a back type rating must pack the PCB 303.
- Dimensions: The PCB 303 measures 24" (60 cm) tall by 16" (40 cm) wide by 3" (7 cm) thick and weighs approximately 15 lbs. (6.5 kg).
- Canopy Types:
- 26-foot Standard Lo-Po PN. 420510
- 26-foot Military Lo-Po PN. 420520
- 26-foot Mid-Lite PN. 420550
- 26-foot Lite PN. 420601
- All four canopies are manufactured with low porosity (Lo-Po) cloth that restricts airflow, allowing a slower, more stable rate of descent than conventional parachute cloth.
Canopy Specifications (for MIL. LOPO, REG. LOPO, MID-LITE, LITE):
- Diameter: 26 ft for all canopy types.
- Canopy Weight (lbs/kg):
- MIL. LOPO: 7.75/3.50
- REG. LOPO: 7.5/3.40
- MID-LITE: 7.4/3.35
- LITE: 7.9/3.30
- Max. Total Suspended Weight (lbs/kg): 254/115 for all canopy types.
- Max. Deployment Speed (kts): 150 for all canopy types.
- No. of Gores: 24 for all canopy types.
- No. of Panels per Gores: 4 for all canopy types.
- Suspension Line Strength (lbs/kN): 650/2.9 for all canopy types.
- Radial Tape Strength (lbs/kN): 250/1.11 for all canopy types.
- Canopy Cloth: Ripstop Nylon for all canopy types.
- Canopy Cloth Porosity (CFM): 30-50 for all canopy types.
- Suspension Line Material: Braided Nylon for all canopy types.
- No. Circular Reinforcing Tapes: 3 for all canopy types.
- Turn Speed (360 degrees): 6-8 sec for all canopy types.
- Forward Speed (mph/km/h): 6-8/10-12 for all canopy types.
- Opening Time (varies w/ speed): 1.1-2.5 sec for all canopy types.
- TSO Category: C-23c Cat. B for all canopy types.
- Rate of Descent (fps/mps):
- @225 lbs/100 kg: 18.6/5.7 for MIL. LOPO, REG. LOPO, MID-LITE, LITE.
- (Lite w/175 lbs/80 kg): 19.6/6.0 for LITE.
Required Packing Tools:
- A - Shot Bags (at least 4)
- B - Line Separator (1 ea)
- C - Pilot Chute Locking Rod (1 ea)
- D - Pilot Chute Locking Strap (1 ea)
- E - T-handles (3 ea)
- F - Pull-Up Cords (3 ea)
- G - Tension Plate (1 ea)
- H - Tension Hook (1 ea)
Usage Features
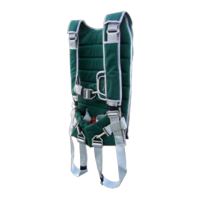
Harness and Container Assembly (P/N 124105):
- Fully Adjustable Harness: Allows wearers to adjust the harness using seven adjustment points for a perfect fit. Works well for clubs where different people will be using the system, also works well for the non-pilot seat in two seat airplanes where different passengers will be carried.
- Aerobatic Harness: This harness option moves the snaps that normally sit on top of the pilot's legs, to your chest, where there is no pressure from a seat belt. This works best where a Hooker Harness Ratchet type seat belt is used.
- Quick Ejector Snaps: This is the Military type hardware that can be used in place of the standard B-12 snaps. Works best for former military pilots who have become accustomed to this type of hardware.
- Capewell Riser Releases: For landing in high wind conditions allow the pilot to release the parachute to prevent dragging. Disadvantages - Heavy and expensive hardware.
- Oxygen Pocket: Pocket built in to the system for a bail out bottle. (Pocket only)
- ELT Pocket: Pocket built in to the system for the pilots ELT. (Pocket only)
- Sheepskin Pad: Sheepskin pads keep you cool in the summer and warm in the winter. Installed using the Velcro channels already in place on your system.
- Aero Pad: A foam pad and hold in place by the pilots weight to restrain the Para-Cushion and prevent shifting during high G maneuvers.
- G-Pad: An auxiliary pad that attaches to the back pad of any Para-Cushion. The G-pad is formed to snugly fit around the pilot's sides providing extra support during high G maneuvers.
- Lumbar Pad: Attaches to any Para-Cushion and provides support on the lower back area.
- Custom Monogram: We can monogram your name, N number, or anything that space will allow on the front of your container.
- Survival Equipment Pocket: Storage space built in to the container, to hold personal items such as a cell phone, signal mirror, energy bar and a small first aid kit.
Deployment and Operation:
- System Function: The Para-Cushion is activated by pulling the ripcord handle. This withdraws the ripcord pins and releases the locking loops allowing the pilot chute to eject, catch air and extract the parachute canopy from the container. A "diaper" is sewn to the skirt at the bottom of the canopy and is where some of the suspension lines are stowed. The balance of the lines are stowed inside the container. On deployment, the canopy and suspension lines are extracted from the container. The diaper is released as the last stows deploy, allowing the canopy to inflate.
- Typical Deployment: Takes about 2 to 3 seconds from ripcord pull to fully inflated canopy, traveling a vertical distance of 150 to 300 feet. This does NOT mean that you should plan on jumping or pulling at 300 feet. Deployment time and distance depend on, among other factors, your airspeed.
- Care of the PCB 303 Emergency Parachute System: Parachutes are simultaneously very rugged and quite delicate. They are life saving devices and should be treated with great care. Parachutes are made of nylon, a very strong and durable, but not invincible, material. Nylon is deteriorated by small amounts of acid and weakened by ultraviolet sunlight. These surface effects do not seriously influence thicker materials, such as webbing or pack material, but canopy cloth is very vulnerable. If your Para-Cushion is opened or used, it should be taken to a certified parachute rigger, or returned to the manufacturer for airing, drying, inspection and repack. FAR 65.129 requires that no parachute be packed, maintained, or altered in any manner that deviates from procedures approved by the manufacturer.
- How to get out of the aircraft: It boils down to two steps: Get clear of the aircraft, then pull your ripcord. In that order. If the parachute begins to open while you're still aboard, the wind may inflate it, dragging you out or into the tail. Also, it may entangle with the aircraft. There are no other hard and fast rules - the craft may be tumbling, spinning, or inverted. Get yourself out any way you can. Unless you're above 15,000 feet, clear the aircraft and pull your ripcord immediately. There is enough oxygen to breath and you'll be descending into denser air. It also gives observers an opportunity to get a fix on your position.
- How to open your Parachute: The ripcord handle is located near the chest strap on the wearer's left front of the harness. The key is to LOOK at the ripcord handle, rather than fumble or tug on a harness fitting. Beneath the fabric cover, the ripcord handle is held in place by a pocket. Look at it first because it may have been dislodged by your exit. REACH over and grab it with both hands (or typically with your right hand and left thumb), and PULL, YANK IT HARD. This is no time to be gentle! Actually pulling, which uses the muscles of your forearms, is not as effective as pushing, which takes advantage of your upper arm strength. If it doesn't come free on the first pull, check to make sure it is the handle in your hand, not some other piece of hardware. Back the handle up to the housing to create slack in the cable, then punch it out again. The entire cable assembly should come completely out of the housing. To reduce the pull force, push the handle in the direction that the protective ripcord housing points - rather than straight out from your chest. The ripcord housing on the Para-Cushion 303 Back comes over your shoulder, so push the handle down toward your feet. By having both hands together on the handle, you also reduce the chance of the canopy or lines entangling with an extended limb. Keep your feet together for the same reason. Body position is secondary to pulling.
- How to Steer: Having a steerable parachute reduces your rate of descent, increases your stability, and allows you to avoid obstacles (buildings, trees, water, power lines, etc.). The parachute drifts with the wind and has a forward speed of about 6 MPH, which can be directed with or against the wind using the built-in steering vents in the rear. The canopy may be turned by pulling down on the steering line rings or webbing toggles, located on the rear of the risers, just above your head. An 8-12 inch pull will produce the best rate of turn. Excessive pulling will not improve the performance.
- How to Land: Ideally, you want to reduce your landing speed by facing into the wind (or quartering slightly). Avoid all but very slight turns below 200 feet. Put your feet and knees tightly together and point your toes slightly so you don't land on your heels. The tension caused by keeping your ankles and knees pressed tightly together increases their individual support, reducing your chance of injury. Keep your elbows in and try to look at the horizon, not down at the ground. This will give you a better idea of your altitude (much like looking out the side, rather than over the nose during landing). Maneuver the canopy as necessary to avoid all obstacles. In the event of a tree or power line landing, keep your feet together so you don't straddle a limb or wire. Be prepared to slide through and hit the ground afterwards. You should be able to avoid power lines, but if not, throw away the ripcord — it is three feet of dangling electrical conductor. To prepare for a water landing, the chest strap may be unfastened (except with the Aerobatic harness) as long as you cross your arms in front of the harness to prevent falling out. Depth perception over water is difficult at best, so do not attempt to leave your harness "just above" the water.
- Recovery: If the wind keeps your canopy inflated after touchdown, you may be dragged. Pull in on the lines closest to the ground to spill some air, and then run around the canopy to collapse it. In the event of a water landing, take a deep breath just before you splash down. Once under water, unfasten your harness straps and swim as far as possible upstream, allowing the canopy to blow away from you. Entanglements with soggy nylon cloth and lines can weigh you down. If suspended from a power line, do not attempt to climb down, and do not accept assistance from anyone until the power has been shut off.
Maintenance Features
Repair Guidelines:
The following repair specification is set forth to aid riggers in the maintenance of Strong Parachutes. Repairs must be made only by appropriately rated FAA certified parachute riggers.
-
Canopy:
- Type of Repair: Patch, single side.
- Limitations: No limit as to length or number.
- Size Limit: 50% of panel area.
- Limit: 3 per panel, 15 per canopy.
- Panel Replacement: Limit 9 per canopy.
- Radial Seams: Size limit: 12", no more than 4 per canopy.
- Lateral Bands: Damage: size limit 2". Limit: 1 per canopy. Limit: 4 per canopy.
- "V" tabs: No limit.
- Suspension Lines: No limit.
- Darning and ripstop tape are not authorized for certified canopies as they may weaken the fabric. Single side patches are recommended for even small damaged areas.
-
Pilot Chute:
- Pilot Chute: Use restitching or single side patch. Anything more, replace.
- Pilot Chute Cap: Replace when spandura fabric becomes worn.
-
Closing Loop:
- Replace one time per year. See Chapter 8.
-
Bridles:
- Damaged bridles should be replaced.
-
Container:
- Standard military single side patches or replacement of the damaged area is authorized.
-
Harness:
- Any portion of the harness which is structurally damaged should be replaced in a manner to duplicate the original equipment.
-
Ripcord:
- Damaged ripcords should be replaced.
-
Data Card:
- Data cards should not be discarded or replaced. When filled, they should be attached to the new card so a complete log of packing, repairs, and alterations is recorded. This is the history of the parachute.
Packing Procedures (Chapter 7):
Changing Pilot Chute Locking Loop and Cap (Chapter 9):
- Pilot Chute Assembly (PCB 303): Has a pilot chute cap with a spandura rim. This spandura rim is hand-tacked to the top of the pilot chute at 90° angles to the loop openings. By snapping this hand tacking, you can easily remove the cap and lift it off.
- Removing and Installing Cap: Once the cap is removed, remove the loop by snapping the hand tacking. Install a new locking loop by hand tacking from the bottom side up, then back through down, up on the other side, then down again on the opposite edge, followed by a good surgeons knot.
- Note! Pilot chute locking loop must be placed as close to dead center as possible. Being off even a couple of degrees may cause the pilot chute to not sit properly on the packed container.
- Replacing Cap: If you are replacing the cap, you must make two small holes where the loops will come through the spandura. Do this near the seam in the binding tape.
- Rigger Tip: Once you have cut the first hole in the spandura for your loop to come through, fold the cap perfectly in half at that hole, making a crease. Unfold the cap, and you can see just where 180° is and where your other hole should go.
- Installing New Cap: Once the holes are cut, install the new cap over the loop by aligning the loop ends with the holes in the spandura cap and pulling the loop through the holes with your hand tack needle.
- Hand tack new cap in place at 90° angles to the loops.
- Note! Be careful not to catch the pilot chute canopy cloth below the stitch line at the top of the pilot chute. Doing so may result in stress being put on the cloth resulting in a hole in the canopy.
Installing the Toggles (Chapter 10):
- Thread the steering line through the grommet in the toggle, starting from the underside of the toggle (the side with Velcro®).
- Lay the toggle on the riser where it will be when set, and measure where the steering line should be tied. There should be one or two inches of slack in the steering line after the rest of the lines are pulled tight. Figure-8 the line through the grommet and secure with an overhand knot.
- If the steering line is thin, as in the Mid-Lite, or Lite, a second figure-8 may be necessary to fill up the grommet hole. Mate the Velcro® to secure the toggle to the riser.
- For original Para-Cushions (old style) that utilize a metal ring, route the steering lines through the guide ring on each riser, zigzag stitch a 1 1/2 inch loop (trim the excess line), then clip loop through and over a 1 inch ring or through the steering loop.
- Safety tie each steering ring to the riser immediately below the guide ring using seal thread (cotton 24/4), one turn, single ply.