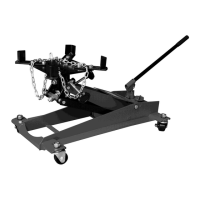
The Strongway 3-Ton Hydraulic Long Reach Professional Floor Jack (Item# 113239) is a robust lifting device designed for professional use, capable of raising vehicles or heavy loads. This owner's manual provides comprehensive instructions for assembly, operation, maintenance, and troubleshooting, emphasizing safety precautions to prevent personal injury and property damage.
Function Description:
The primary function of this device is to hydraulically lift heavy loads, particularly vehicles, to a desired height for maintenance or repair. It operates by converting manual pumping action into hydraulic pressure, which extends a ram to raise a saddle that supports the load. The "long reach" aspect suggests an extended frame design, allowing access to deeper lifting points under a vehicle. The "professional" designation implies durability, reliability, and features suitable for frequent use in demanding environments. A release valve allows for controlled lowering of the load.
Important Technical Specifications:
- Item Number: 113239
- Capacity: 3 Tons (approximately 2721.55 kg)
- Lifting Range (Min.): 3.35 inches (8.5 cm)
- Lifting Range (Max.): 24 inches (61 cm)
- Safe Operating Temperature: 40°F – 105°F (4°C - 41°C)
The jack's hydraulic system is designed to provide a smooth and controlled lift and lower. The inclusion of a foot pedal suggests an alternative or supplementary method for initial lifting or quick adjustments, enhancing operational flexibility. The rear swivel casters indicate maneuverability, allowing the jack to be easily positioned under a vehicle.
Usage Features:
The manual outlines a detailed procedure for both raising and lowering the jack, with a strong emphasis on safety.
Assembly:
- Familiarization: Users are instructed to identify components such as the lifting arm, saddle, front wheel, handle, foot pedal, rear swivel casters, pump plunger, and oil fill plug.
- Handle Assembly: The handle consists of multiple pieces connected via a quick disconnect mechanism. Users must press the quick disconnect on handle piece 2, align holes, and allow the quick disconnect to trigger.
- Handle Socket Preparation: The retaining clip attached to the handle socket must be carefully removed. Caution is advised as the socket will spring upward.
- Handle Insertion: The assembled handle is inserted into the handle socket, aligning the square hole at the bottom of the handle with the square bolt inside the socket.
- Securing Handle: A screw in the handle socket is tightened to secure the handle.
- System Air Purge (Initial Use): Before first use, the hydraulic system must be purged of air by cycling the lift up and down several times without a vehicle on the jack.
System Air Purge Procedure (Important: Before First Use):
This procedure is crucial to remove air introduced during shipment and handling, ensuring proper hydraulic function.
- Remove the cover plate.
- Turn the release valve counter-clockwise to the open position.
- Rapidly pump the handle 6-8 times.
- With the handle in the down position (exposing the oil fill plug), use a flat blade screwdriver to push the oil fill plug slightly to the side to purge trapped air.
- Replace the cover plate.
- Turn the release valve clockwise to the closed position.
- Check for proper pump action; repeat if necessary.
Raising the Jack:
- Vehicle Stabilization: Block the vehicle's wheels and set the parking brake to prevent shifting.
- Positioning: Position the jack near the desired lift point, referring to the vehicle manufacturer's owner's manual for approved lifting points. Ensure the saddle is centered and firmly contacts the lifting point.
- Handle Assembly: Assemble the handle, ensuring alignment with slots.
- Closing Release Valve: Turn the release valve clockwise until firmly closed.
- Pre-Lift Check: Double-check saddle centering and full contact with the lifting point.
- Lifting: Pump the handle to lift the vehicle to the desired height.
- Support: Immediately support the lifted load with appropriately rated vehicle support stands before working on the vehicle.
- Caution: The manual explicitly warns against disabling the lift control valve by any means other than using the operator's hand or the provided/authorized replacement handle. Extensions on the operating handle are also prohibited.
Lowering the Jack:
- Raise for Clearance: Raise the load high enough to allow clearance for the jack stands.
- Remove Supports: Carefully remove the jack stands.
- Handle Grip: Grasp the handle firmly with both hands to prevent slipping and rapid lowering.
- Opening Release Valve: Slowly turn the release valve counter-clockwise. Bystanders should be kept clear.
- Storage Position: After removing the jack, keep it in the lowered position to reduce exposure to rust and contamination.
- Warning: Extreme caution is advised when lowering, as the handle can turn rapidly, and opening the release valve too fast can cause rapid lowering, leading to serious injury or death.
Maintenance Features:
Regular maintenance is crucial for the longevity and safe operation of the jack.
Inspection:
- Before each use, inspect for damage, wear, broken or missing parts (e.g., pins), and ensure all components function correctly.
- Follow lubrication and storage instructions for optimal performance.
Binding:
- If the product binds under a load, use equipment with a larger capacity to safely lower the load.
- After unbinding, clean, lubricate, and test the equipment. Rusty components, dirt, or worn parts can cause binding.
Cleaning:
- If moving parts are obstructed, use cleaning solvent or degreaser.
- Remove existing rust with a penetrating lubricant.
Lubrication:
- Proper lubrication is essential for safe operation and preventing damage.
- Inspect before use and lubricate when necessary with light penetrating oil or lubricating spray.
- Lubricate all moving parts: monthly for light-duty use, weekly for heavy/constant use.
- Never use sandpaper or abrasive material on surfaces.
Rust Prevention:
- Daily check rams and pump plungers for rust or corrosion.
- Lift the equipment without a load to its maximum height and inspect under and behind lifting points. Clean as needed if rust is visible.
Grease Fittings:
- Some models have grease fittings that require regular greasing and lubrication.
Storing the Jack:
- Lower the lifting ram.
- Place the handle in the upright position.
- Store in a dry location, preferably indoors.
- If stored outdoors, lubricate all parts before and after use.
- Always store the jack in the fully retracted position in outdoor or caustic environments to prevent corrosion and rust.
Adding Jack Oil:
- Position the jack on level ground and lower the saddle.
- Remove the cover plate and oil plug.
- Fill the oil case until the oil level is just beneath the lower rim of the oil fill hole.
- Replace the oil plug and cover plate.
- Perform the System Air Purge Procedure.
Replacing Jack Oil:
- Position the jack on level ground and lower the saddle.
- Open the release valve (counter-clockwise).
- Remove the cover plate and oil plug.
- Turn the jack on its side to drain old oil from the oil fill hole.
- Replace the oil plug.
- Replace the cover plate.
- Perform the System Air Purge Procedure.
- Additional Warnings for Oil:
- DO NOT USE MOTOR OIL IN THE JACK.
- ONLY USE ANTI-FOAMING JACK OIL.
- ALWAYS USE A GOOD GRADE HYDRAULIC JACK OIL.
- DO NOT USE HYDRAULIC BRAKE FLUID, ALCOHOL, GLYCERINE, DETERGENT, MOTOR OIL, OR DIRTY OIL.
- Improper fluid can cause damage, premature failure, and sudden load loss.
- Dispose of hydraulic fluid according to local regulations.
Additional Lubrication:
- Periodically check the pump piston and ram for rust/corrosion. Wipe with a clean, non-scratching oil-soluble cloth.
- NEVER USE SANDPAPER OR ABRASIVE MATERIAL.
- Store the jack with the pump piston and ram fully retracted when not in use.
Troubleshooting:
The manual includes a troubleshooting guide for common issues:
- Jack will not lift load: Release valve not completely closed (turn handle clockwise), weight capacity exceeded (decrease weight or use higher capacity jack).
- Jack will not hold load: Air in hydraulics (purge air from system), low oil level (add oil).
- Jack will not lower: Oil reservoir overfilled (drain excessive oil, lubricate moving parts), jack binding or foreign obstruction (check locking pin and release handle), power unit malfunctioning (replace power unit).
Replacement Parts:
Replacement parts are available through Customer Service (1-800-222-5381). When ordering, the model number, serial number, and description are required. The distributor reserves the right to make design changes.
This comprehensive manual ensures users can safely and effectively operate and maintain the Strongway 3-Ton Hydraulic Long Reach Professional Floor Jack, maximizing its lifespan and performance.