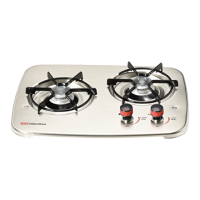
INTRODUCTION
1. Your Drop-in
Cooktop has been
certified
by Underwriters Laboratories
(UL)
for the
U.S.A. and Canada for use
with
LP/Propane
gas
only.
2. Your cooktop
is one of the
following models:
SD2 or SD3.
3. Model number
letter designation:
S
-
Suburban
D
-
Drop-in
#
-
Number of burners
4. The
complete model, serial
number
and stock
number
are located
on
the
UL
label located
under
the top. This information will be needed
when servicing
appliance or ordering
parts.
Record
the information
below and retain for future
reference. Replacement
parts
can be ordered through
your
local dealer or
Suburban Service Center. To obtain
information
on locating a local
service
agency, call
Suburban
I\,4anufacturing Company,
Customer Service Department,
(423)
775-2131.
Model No.
Serial No.
Stock No.
Date of Purchase
4.
Before
placing
drop-in cooktop into
cabinet,
determine
which
one of the three
knockout
openings in the burner
box
(left
side,
right
side or rear)
will be used
for
routing
of the
gas
supply tubing to
the
pressure
regulator.
After
making
selection,
knockoul
the 1 inch
plug.
Place
drop-in cooktop into the
prepared
opening and
secure
to cabinet
with four
(4)
wood
screws.
(Not
provided)
5. Route
gas
line
through opening in
burner box and connect the
gas
line to the
3/8" flare fitting
inside the
burner box. Place nylon brushing
ovei
gas
line
and
insert
brushing
into opening in
burner box.
CAUTION:
Gas
supply tubing within the confines
of the
appliance
connection
shall be rigid
or semi-regid metallic tubing.
6. Be sure
all openings in the
cabinetry around lhe
gas
line
are sealed
at time
of installation.
CAUTION:
lt is imperative
that the cabinet in which the
cooktop is
placed
be
separated from other
appliances so that the
combustion air
supply to
the top burners
can not be affected in
any
way
by any forced-air
heating
appliance
or its return air
system or by any other source
of
positive
or
negative
air
pressure.
A negative air
pressure
created
by another forced
air appliance
may draw the flame
down around the top burners
and into
the cooktop
resulting in
damage to the burners and cooktop,
as well as
possible
personal
injury and/or damage
to
vehicle.
A
positive
draft
could
cause
the burner flame
to lift-off the burner and
go
out
resulting
in an
uncontrolled
escape of
gas.
Whenever the
gas
fumes reach
an open
flame
or another
ignition
source, an explosion and/or fire
will occur
in
property
and/or loss
of life.
7. Be
sure burner knobs
are in
"olf' position.
Turn
on
gas
supply.
Check all
connections
for Ieaks.
WARNING:
Never
check for leaks
with an open flame.
Apply a
soap and
water
solutlon
to all
ioints
to see if bubbles are
formed.
NOTE:
The
appliance must
be disconnected from the
gas
supply
piping
system
during
any
pressure
testing
of that
system at test
pressure
in access
of
'112
PSIG.
The
appliance must
be isolated from the
gas
supply
piping
during any
pressure
testing
of the
gas
supply
piping
system at test
pressure
equal to,
or less than,
1/2
PSIG.
8.
Remove the top
and the
grate(s)
from their
packing.
a. Remove the
protective
rubber feet from the
plastic
bag and
slip over the
grate
legs.
b. lnstall
the
grate(s)
on the top.
c.
Remove the
grate
retainer
clips from the
pack-out
bag and install
the clips
over
the burner
grate
legs
from the underside of the
stove top.
Squeeze
the ends
of the clips together and
slip over the ends
of
the
burner
grate.
9. Position
the top over the
burners and secure in
place
with
two
(2)
thumb
screws
and two
(2)
nylon washers
provided.
10.
Your Suburban
Drop-in
Cooktop
is now ready
for operation.
Before
operating,
read
the safety information
and operating instructions
contained in this
manual.
..,
.,zt'
"'7'-'"
//
.-/
" .ii
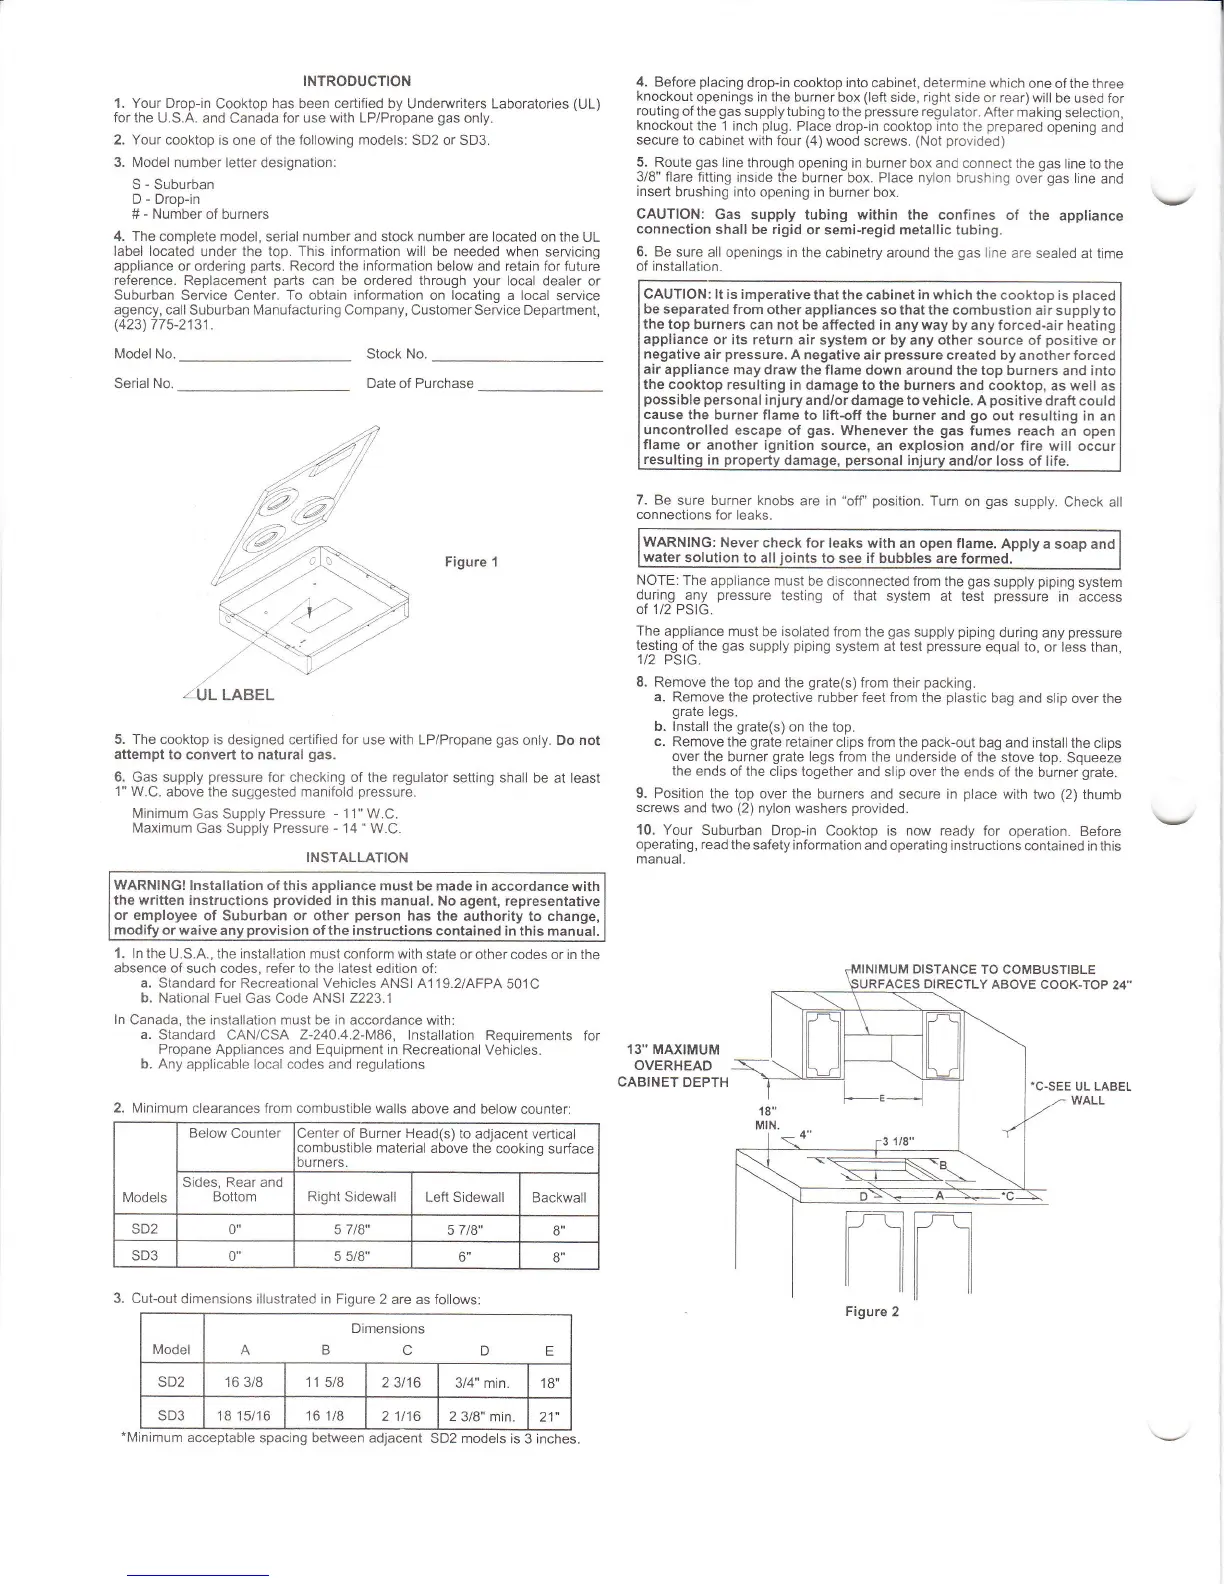
Figure 1
..:UL
LABEL
5. The cooktop is
designed certified
for
use with LP/Propane
gas
only. Do not
attempt
to convert to natural
gas.
6.
Gas supply
pressure
for checking of the regulator
setting shall be
at least
1"
W.C. above the
suggested
manifold
pressure.
Minimum
Gas Supply Pressure
- 1 1"
W.C.
Maximum
Gas
Supply
Pressure
-
14
"
W.C.
INSTALLATION
WARNING!
lnstallation
of this
appliance
must be made in
accordance with
the written instructions
provided
in
this manual. No agent,
representative
or employee
of Suburban or other
person
has
the authority to change,
or
waive anv
Drovision
of the instructions
contained in this manual.
1.
In the U.S.A., the installation must
conform with state
or other codes or in the
absence of
such codes, refer
to
the
latest
edition
of:
a. Standard
for Recreational
Vehicles
ANSI A1 1g.2/AFPA
501C
b. National
Fuel Gas Code
ANSI
2223.1
ln
Canada, the installation must be in accordance
with:
a.
Standard CAN/CSA Z-240.4.2-M86, Installation
Requirements
for
Propane Appliances and Equipment in
Recreational Vehicles.
b.
Any applicable local codes and regulations
2. Minimum
clearances from combustible walls
above and
below counter:
3. Cut-out
dimensions illustrated in Figure
2 are as follows
13'' MAXIMUM
OVERHEAD
CABINET
DEPTH
nn
DISTANCE
TO COMBUSTIBLE
S DIRECTLY ABOVE
COOK.TOP
24'
Models
Below Counter
lenter of Burner Head(s)
to adjacenl vertical
:ombustible material
above the
cooking surface
lurners.
Sides, Rear and
Bottom
Right Sidewall
Left Sidewall
Backwall
SD2
0"
5 718" ) I 16
8"
5UJ
0"
5 5/8"
o
o
Model
Dimensions
B C
D
E
SD2 16 3/8 115t8
2 3t16 3/4" min.
18"
SD3 18 15/16 16 1/8
21116 2
3/8" min
21
between adiacent
SD2 models
'Minimum
acceptable
spacing adjacenl
Figure
2
 Loading...