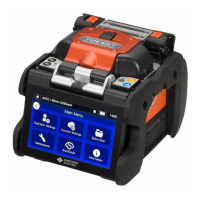
Splice program Heater program Wireless LAN SD Power Time
Heater panel
Control panel
Using Keypad
Home Screen icons
Start and cancel
heating cycle
Power ON/OFF
Reset
Set
TYPE-72C
Quick Reference Guide
Display the Settings panel
Power source type
Change image view
Display/Non-display icons
Start the splicing process
Start the arc test
Start the heating process on heater 1 and 2
View splice data after splicing
Adjust the zoom of a fiber image
Adjust display brightness
Adjust the focus of a fiber image
Capture a fiber image
Heater 1
Heater 2
Heater 1
Heater 2
To display the Settings panel, tap the
Settings panel icon ( ) on Home screen.
■Settings panel
■Home screen
Heater 1
Heater 2
Log in to Administrator
mode by entering passcode.
Adjust the volume.
Display the menu screen.
Set up Heater Program.
■New Technology
When the NanoTune™ is applied to poor fiber end face, a
NanoTune™ screen appears. Even in AUTO NanoTune program,
the NanoTune™ is not applied to good end face, and the usual
splice screen is displayed.
NanoTune™
Play Help Videos.
Settings panel icons
Set up Splice Program.
While splice program is selected to “AUTO
NanoTune”, the NanoTune
™ analyzes the
cleaved fiber surface and then sets up optimal
splice condition.
The splice error prevention system