Inspect the gas supply piping or
hose prior to
turning the gas ON. If there is evidence of cuts,
wear, or abrasion, it must be replaced prior to
use. The replacement pressure regulator and
hose assembly must be the type specified by the
manufacturer. Do not use the Side Burner if the
odor of gas is present. The pressure regulator
and hose assembly supplied with the units must
be used. If the unit is LP, screw the regulator and
hand tighten to the valve of the cylinder and leak
check the hose and regulator connections with
a soap and water solution before operating the
Side Burner. Make sure you always read about
LEAK PREVENTION. Always keep your face and
body as far away as possible when lighting.
Refer to spiders and insects warning and
procedure under the cleaning and maintenance
page of this manual.
FOR OUTDOOR USE ONLY!
ASSEMBLY & LIGHTING
Remove all packing materials.
Ensure that the burners are positioned securely
on their orifices.
Place grates in the proper location over burners.
Connect gas using proper gas regulator.
1. Open the gas supply shut-off valve.
2. Push in the knob to the left wait a few
seconds and then click the flame-thrower
ignition system to ignite. If the igniter does
not light turn to the right and OFF position,
verify that the gas is on and then try again.
3. Once you see or hear a flame you can
adjust the burner to the desired position.
CAUTION: If ignition does not take place within a
few clicks, turn knob to the OFF Position, wait for
five minutes and repeat step 2.
Match/BBQ Lighter Lighting Instructions:
The burners can be lit manually using a lighted
long match, taper or long BBQ lighter.
1. Push and turn the knob counter-clock-wise
past the “CLICK” position. Hold the knob
pushed in for 5 seconds.
2. Insert a lit match or BBQ lighter through the
grates and near the top of the burner. Once
you see or hear a flame you can release the
knob.
Important: If burner fails to light within 5 seconds,
turn off gas and wait 5 minutes before repeating
the process.
Warning: If you smell gas, shutoff the gas supplies
and immediately checks for leaks using the
soapy water technique.
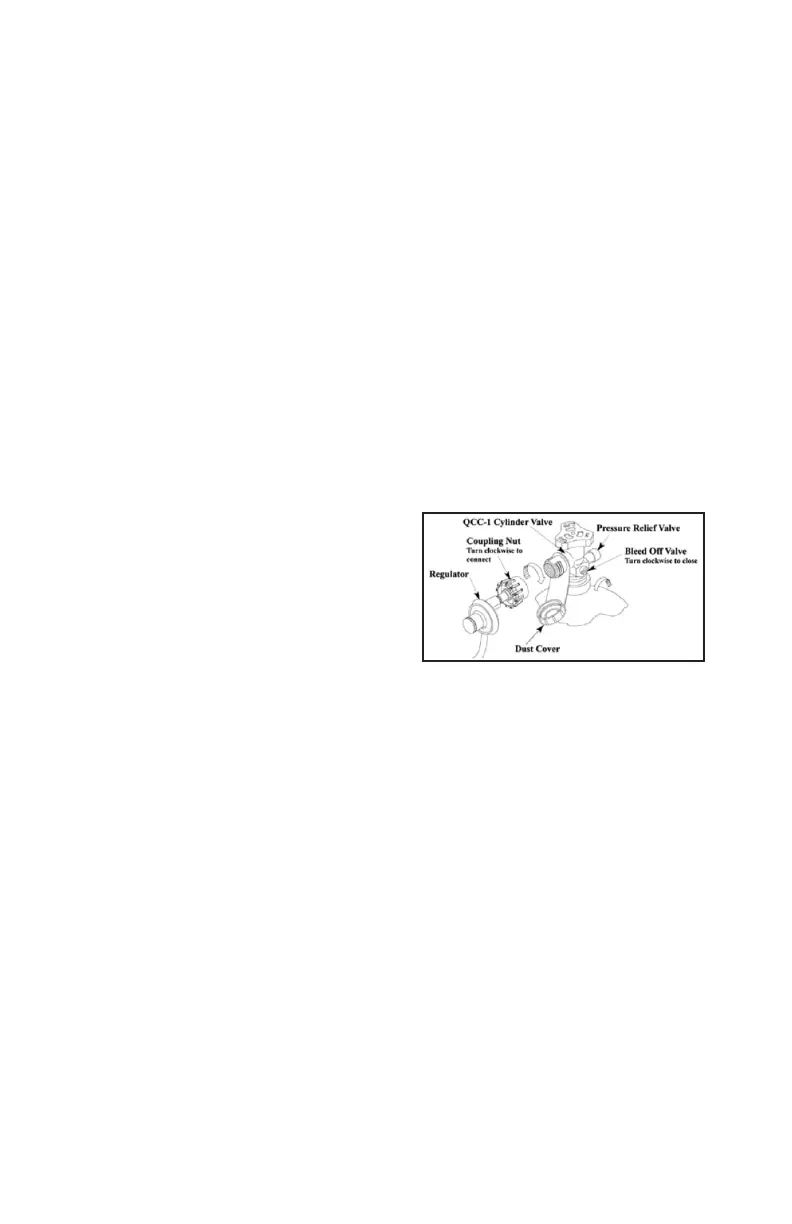
CONNECTING TO THE LP TANK
The hose and regulator are connected in the
following manner:
• Insert the regulator inlet into the cylinder
valve and turn the black coupling nut
clockwise until the coupling nut is
hand tight. DO NOT over-tighten this
connection.
• To disconnect the coupling nut, first make
sure the main cylinder valve is turned off.
Grasp the coupling nut and turn counter
clockwise. The inlet will then disengage.
FILLING AND REFILLING LP GAS CYLINDERS
All purging and refilling of LP gas cylinders
must be performed by qualified personnel in
the LP gas industry. Never store a spare LP gas
cylinder under or near this appliance.
Never fill the LP gas cylinder beyond 80 percent
full. Failure to follow these instructions may
result in explosion, personal injury or death.
ALWAYS WAIT 5 MINUTES BEFORE RE-
LIGHTING A HOT BURNER!
NOTE
Improper lighting procedures can cause the
flow control to activate, resulting in reduced
heat output. If this is suspected, shut off all
burner controls and cylinder valve. Wait 30
seconds, then very slowly re-open cylinder
valve. Wait an additional 5 seconds before
turning burner control knob and attempting
to light.
12
 Loading...